- Release:
- Update:
How to create a checkbox in Excel
When you conduct a survey by questionnaires, it forces you to lots of work especially you use checkboxes on paper and it'll be hard to summarize it.
However, if you make checkboxes on Excel and send it as data, you can summarize easily.
Here we introduce from a basic way to create checkboxes to advanced way to summarize them.
What is a checkbox?
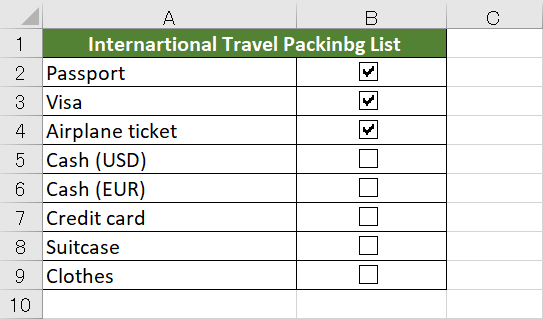
A checkbox is a square using for to-do lists and a questionnaire. You can answer simple questions by putting a ✓ in a box.
You can create this checkbox on excel, count the number of check marks automatically and link a checkbox with another.
How to create a checkbox
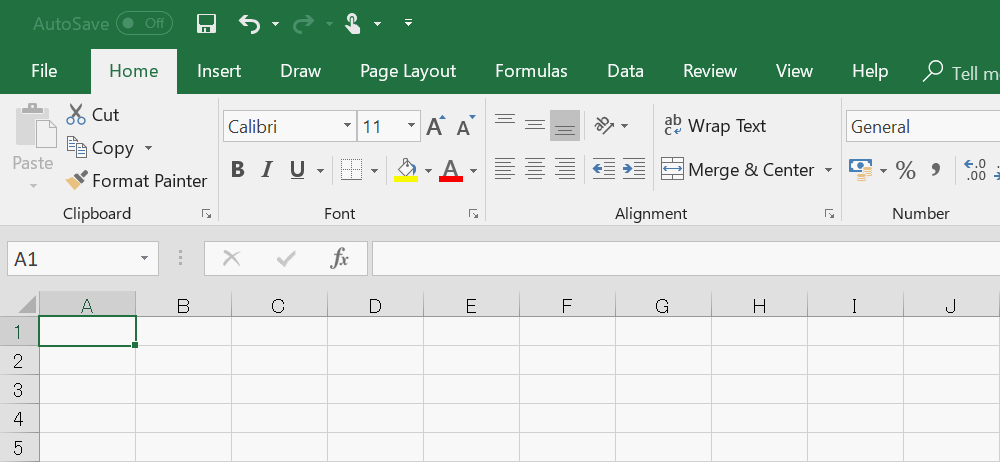
First of all, you need to display【Developer】 tab. It is hidden by default.
![Select [File]](/_wt/officehack201907/img/en/checkbox3-1.png)
Click【File】tab
![Select [Option]](/_wt/officehack201907/img/en/checkbox4-1.png)
Click【Options】
![Select [Customize Ribbon]](/_wt/officehack201907/img/en/checkbox5-1.png)
【Excel Options】dialog box will be displayed. Click 【Customize Ribbon】on the left, and check 【Developer】 checkbox then click 【OK】.
![Display [Develop] tab](/_wt/officehack201907/img/en/checkbox6-1.png)
【Developer】tab is displayed now and click it.
![Select [Insert]](/_wt/officehack201907/img/en/checkbox7-1.png)
Click【Insert】and click 【Check Box】under 【Form Control】.
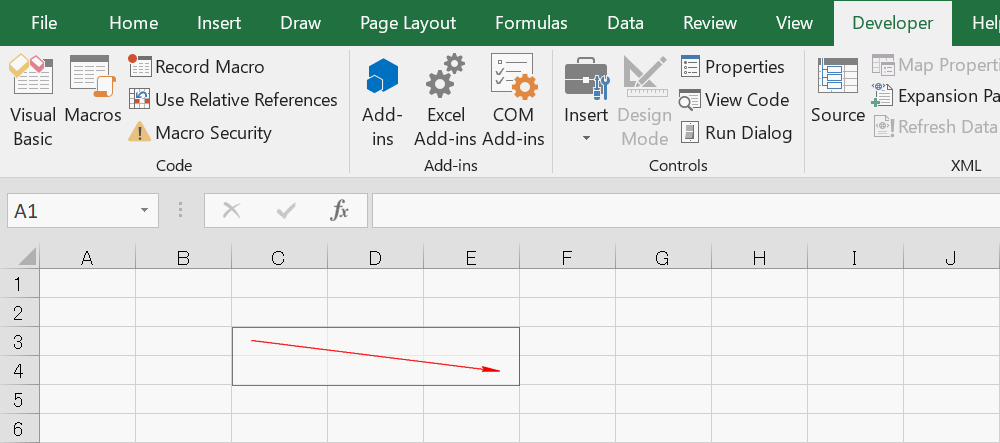
"+" cursor is appeared, and move to the place you want to put a checkbox. Click and drag then the square is shown.

Leave your finger from the button, checkbox and "Check Box 1" is appeared.
How to edit a checklist
We introduced a basic way to create a checkbox. You can learn how to copy it, change the size, summarize and delete as advanced use.
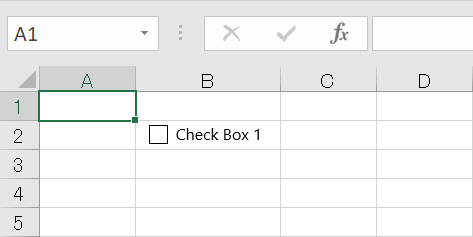
When you insert a checkbox, "Check Box 1" is entered automatically in the text area.
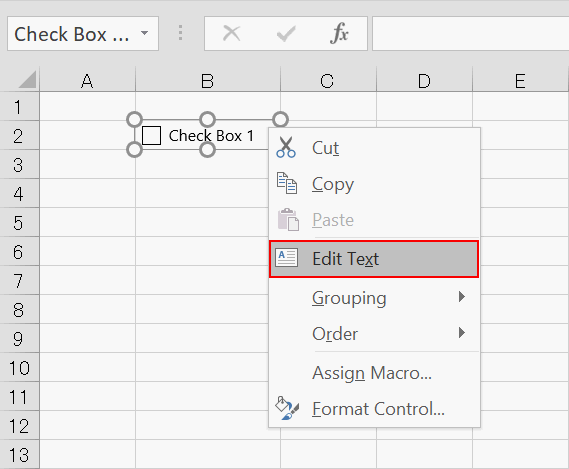
To delete this text, right-click on the checkbox, select 【Edit Text】from the right-click menu.
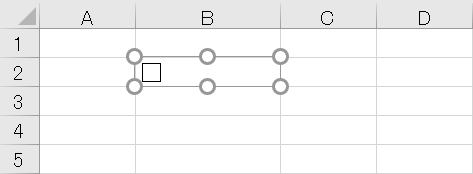
Select "Check box 1" and press Delete key to delete this "Check Box 1". Then click anywhere on the screen to complete editing.

To change the text, select "Check Box 1" and enter text you want. In this case, we entered "Paying utility bills" instead. Click anywhere on the screen to complete editing.
How to resize a checkbox to fit a cell

Right-click a checkbox to select. Then click【Format】tab and select【Snap to Grid】under【Align】.
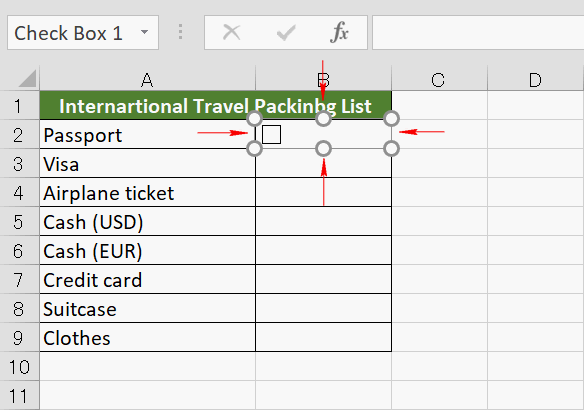
Then resize by dragging and the checkbox fits to the cell.
How to copy a checkbox
We introduce the way to copy a checkbox after creating it.
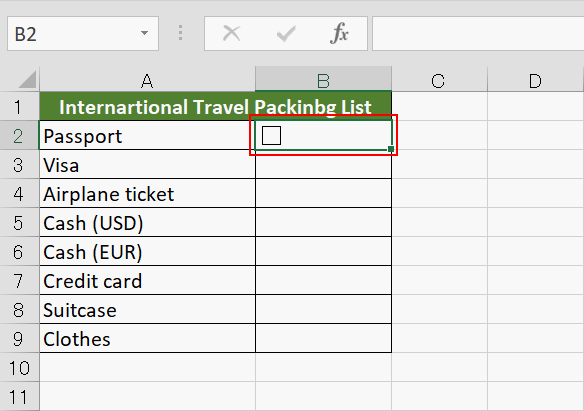
When you make a international travel packing list, create a checkbox in B2. If you want to copy it to B3-B9, select B2.
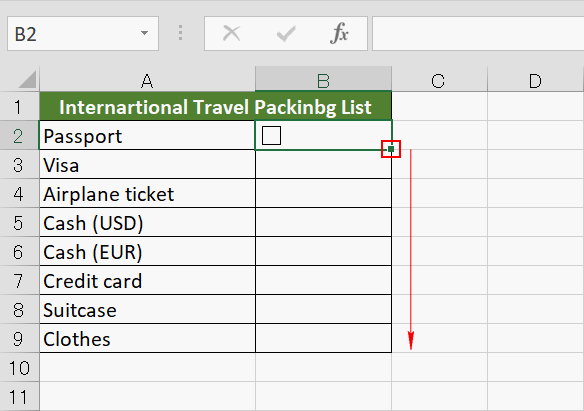
Move the cursor to the lower right corner and it change to "+". Drag it to below.
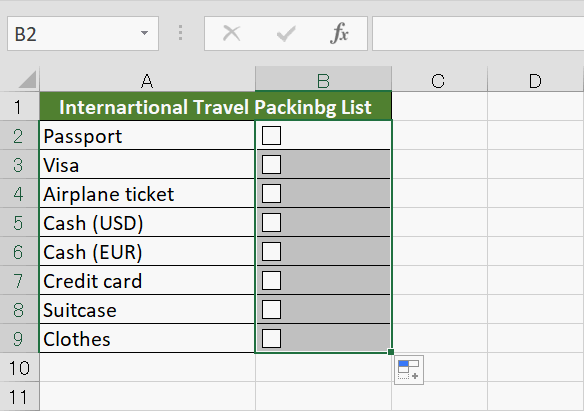
The checkbox copied to B3 - B9
How to delete a checkbox
We introduce the way to delete checkboxes.
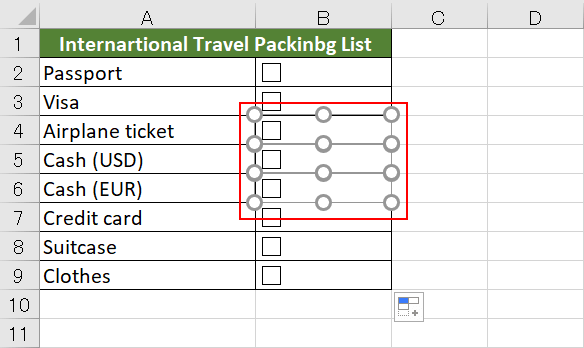
Select the checkbox which you want to delete. You can select more than one cell with pressing the Ctrl key.
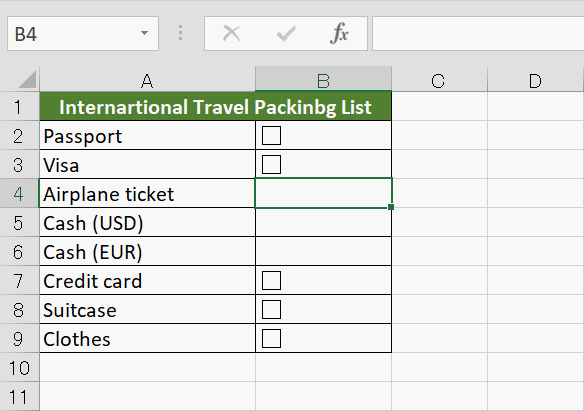
After finishing selection, press the Delete key. Selected checkboxes were deleted.
How to count checked cells
We explain the way to count checked cells.
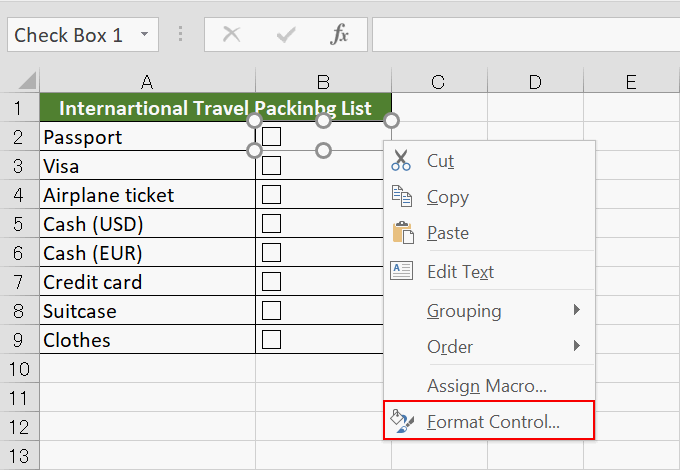
First, link the checkbox to the cell. Right-click on the checkbox and click【Format Control】.
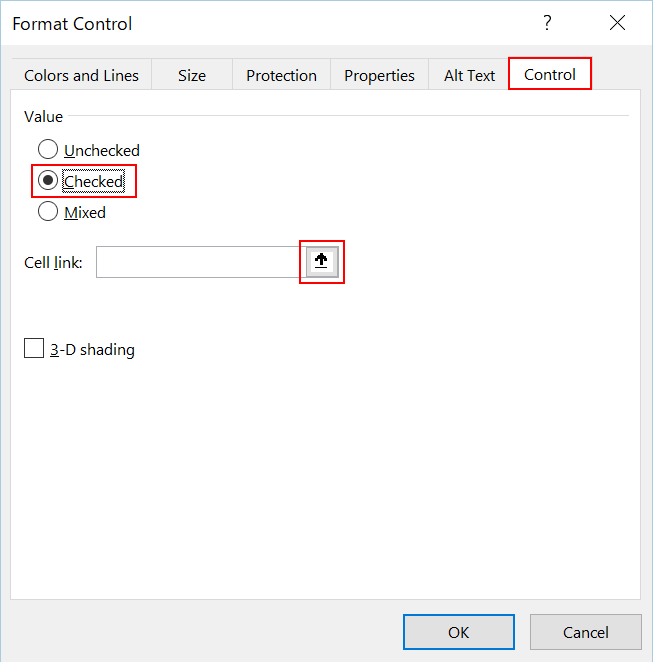
Select 【Control】tab in【Format Control】dialog box. Then click【Checked】under 【Value】and click the right icon of【Cell link】entry field.

Select C2 and it reflect to the dialog box as "$C$2".

Click icon which is red framed in the picture above in【Format Control】dialog box.
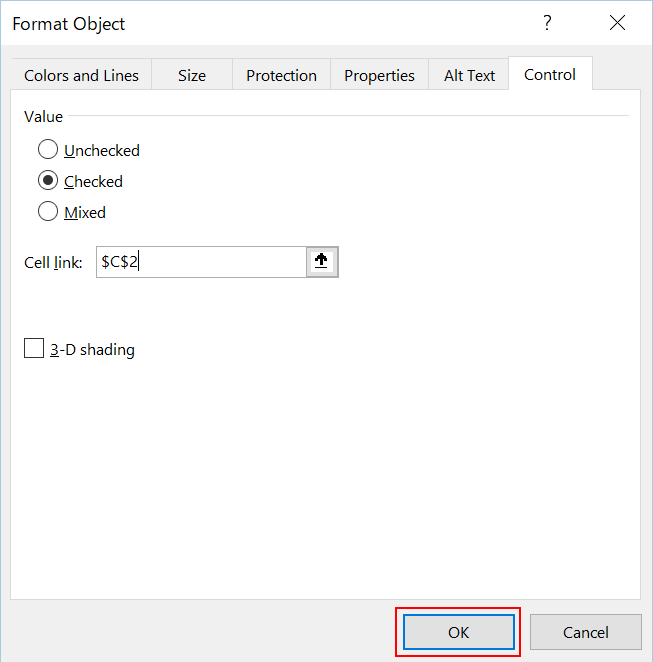
Click【OK】
![[TRUE] in C2 cell](/_wt/officehack201907/img/en/checkbox26-1.png)
"TRUE" appeared in C2. This means that B2 cell is checked.
![[False] in C2 cell](/_wt/officehack201907/img/en/checkbox27-1.png)
When you uncheck, it turns to "FALSE".
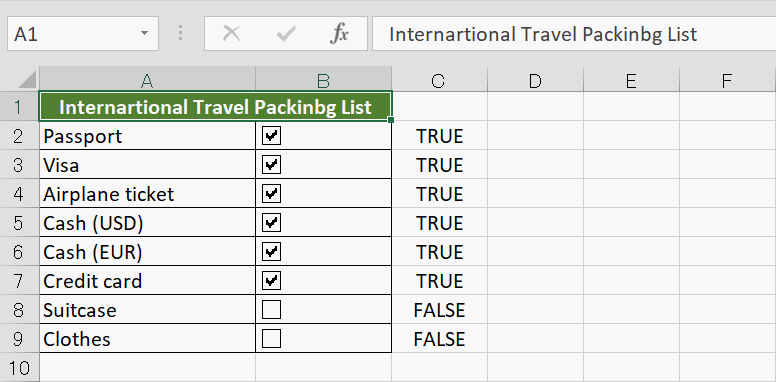
Link other cells to each cell as well. Copy the checkbox and change each cell link setting.
Now we can check if cells are checked or not. We'll explain how to count checked cells.
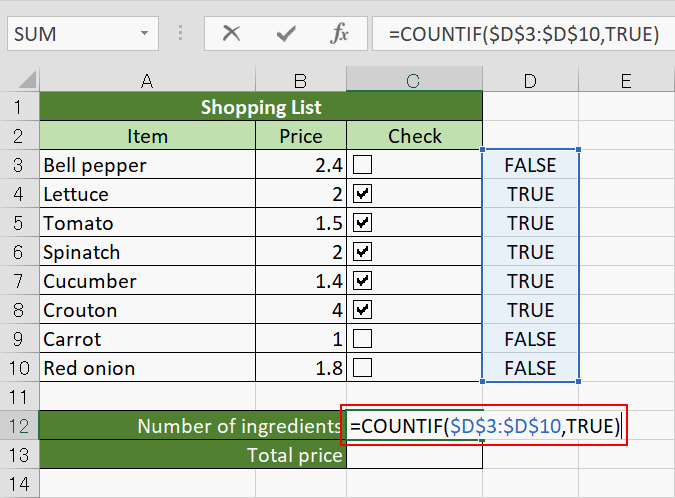
When you have a shopping list above, you can count the number of checked checkboxes and total price with using a function.
In order to count the number of ingredients, select C12 and enter "=COUNTIF($D$3:$D$10,TRUE)". The COUNTIF function is used for counting the number of the cells which meet a criteria in a selected range.
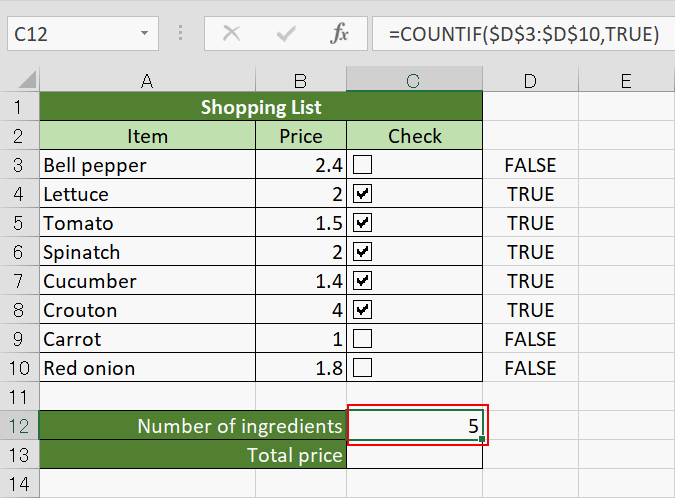
The number of the checked cells "5" is displayed.
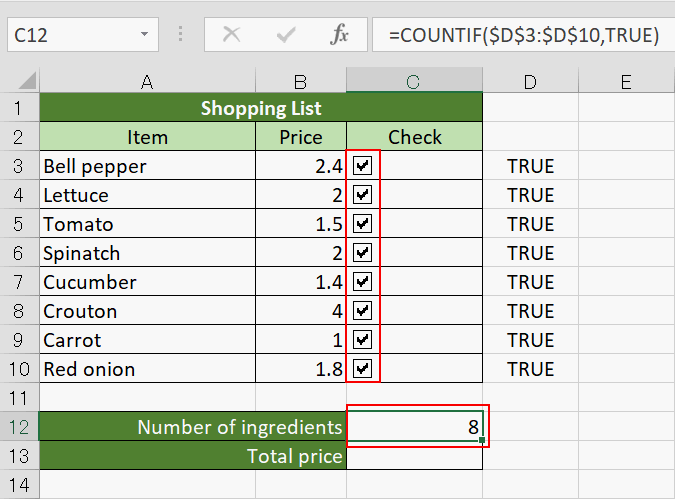
When all the cells are checked, it turns to "8". It is the same number of the checked cells.
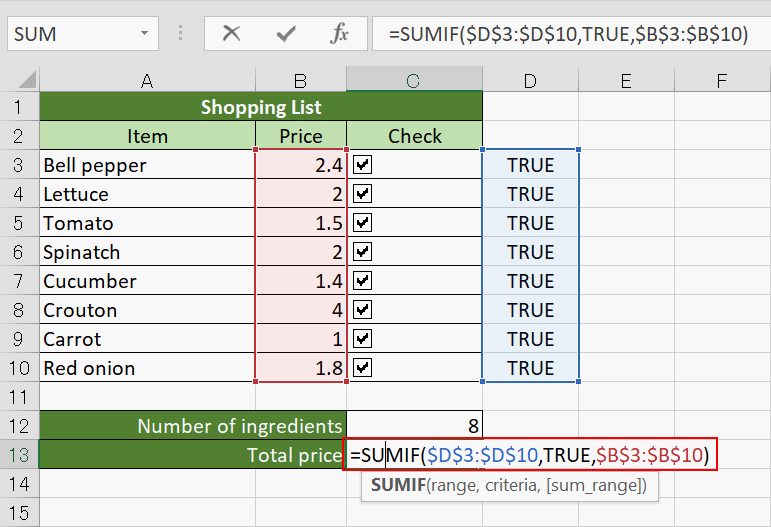
Then calculate the total price of ingredients. Select C13 and enter "=SUMIF($D$3:$D$10,TRUE,$B$3:$B$10)". SUMIF function is used to sum cells that meet criteria in a selected range.
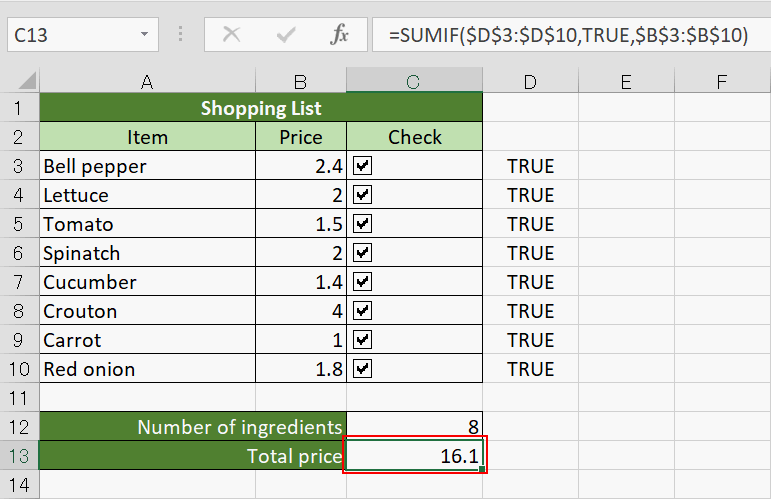
The total price of checked ingredients are displayed.
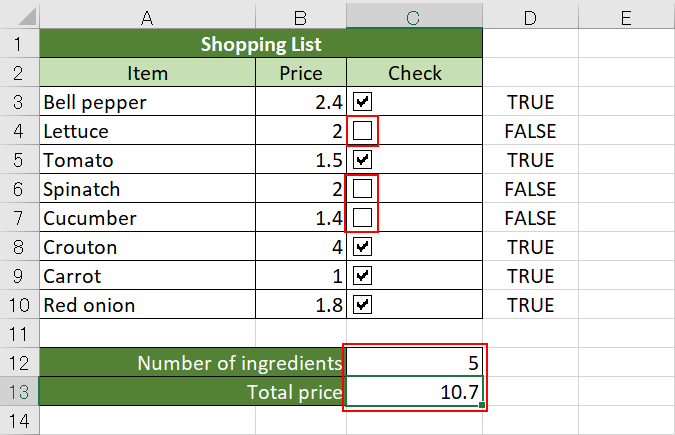
When some of them are unchecked, the number in C12, C13 will change accordingly.
How to check all checkboxes by checking one
We introduce the way to check checkboxes automatically when you check specified one. It’s useful when you want to check lots of checkboxes at a time.
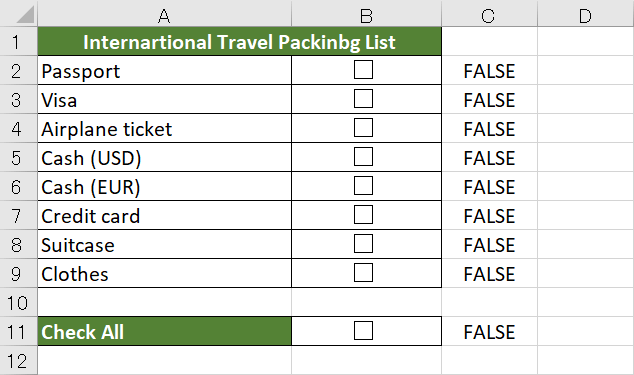
Create a checkbox that you can check all checkboxes.
Before that, you need to link each checkbox to the next one, which you learned above.
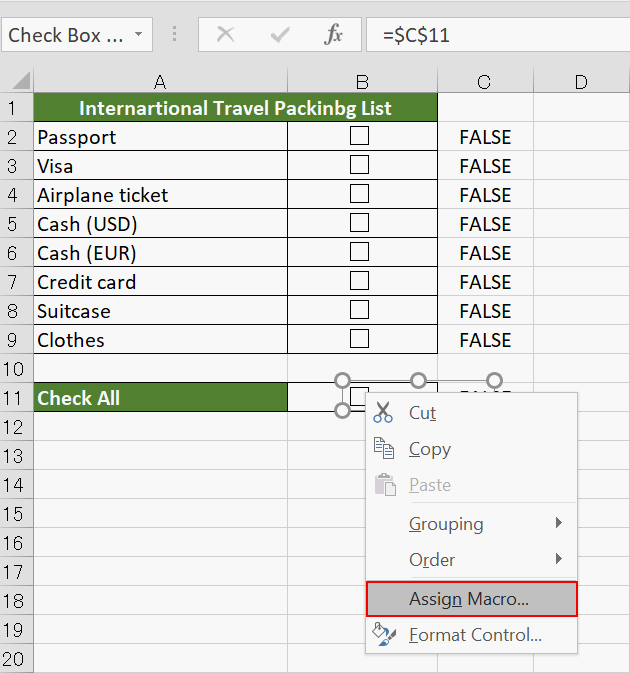
Right click the check box in B11, and select 【Assign Macro】from the context menu.
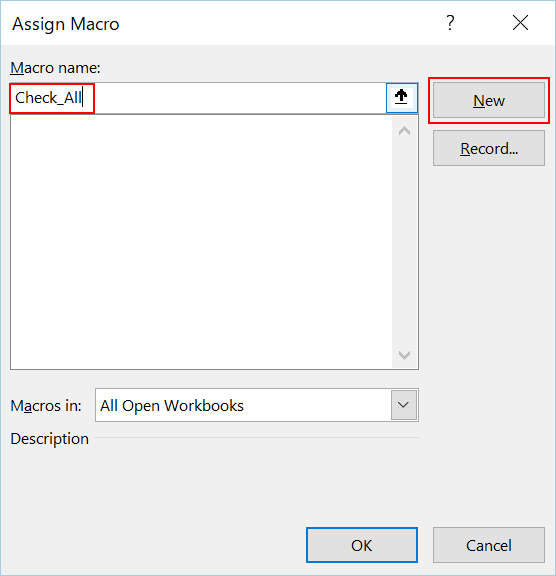
Enter the macro name in【Assign Macro】dialog box.
In this case we entered "Check_All".
Click【New】.
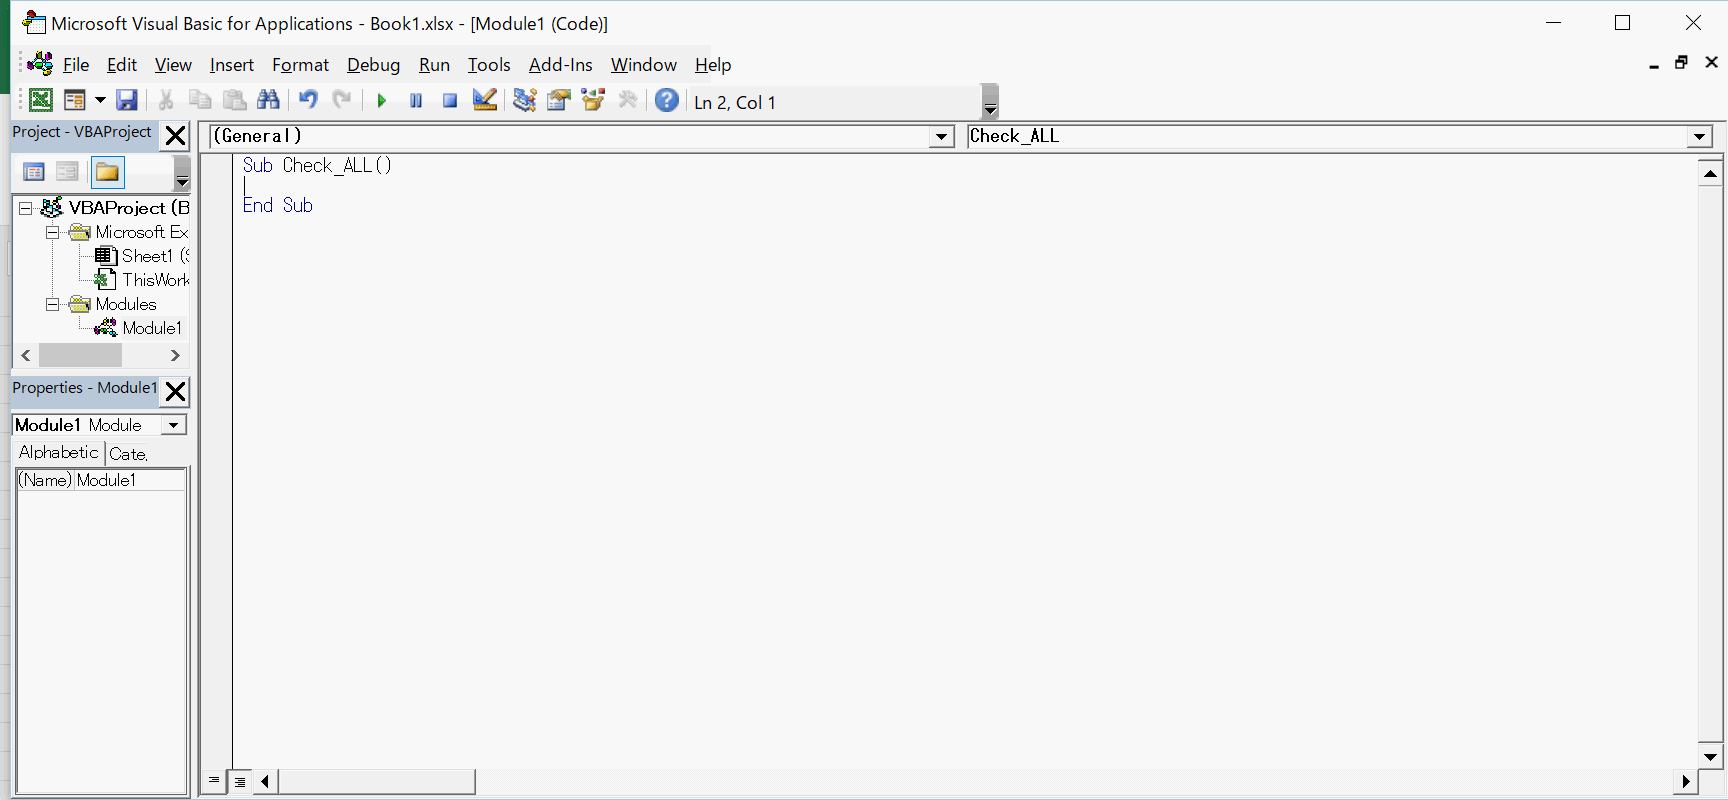
VBE(Visual Basic Editor) open in another window.
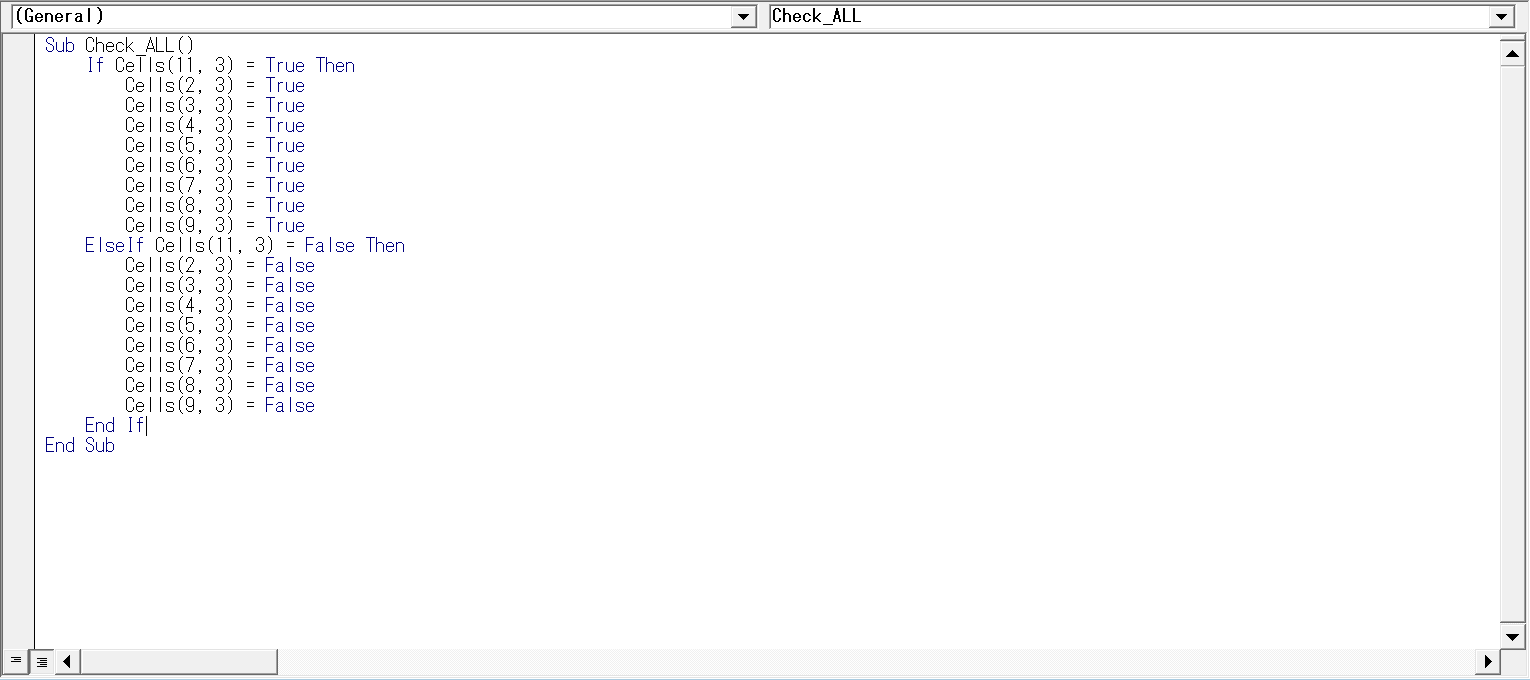
Enter the code below between "Sub Check_ALL()" and "End Sub"
Sub Check_ALL()
  If Cells(11, 3) = True Then
    Cells(2, 3) = True
    Cells(3, 3) = True
    Cells(4, 3) = True
    Cells(5, 3) = True
    Cells(6, 3) = True
    Cells(7, 3) = True
    Cells(8, 3) = True
    Cells(9, 3) = True
  ElseIf Cells(11, 3) = False Then
    Cells(2, 3) = False
    Cells(3, 3) = False
    Cells(4, 3) = False
    Cells(5, 3) = False
    Cells(6, 3) = False
    Cells(7, 3) = False
    Cells(8, 3) = False
    Cells(9, 3) = False
End If End Sub
"Cells(11.3)" means the cell C11. In VBA, a cell is defined as "Cells(Row number.Column number)".
When C11 is "true", other linked cells with checkboxes are true, and when C11 is false, other linked cells are false.
"If A Then X Elself B Then Y End If" means "if it’s A, operate X, if it’s B, operate Y".
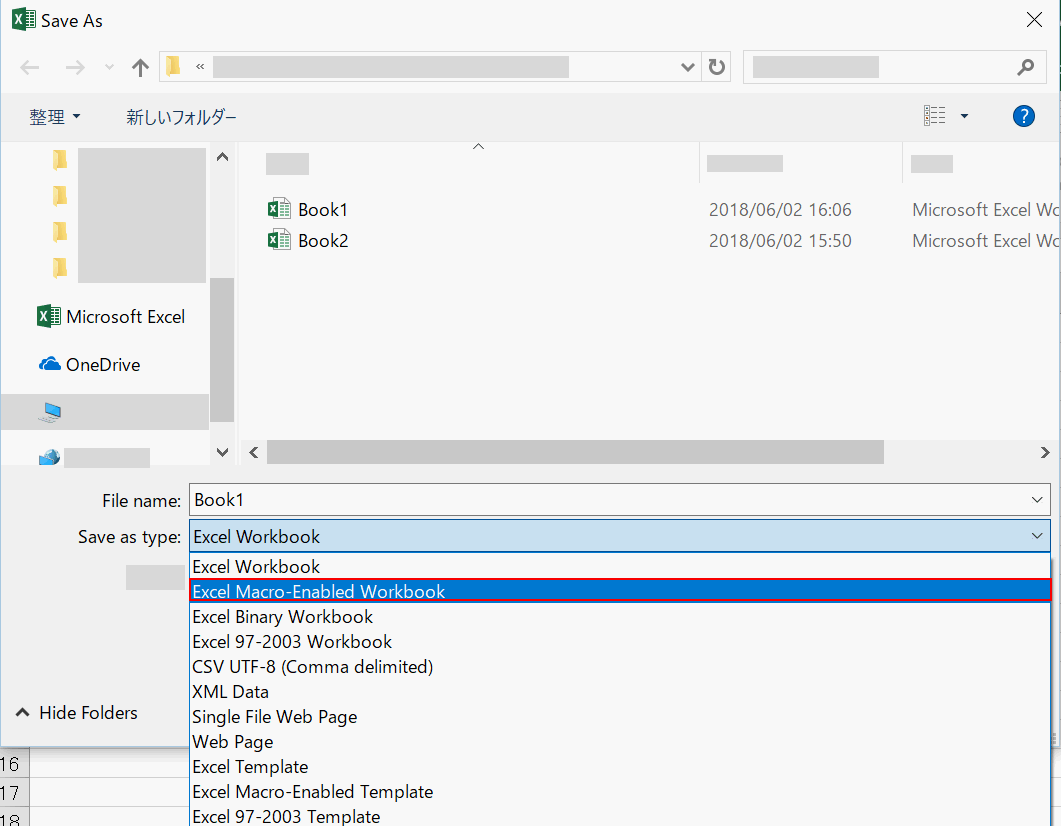
Press Ctrl + S to save the book.
"Save as" dialog box is displayed then select 【Excel Macro-Enabled Workbook】from 【File Format】drop down list then click save.
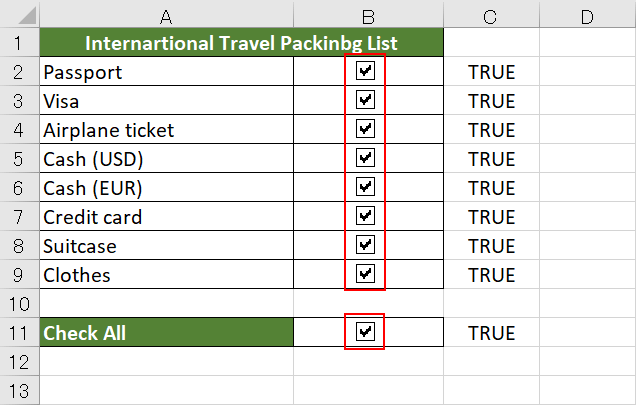
Go back to packing list file. Check the select all checkbox then all of checkboxes from B2 to B9 are checked.
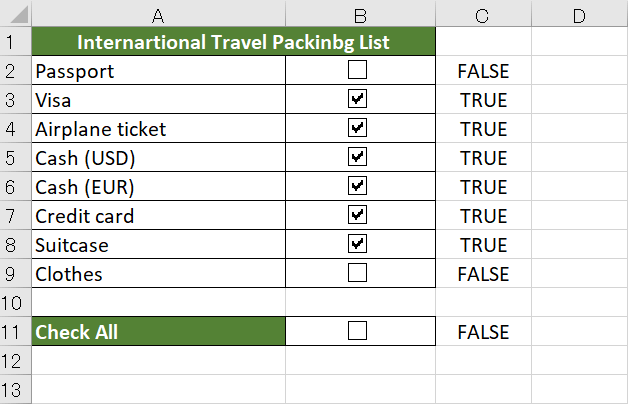
Click the checkbox to uncheck then all of checkboxes are unchecked. You can check each as you want.