
- 公開日:
Windows 10のマルチディスプレイに関する情報
本記事では、Windows 10のマルチディスプレイに関する情報について解説します。
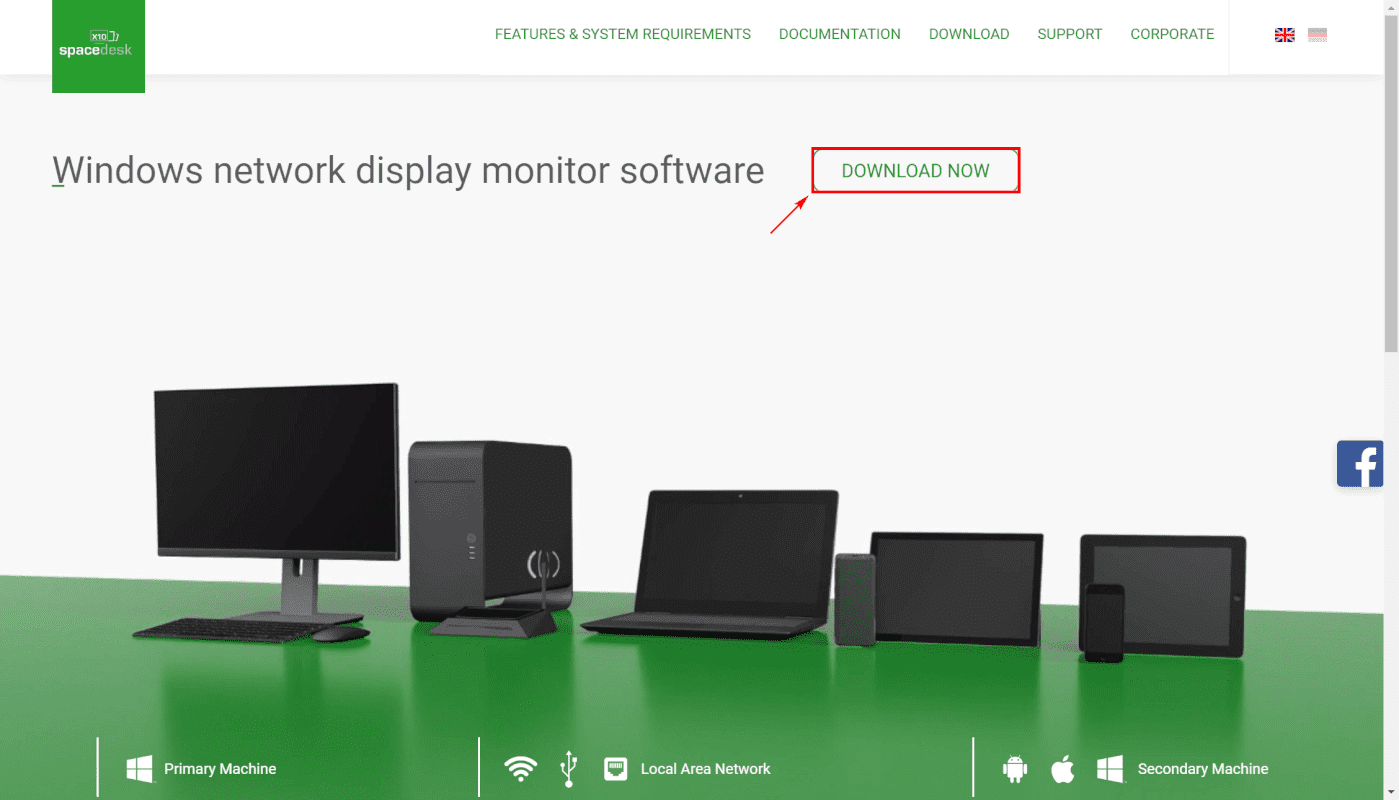
マルチモニタを使用することで画面ごとに異なるウィンドをフルスクリーンで表示することができます。また、spacedeskでノートパソコンをモバイルモニターとして使用する方法をご紹介します。
Windows 10でのマルチディスプレイの設定方法
今回は無料で利用できるspacedeskを使用したマルチディスプレイの設定をご紹介します。使用した機器については下記の表をご覧ください。
spacedeskでマルチディスプレイを使用するには、同一のネットワーク上で使用する必要があります。
| 接続順 | 機種/OS |
|---|---|
| プライマリモニタ(第1画面) | Microsoft Surface Laptop 3、Windows 10 Home 64bit |
| セカンダリモニタ(第2画面) | Microsoft Surface Laptop、Winodws 10 Pro 64bit |
| セカンダリモニタ(第3画面) | iPhone 6 Plus |
spacedeskをインストール
プライマリモニタ(第1画面)
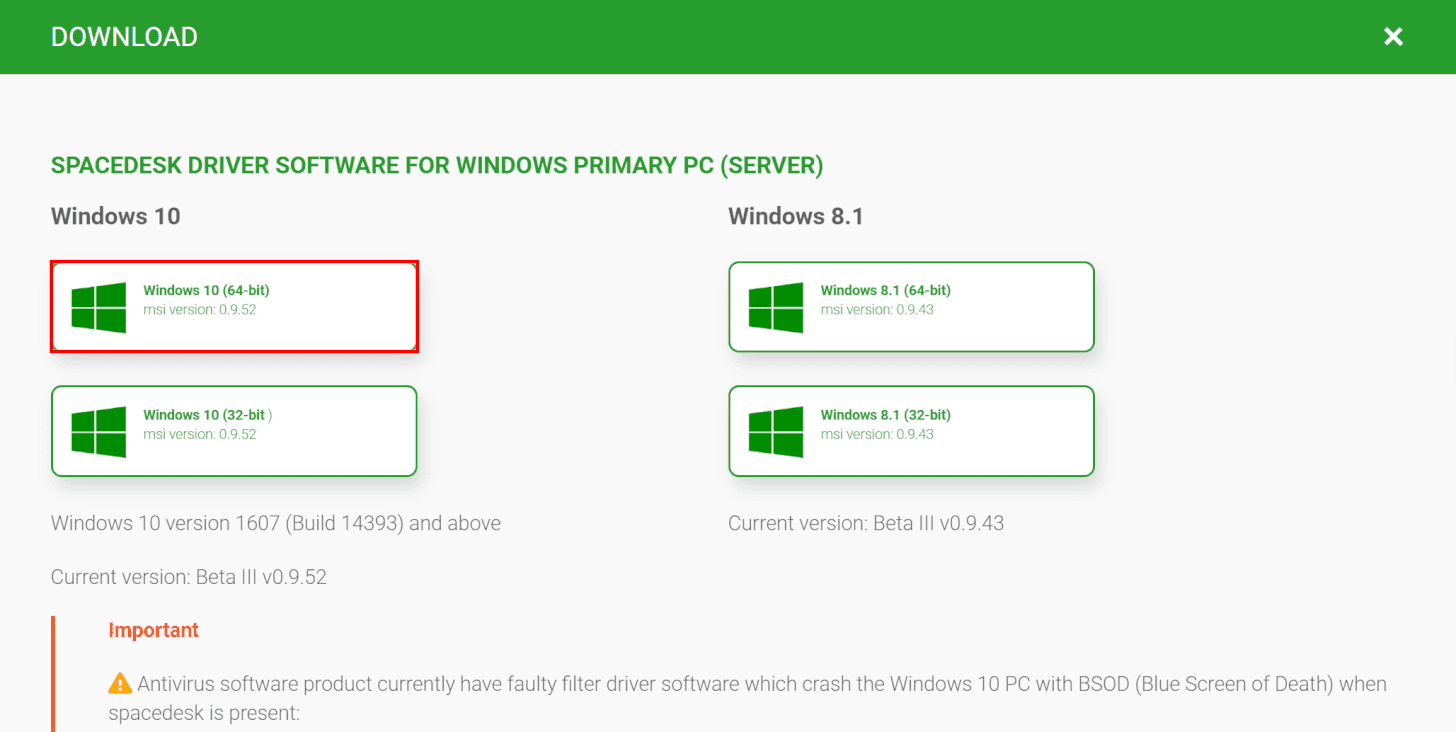
ご使用のシステム環境に合わせたソフトウェアを選択してください。
今回は、【Windows 10(64-bit)】を選択します。ソフトウェアのダウンロードが開始されます。
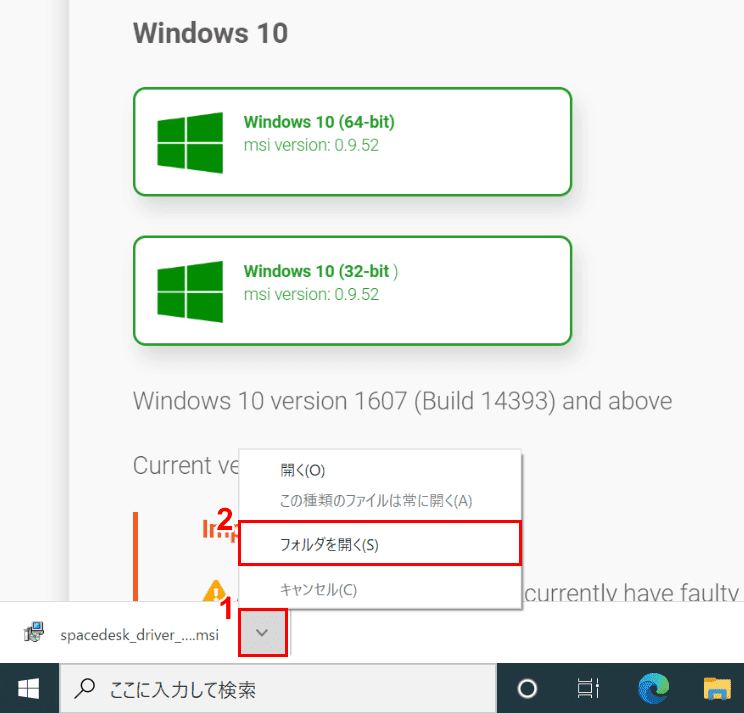
①【矢印】を押し、②【フォルダを開く】を選択します。
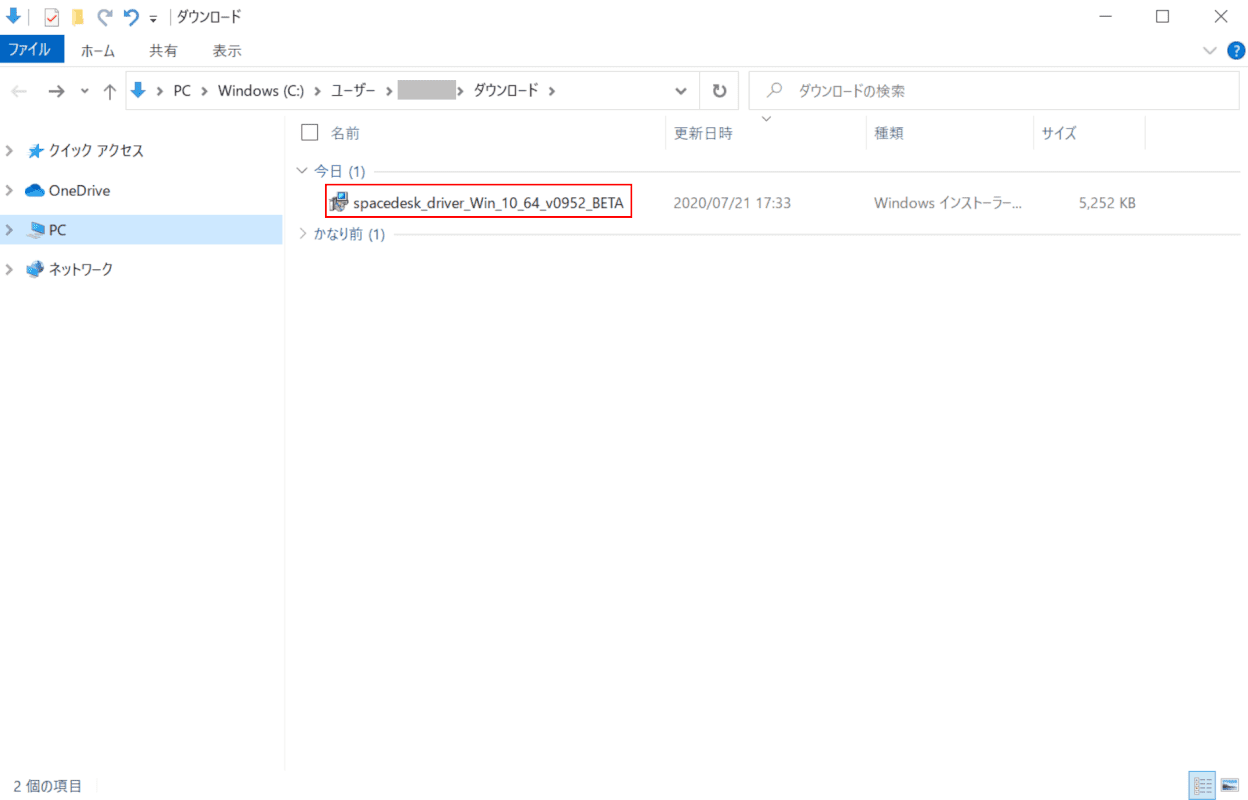
「ダウンロード」フォルダが開きます。
【spacedesk_driver_Win_10_64_v0952_BETA】をダブルクリックします。
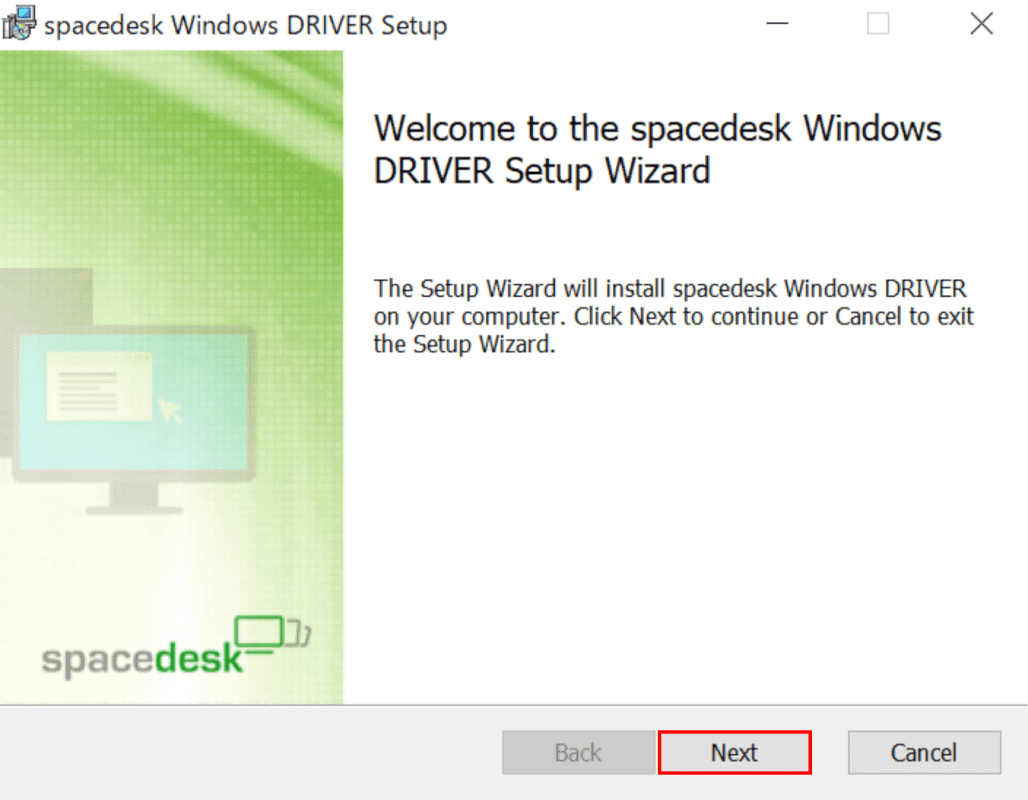
「spacedesk Windows DRIVER Setup」ダイアログボックスが表示されます。
【Next】ボタンを押します。

①【「チェックボックス」を「オン」】にし、②【Next】ボタンを押します。
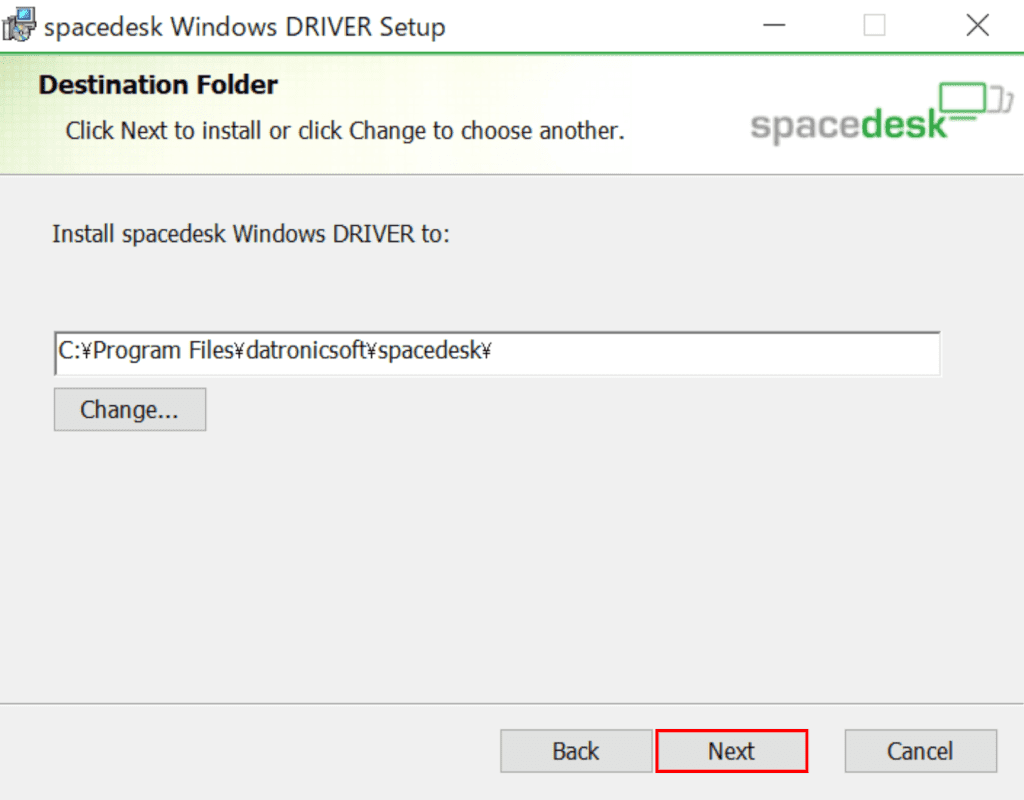
【Next】ボタンを押します。
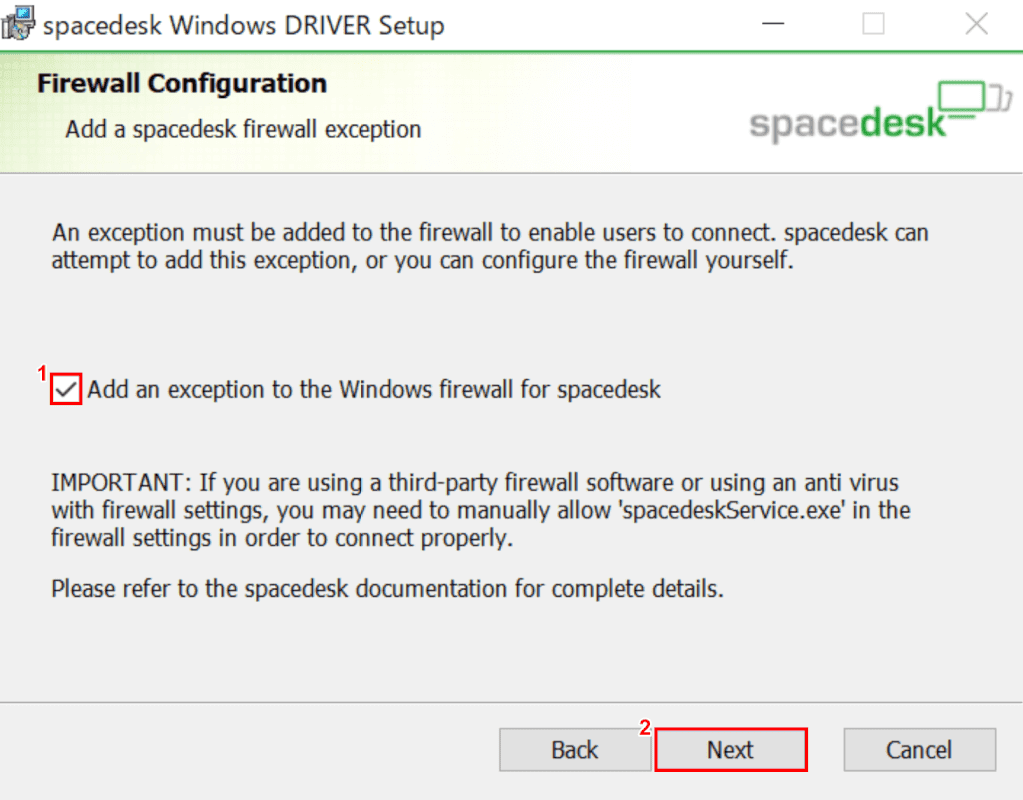
①【「チェックボックス」を「オン」】にし、②【Next】ボタンを押します。
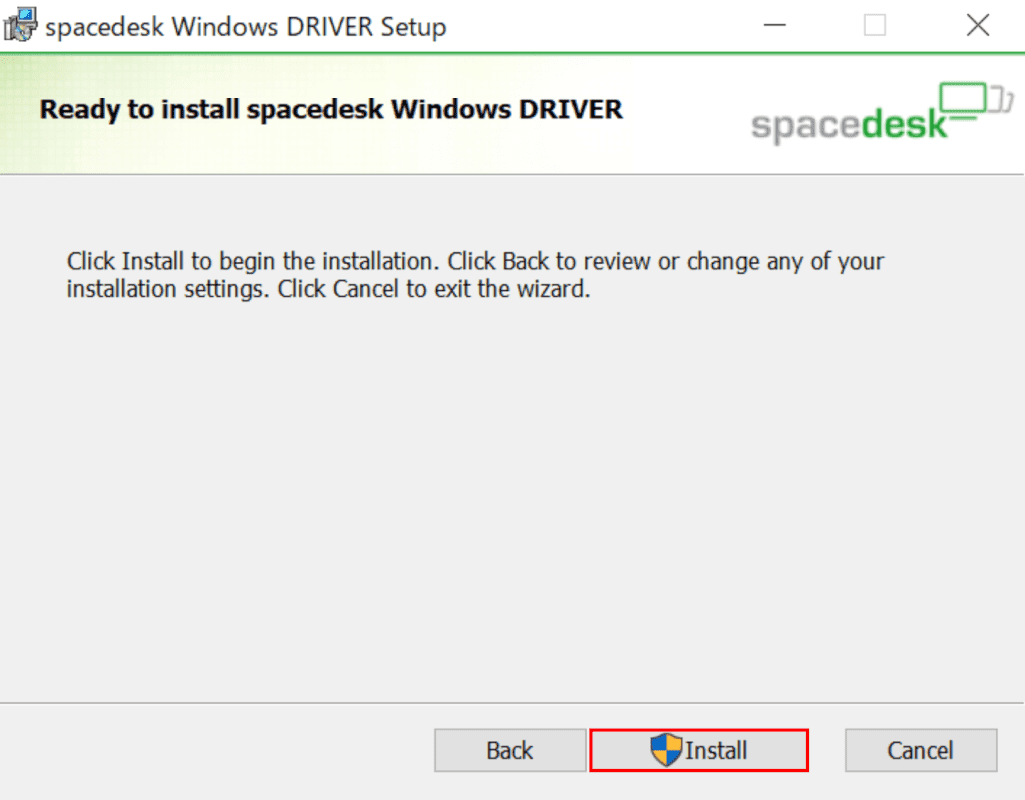
【Install】ボタンを押します。インストールが開始されます。
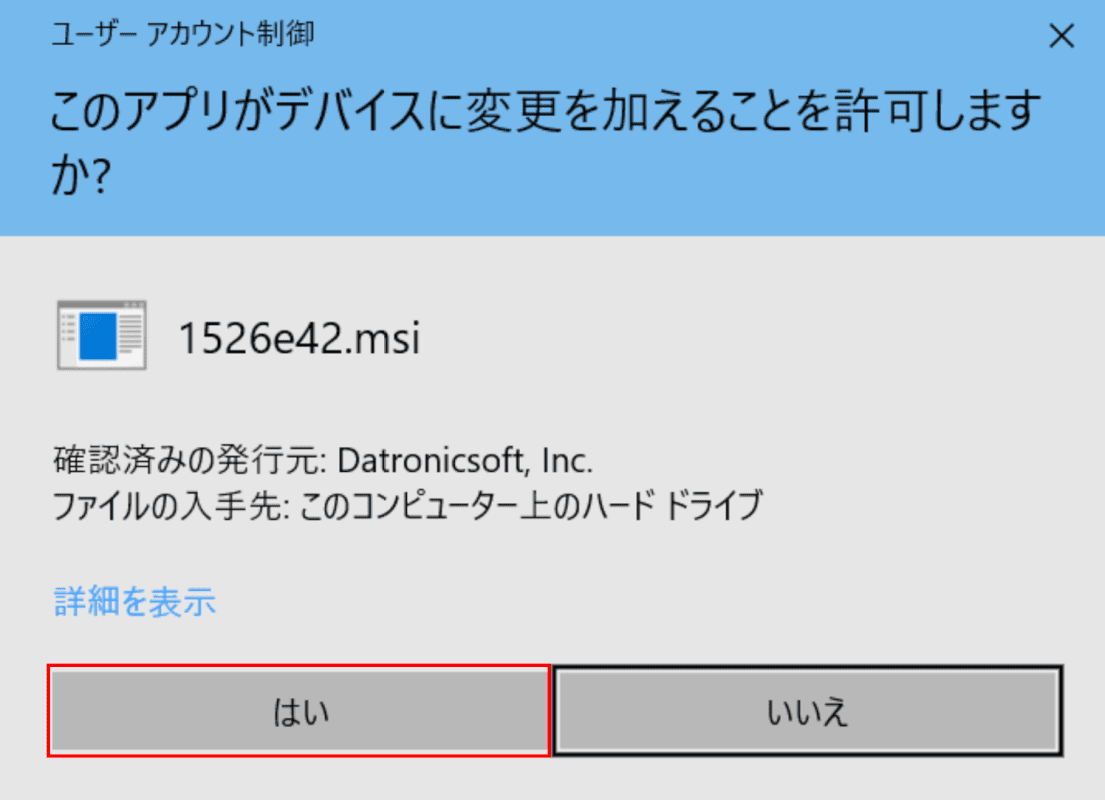
「ユーザーアカウント制御」ダイアログボックスが表示されます。
【はい】ボタンを押します。
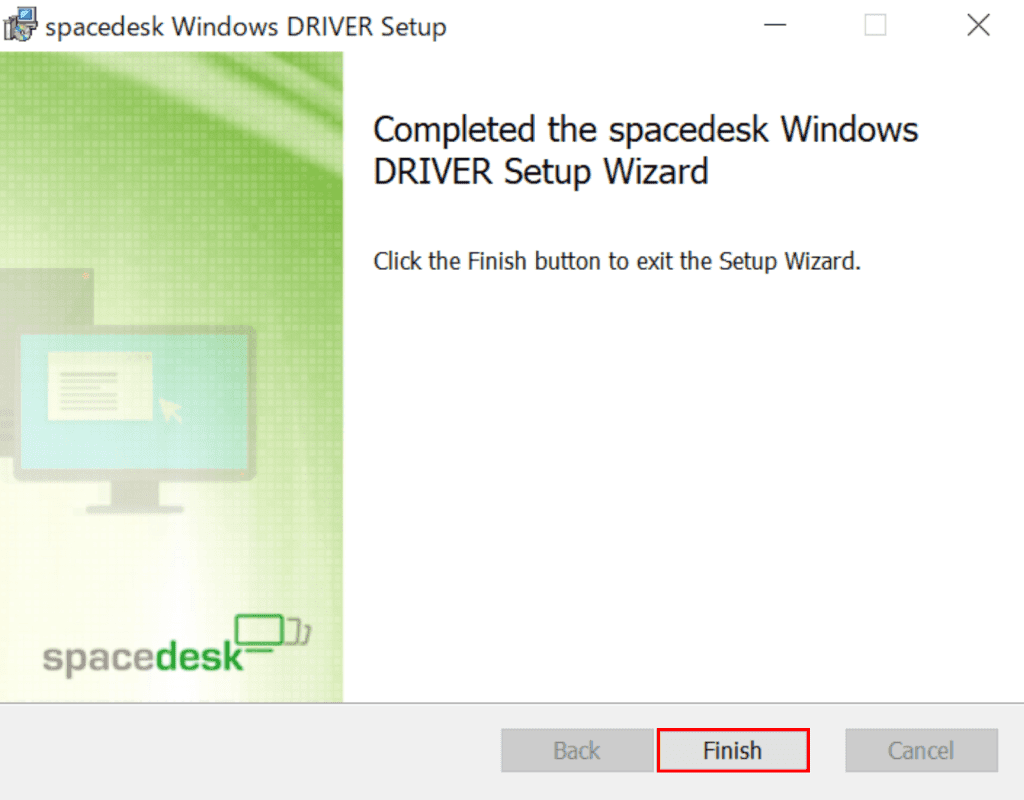
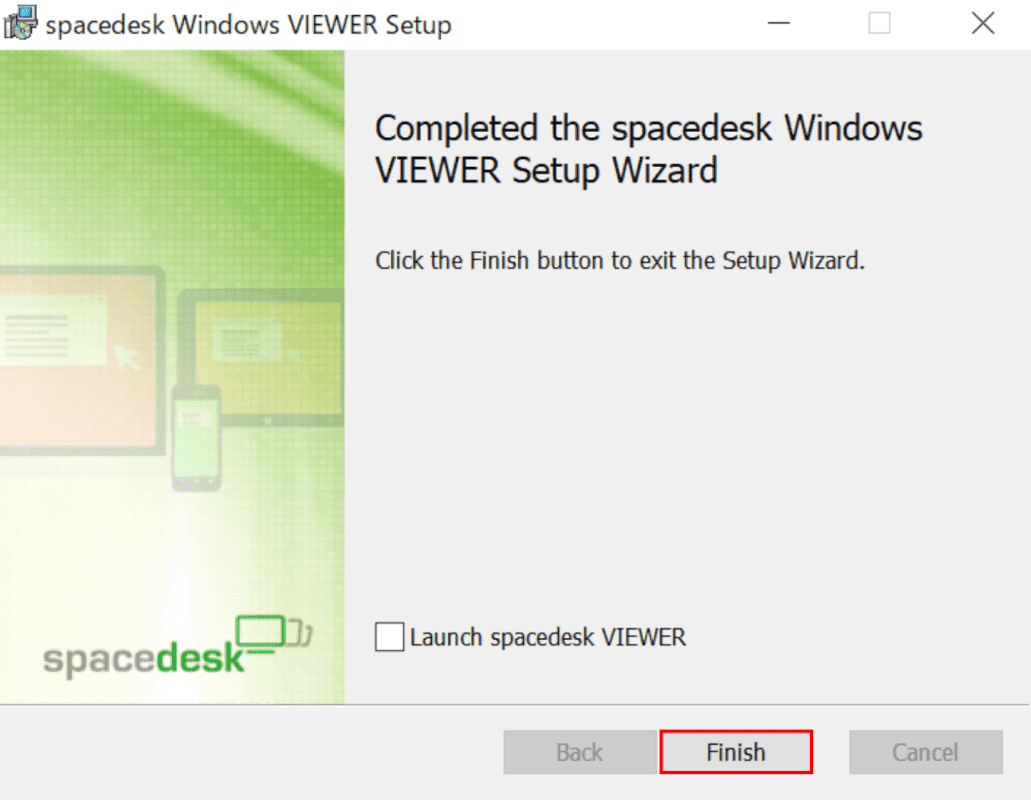
【Finish】ボタンを押します。
spacedeskのプライマリモニタ用ソフトウェアのインストールが完了しました。
セカンダリモニタ(第2画面)

①【「スクロールバー」を「下へスクロール」】し、②「For SECONDARY MACHINE(CLIENT)」と表示されていることを確認します。③【download for Windows(32-bit/64-bit)】を押します。
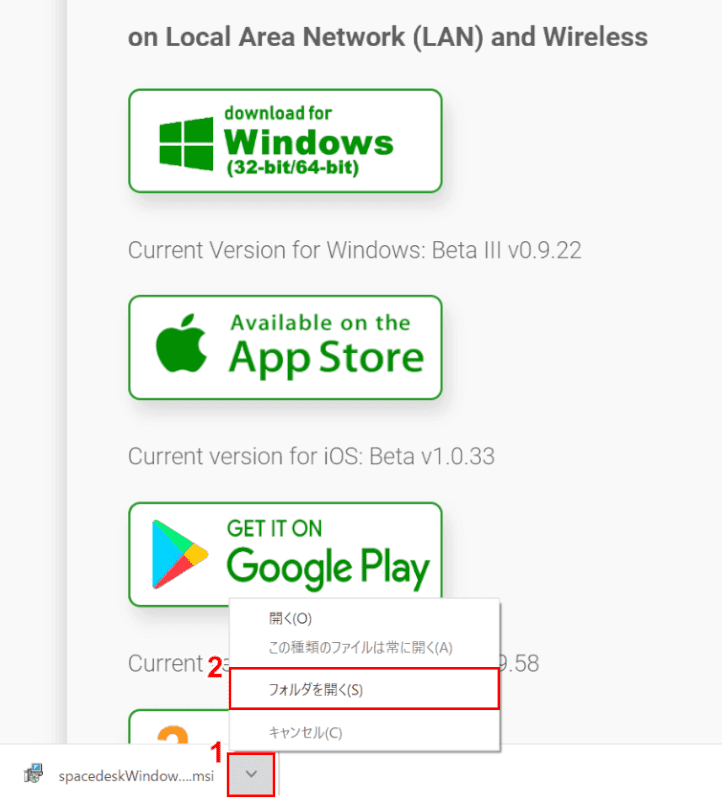
①【矢印】を押し、②【フォルダを開く】を押します。
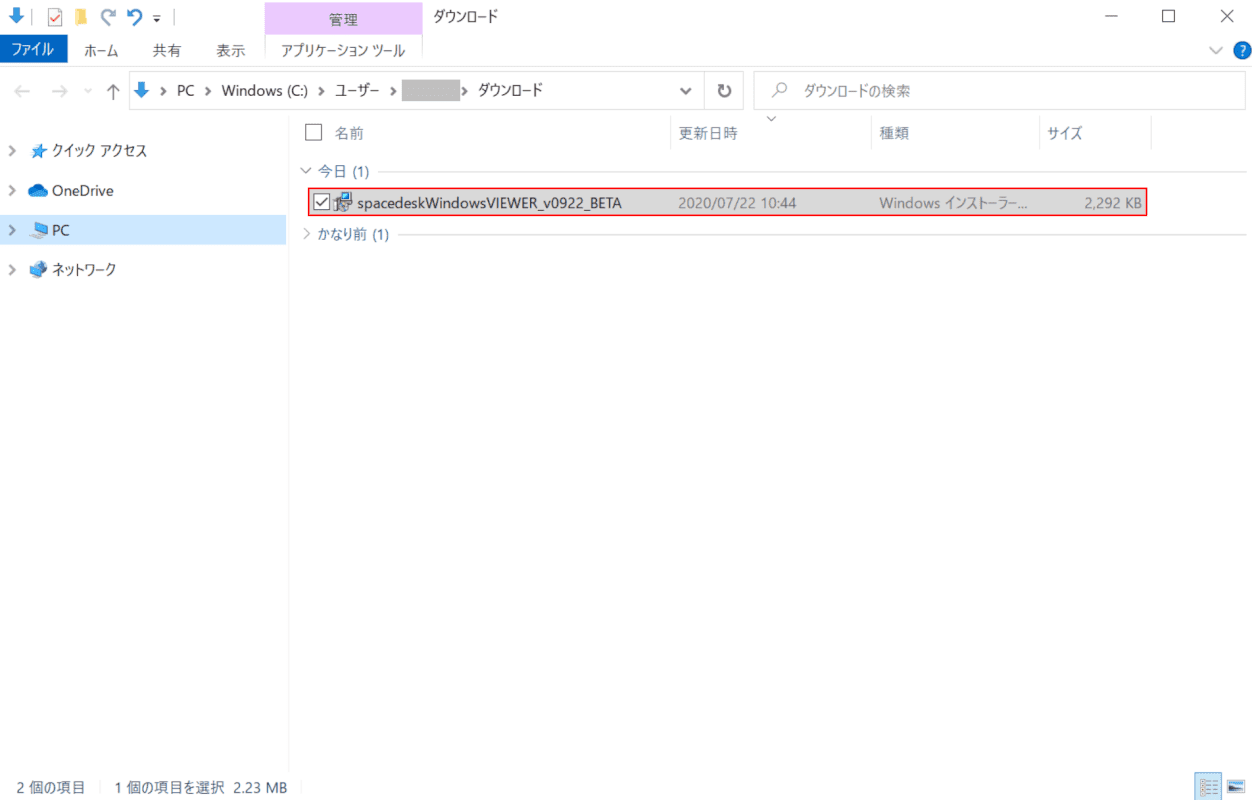
「ダウンロード」フォルダが開きます。
【spacedeskWindowsVIEWER_v0922_BETA】をダブルクリックします。
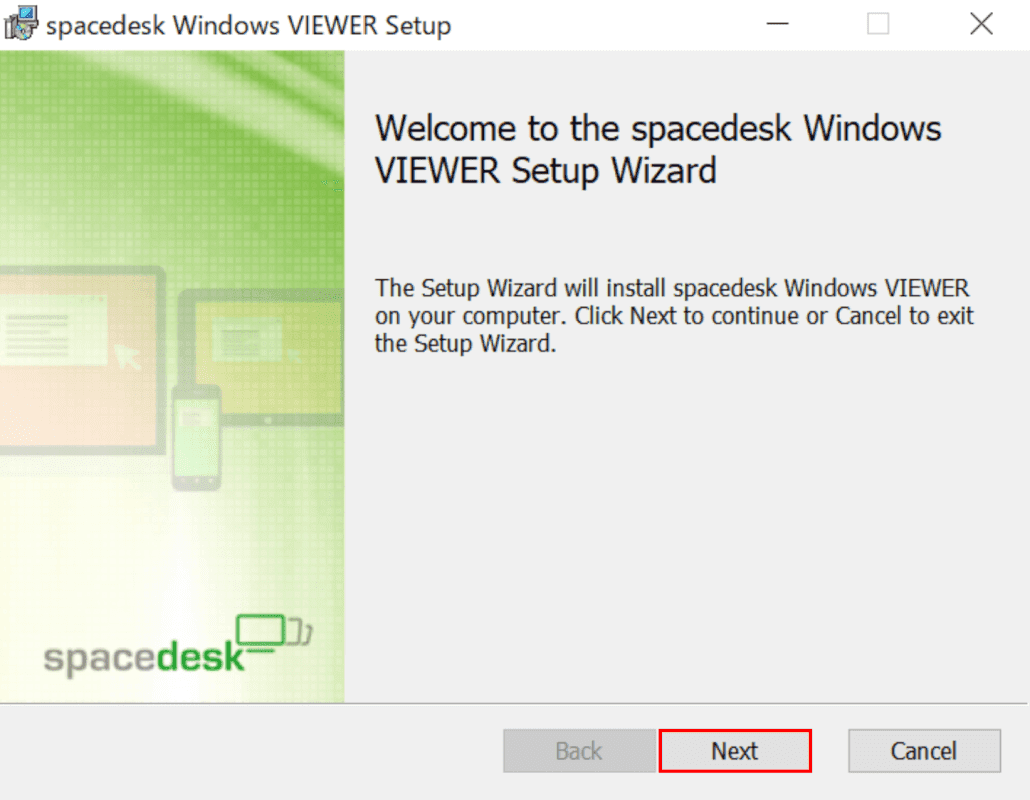
「spacedesk Windows VIEWER Setup」ダイアログボックスが表示されます。
【Next】ボタンを押します。
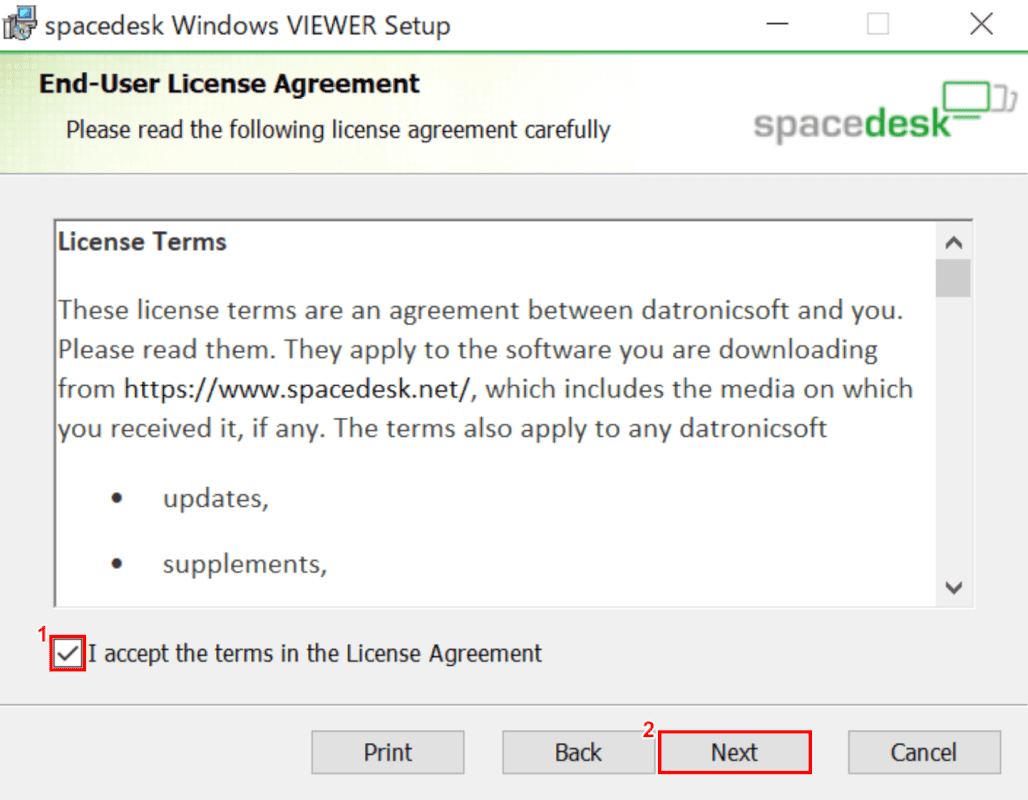
①【「チェックボックス」を「オン」】にし、②【Next】ボタンを押します。
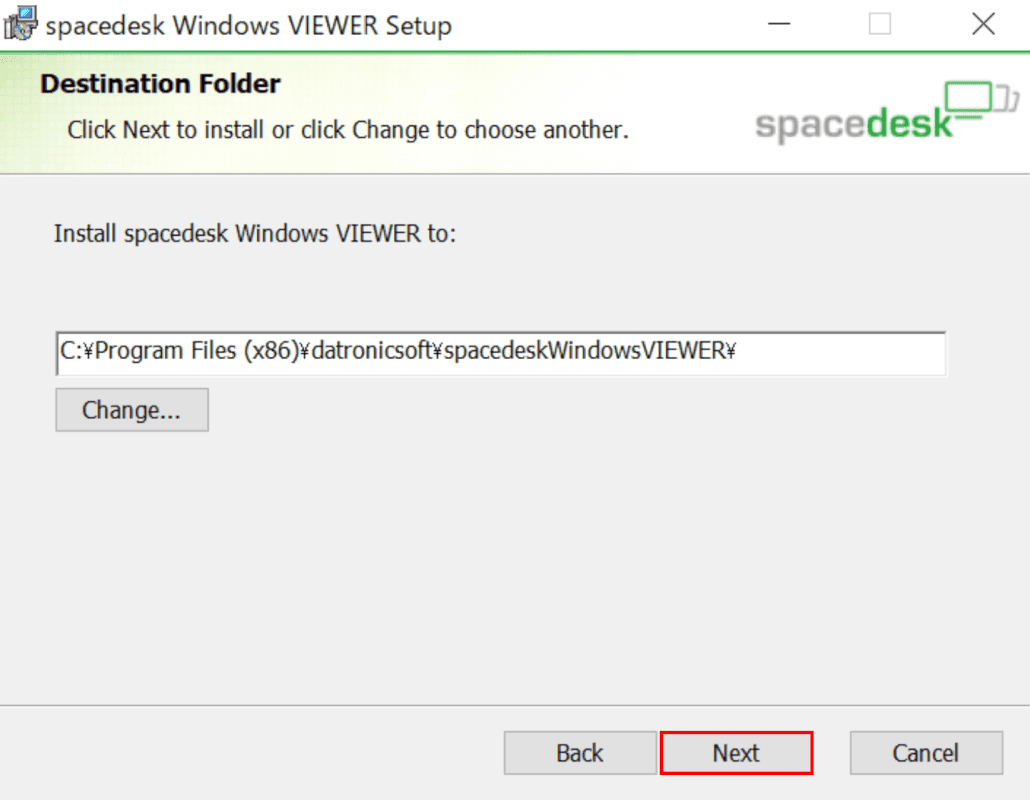
【Next】ボタンを押します。
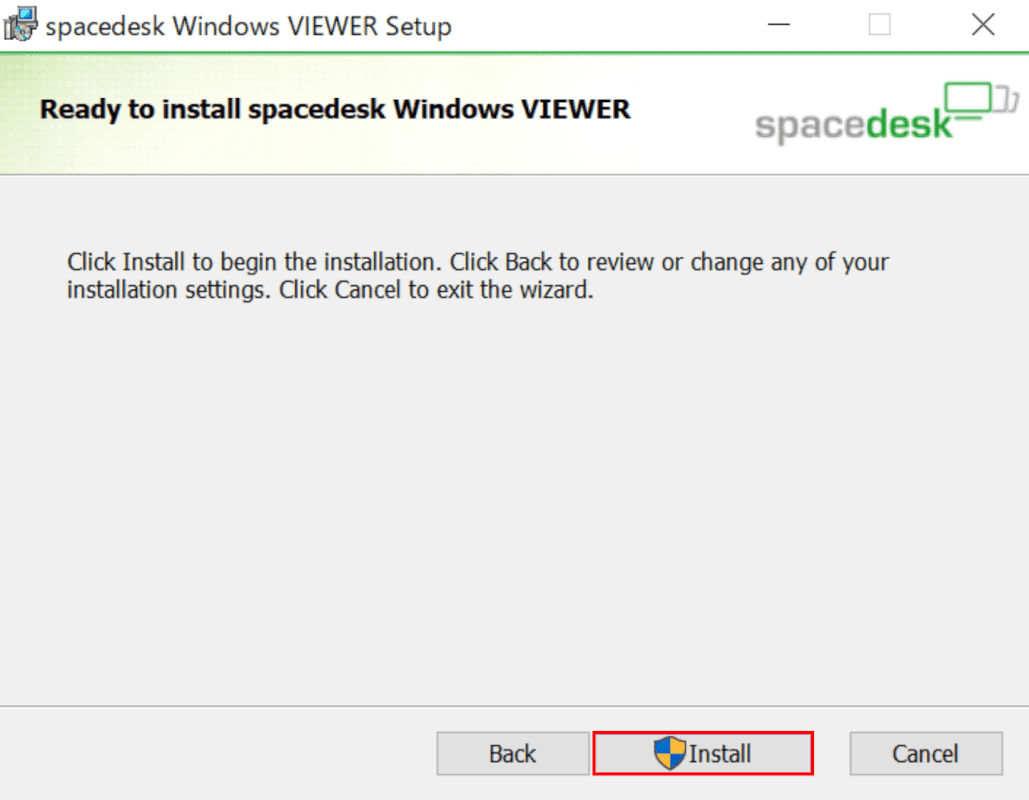
【Install】ボタンを押します。インストールが開始されます。

「ユーザーアカウント制御」ダイアログボックスが表示されます。
【はい】ボタンを押します。
【Finish】ボタンを押します。
spacedeskのセカンダリモニタ用ソフトウェアのインストールが完了しました。
セカンダリモニタ(第3画面、iPhone)
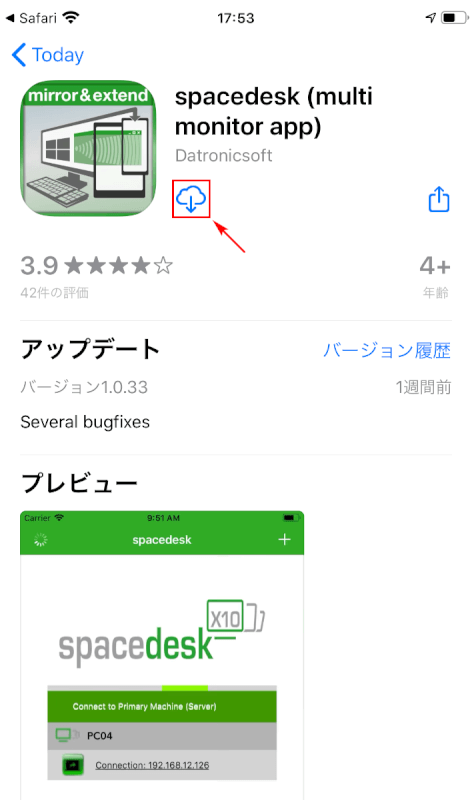
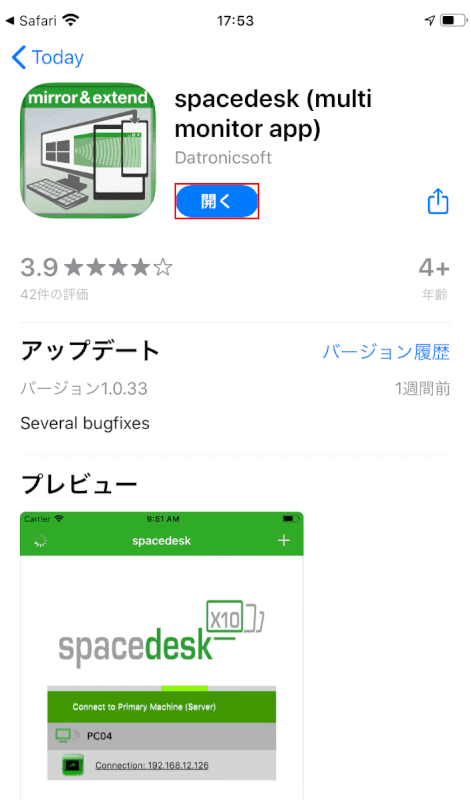
【開く】をタップします。
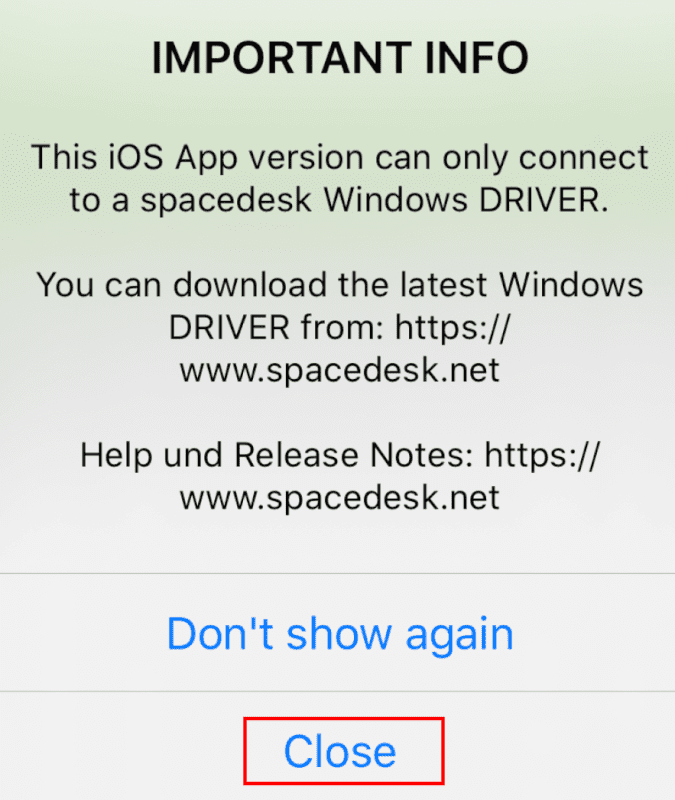
「IMPORTANT INFO」メッセージが表示されます。
【Close】をタップします。
セカンダリモニタ(iPhone)のインストールが完了しました。
2画面の場合
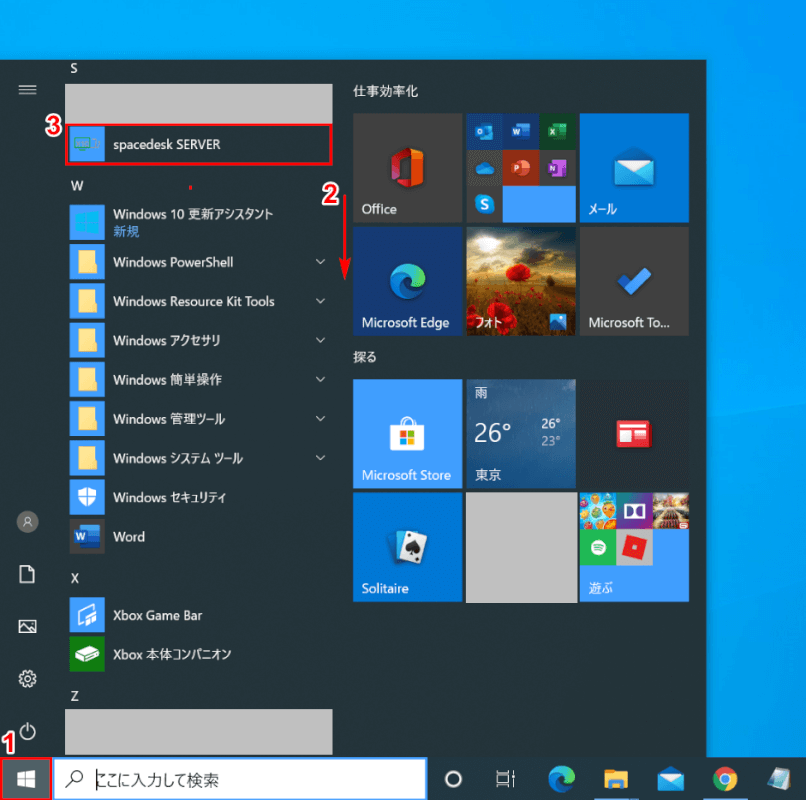
プライマリモニタ(第1画面)のパソコンでWindows 10を開きます。
①【スタート】、②【「スクロールバー」を「下へスクロール」】し、③【spacedesk SERVER】を選択します。
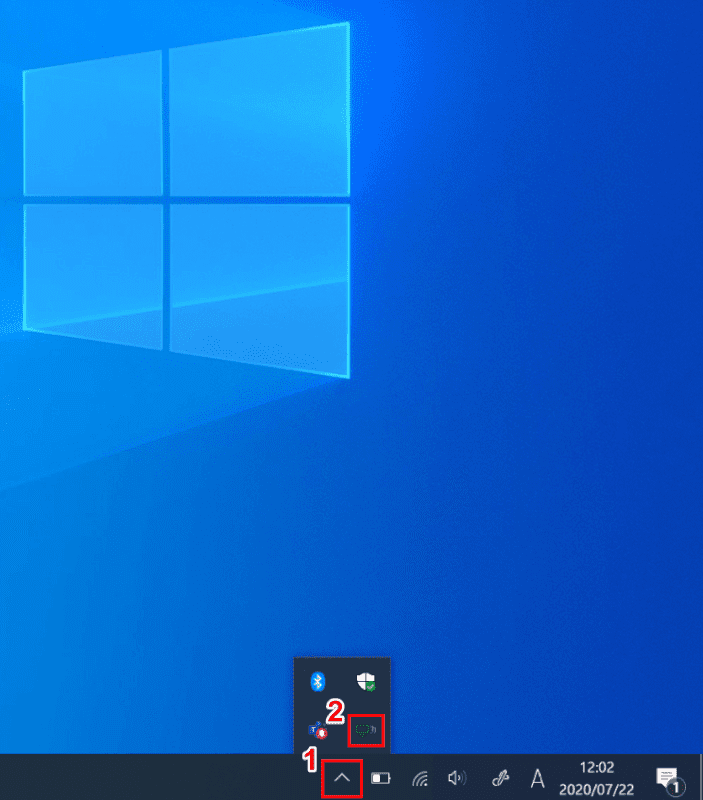
①【隠れているインジケーターを表示します】ボタンを押します。②「spacedesk」のアイコンが表示されていることを確認します。
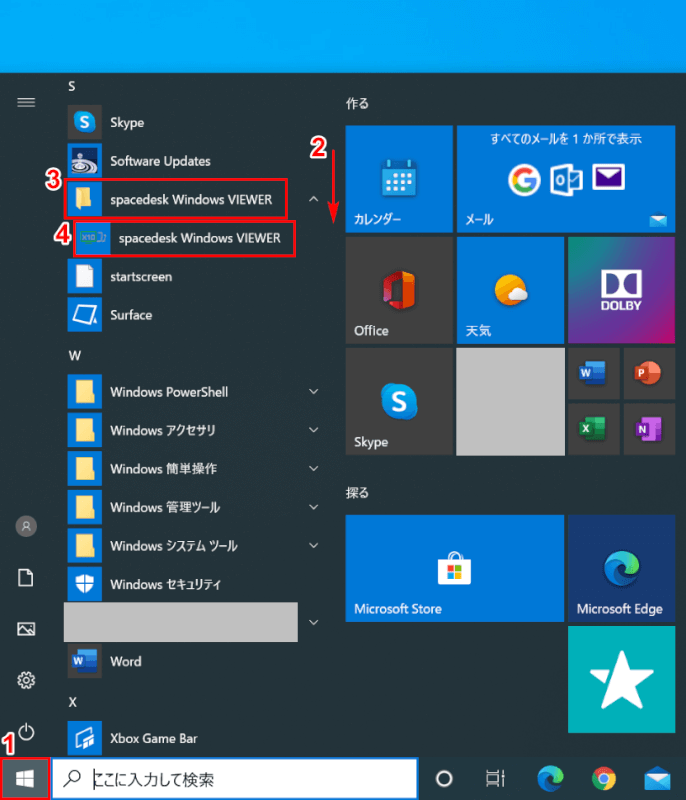
セカンダリモニタ(第2画面)のパソコンでWindows 10を開きます。
①【スタート】、②【「スクロールバー」を「下へスクロール」】します。
③【spacedesk Windows VIEWER】フォルダを開き、④【spacedesk Windows VIEWER】を押します。
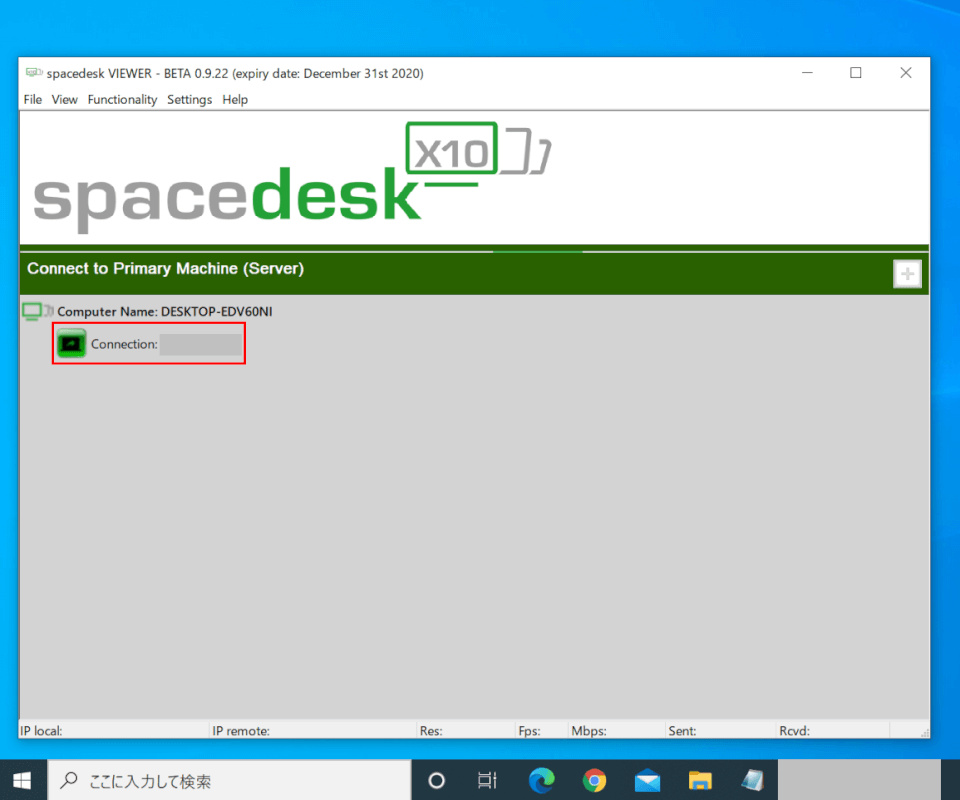
「spacedesk VIEWER」が起動します。
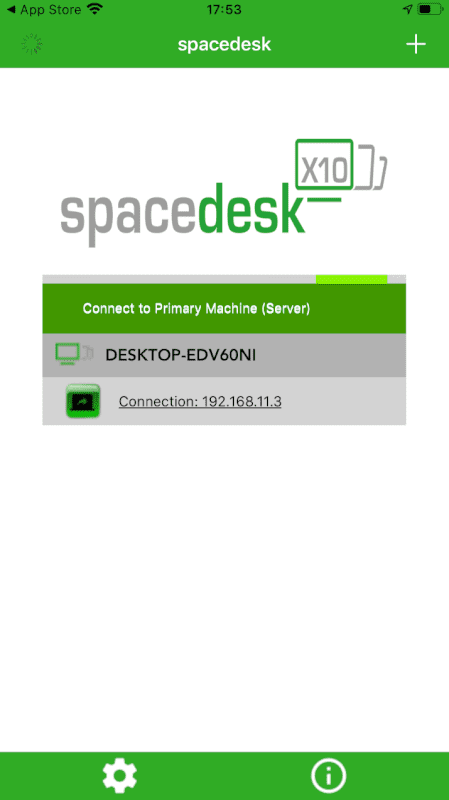
【「赤枠内」の「Connection」】を押します。
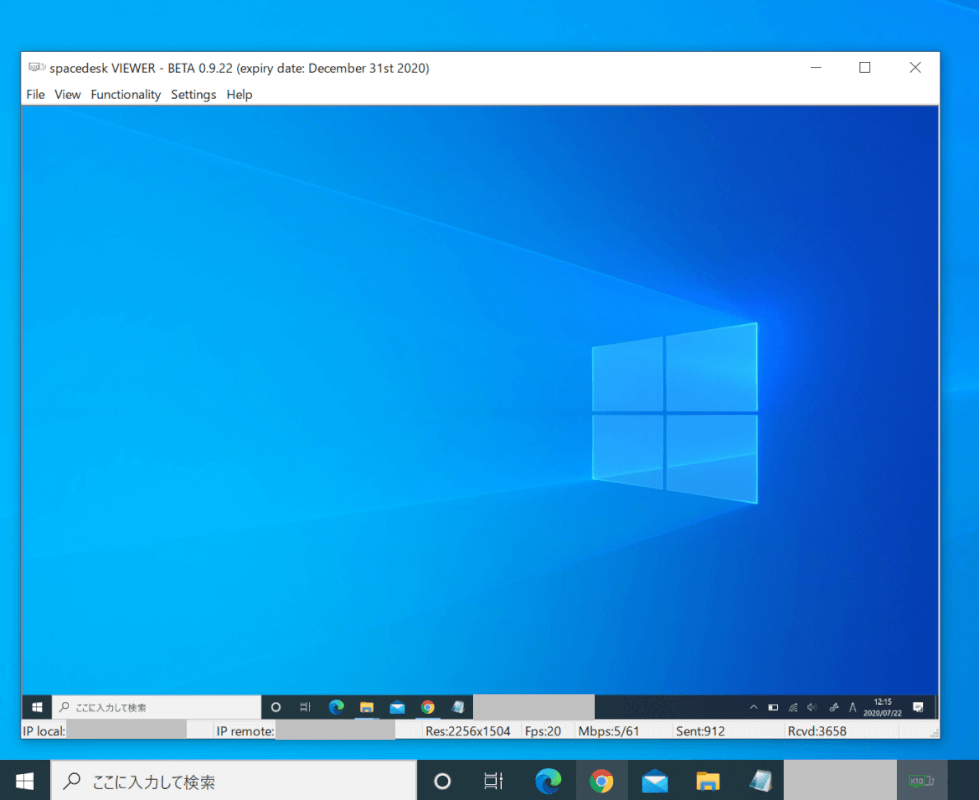
セカンダリモニタでプライマリモニタの画面が表示できました。
プライマリモニタとセカンダリモニタ2台の接続が完了しました。
3画面の場合
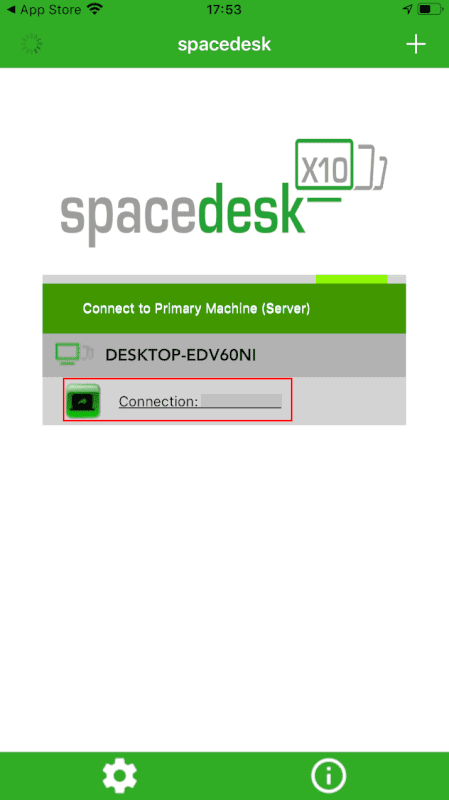
2画面のセクションに続き、セカンダリモニタのiPhoneでspacedeskを起動します。
【「赤枠内」の「Connection」】をタップします。
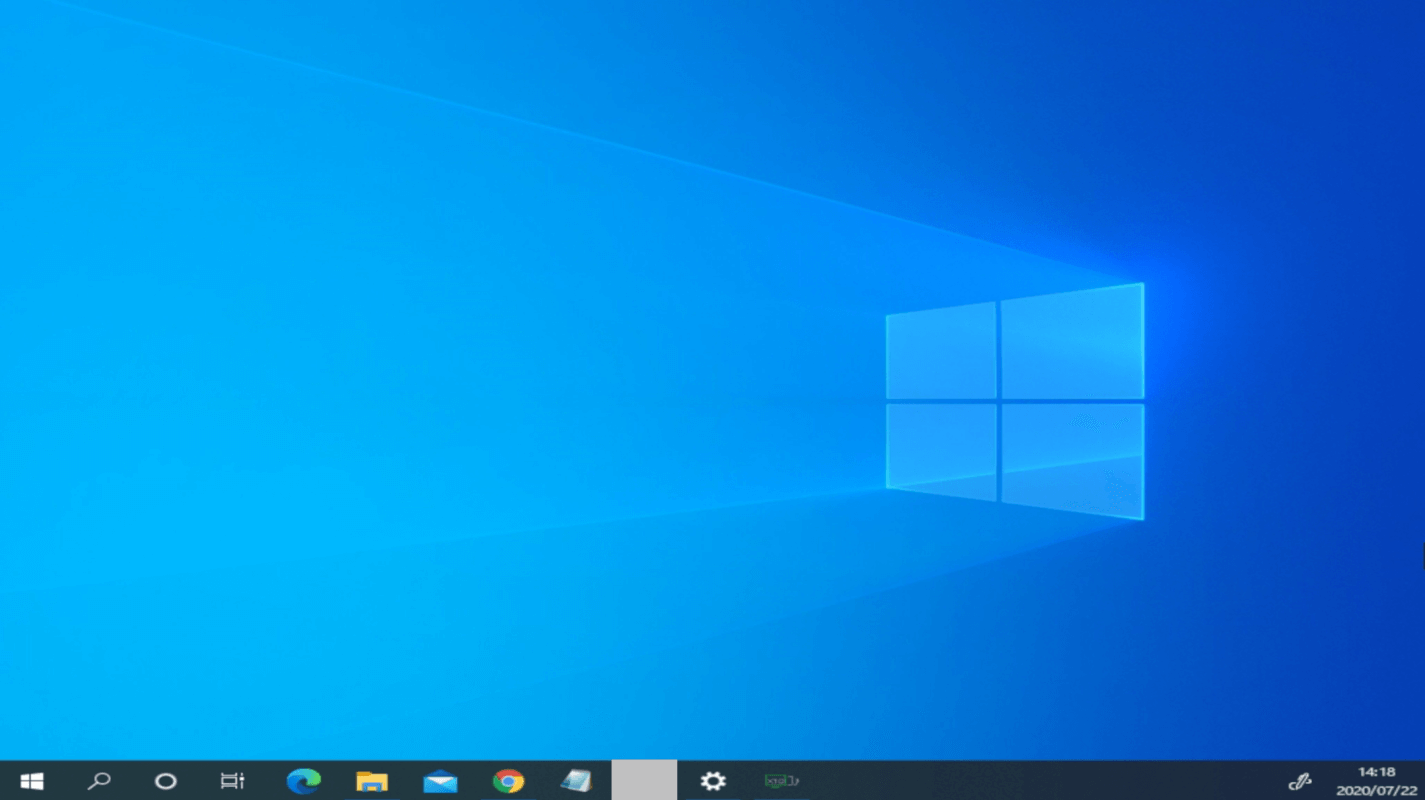
セカンダリモニタ(iPhone)でプライマリモニタの画面が表示できました。
3台での表示が完了しました。
切り替える
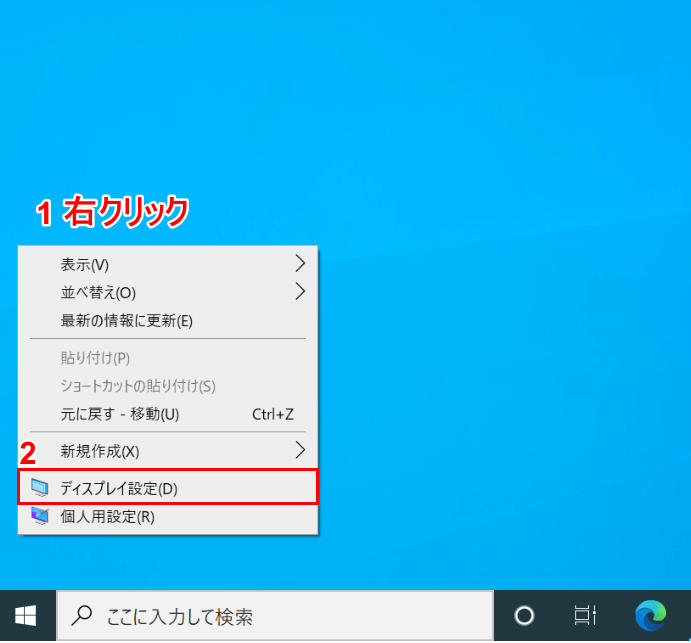
Windows 10を開きます。spacedeskを起動し、プライマリモニタとセカンダリモニタを接続します。
①【「プライマリモニタのデスクトップ上」で「右クリック」】し、②【ディスプレイ設定】を選択します。
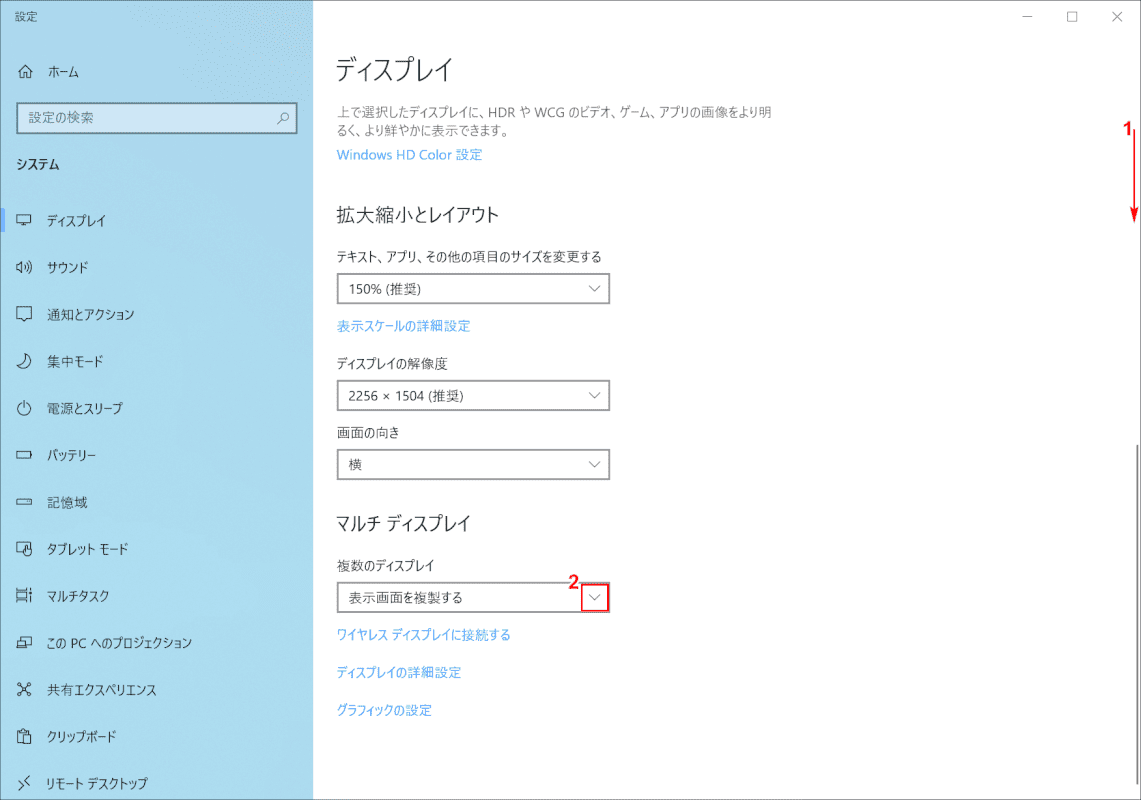
「設定」ダイアログボックスが表示されます。
①【「スクロールバー」を「下へスクロール」】し、②【矢印】を押します。
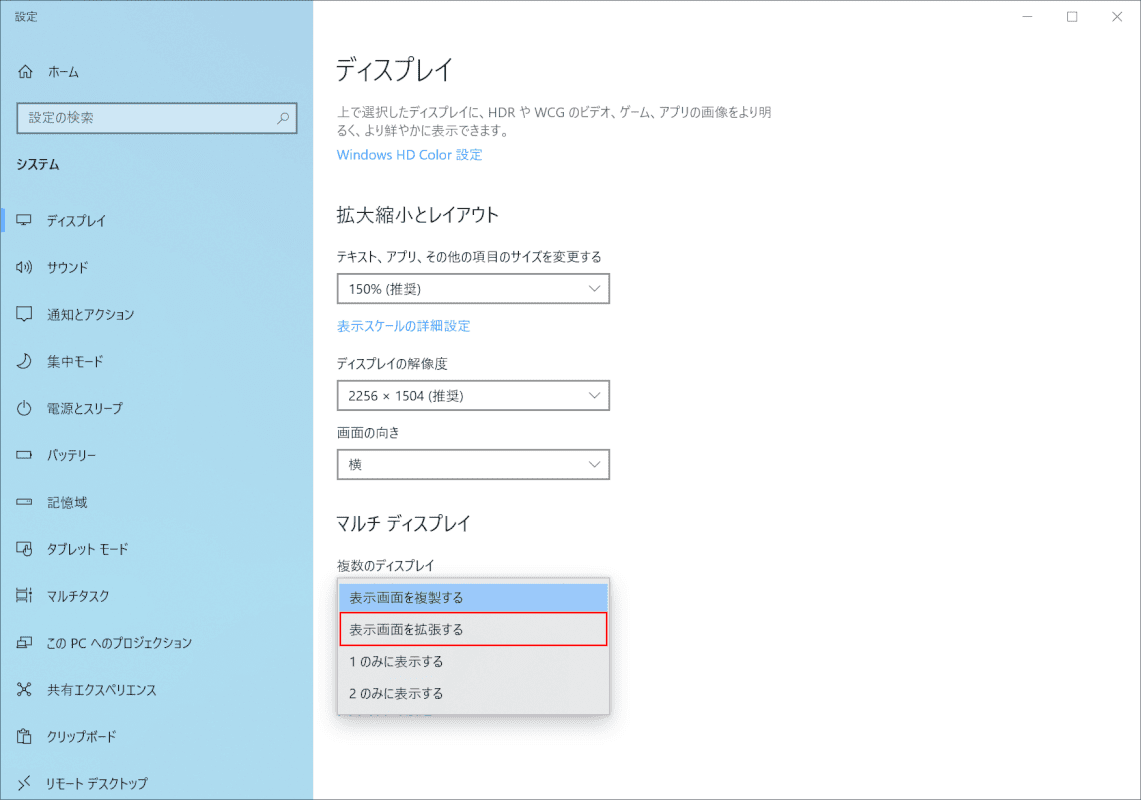
【表示画面を拡張する】を選択します。
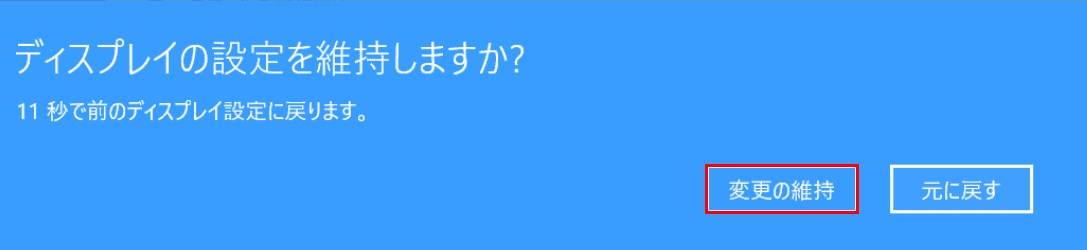
「ディスプレイの設定を維持しますか?」ダイアログボックスが表示されます。
【変更の維持】を押します。プライマリモニタとセカンダリモニタの表示の切り替えが完了しました。
左右の配置を入れ替える
「切り替える」セクションを参考に、「表示画面を拡張する」に設定してから以下の操作を行ってください。
Windows 10を開きます。spacedeskを起動し、プライマリモニタとセカンダリモニタを接続します。
①【「プライマリモニタのデスクトップ上」で「右クリック」】し、②【ディスプレイ設定】を選択します。
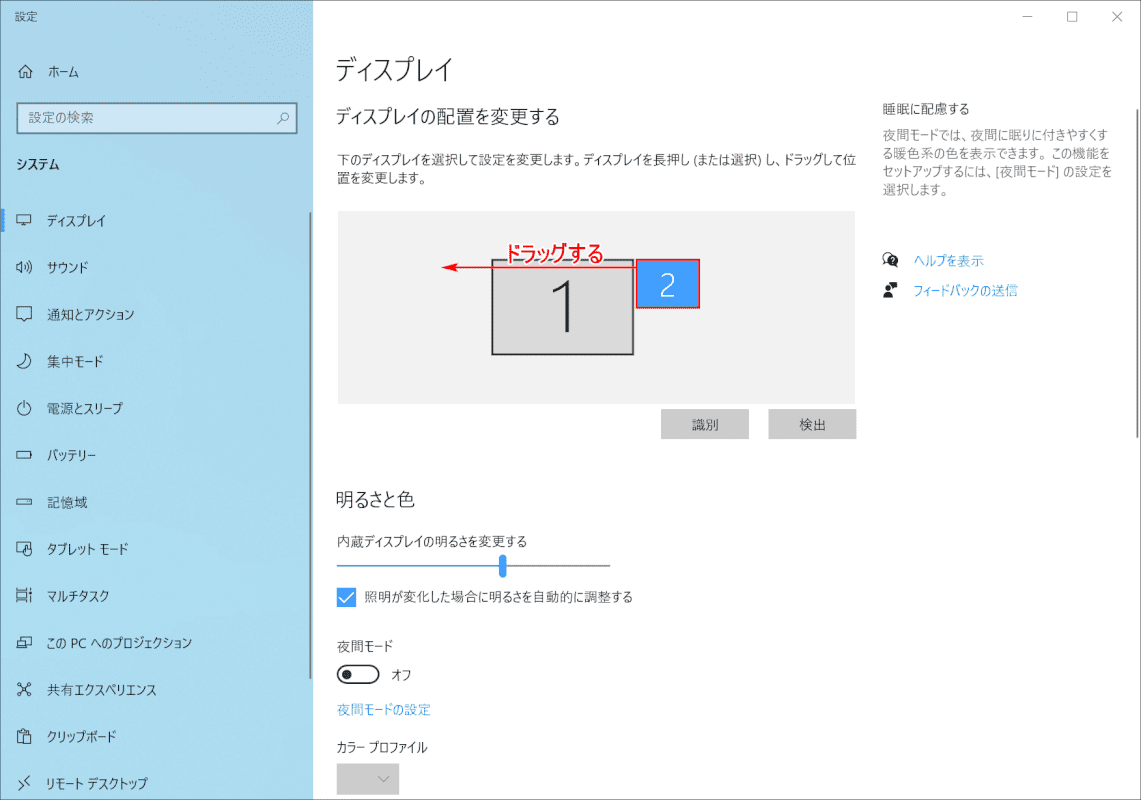
「設定」ダイアログボックスが表示されます。
【「セカンダリモニタ(2)」を「プライマリモニタ(1)】の左へドラッグします。
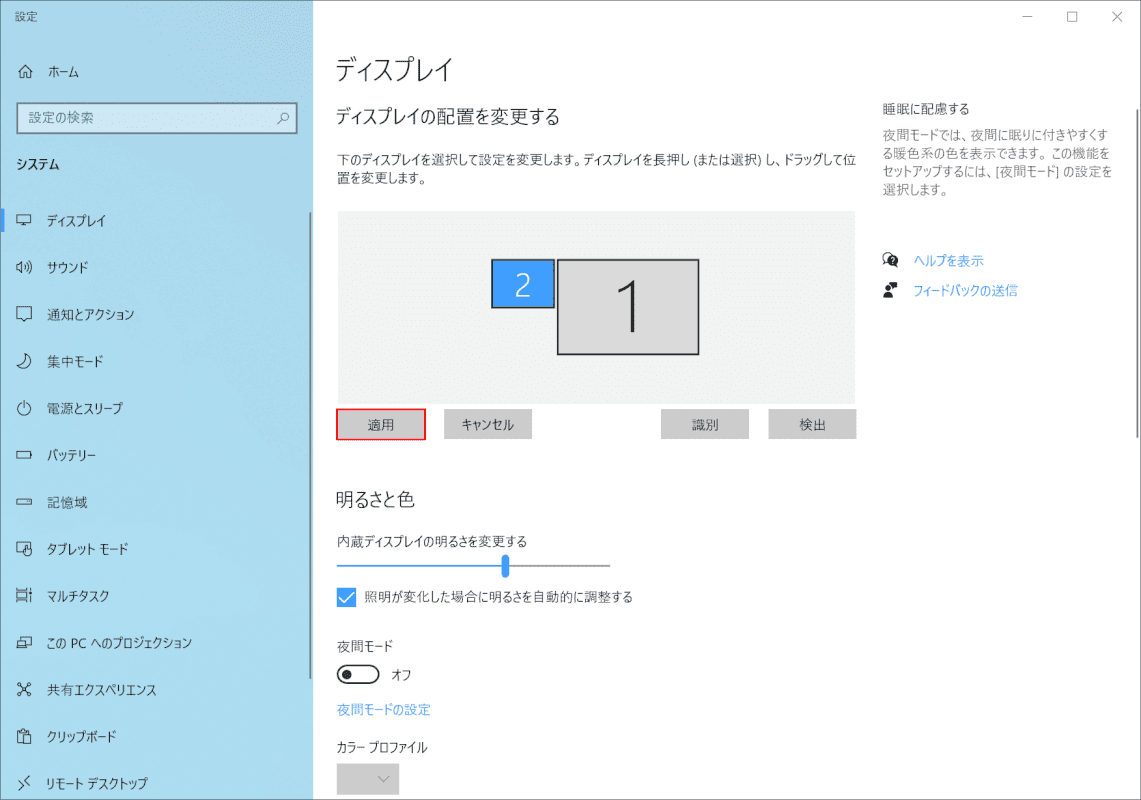
【適用】ボタンを押します。
左右の配置の入れ替えが完了しました。
タスクバーの設定
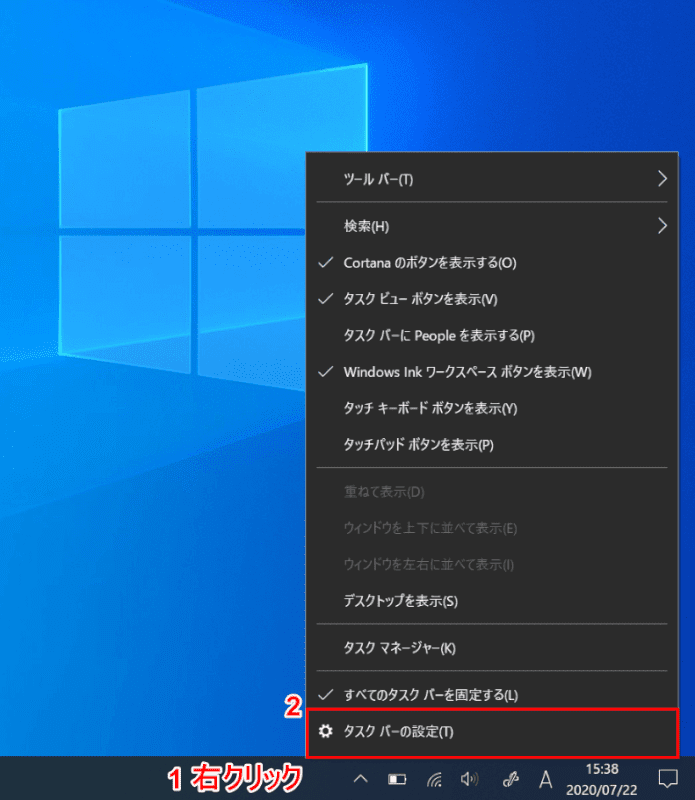
Windows 10を開きます。
①【「プライマリモニタのタスクバー」上で「右クリック」】し、②【タスクバーの設定】を選択します。

「設定」ダイアログボックスが表示されます。
①【「スクロールバー」を「下へスクロール」】し、②【「タスクバーをすべてのディスプレイに表示する」を「オフ」】にします。
セカンダリモニタでタスクバーが非表示になりました。
壁紙(背景)の設定
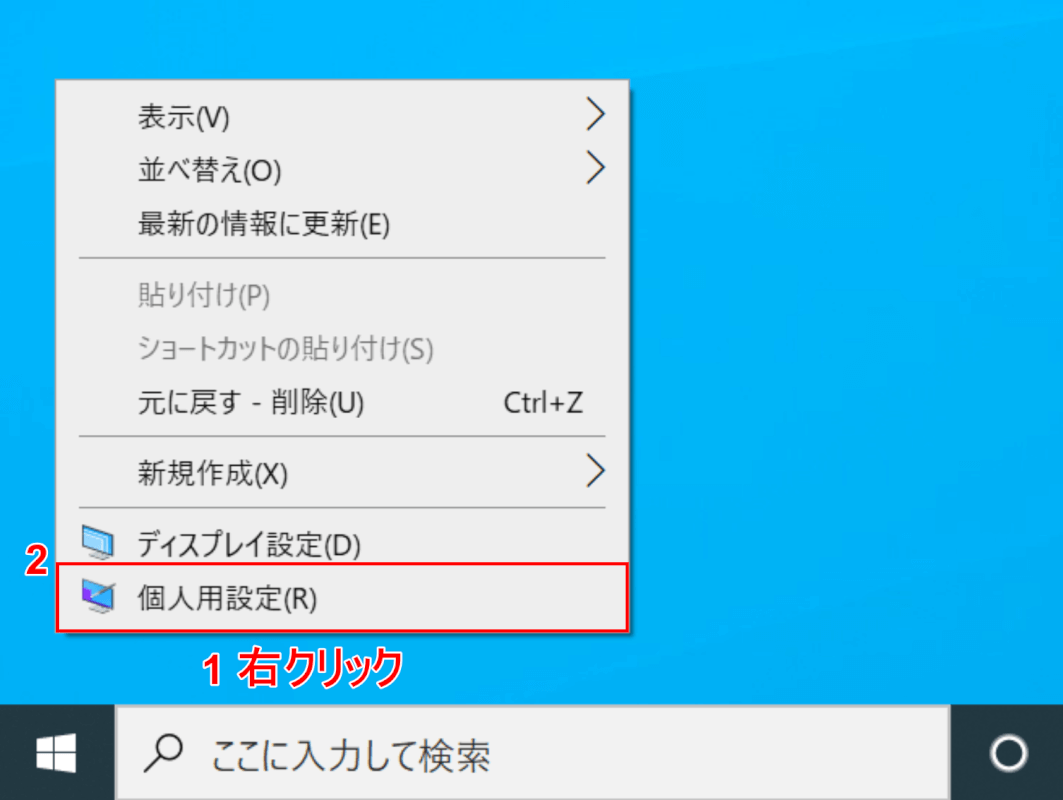
Windows 10を開きます。spacedeskを起動し、プライマリモニタとセカンダリモニタを接続します。
①【「プライマリモニタのデスクトップ」上で「右クリック」】し、②【個人用設定】を選択します。
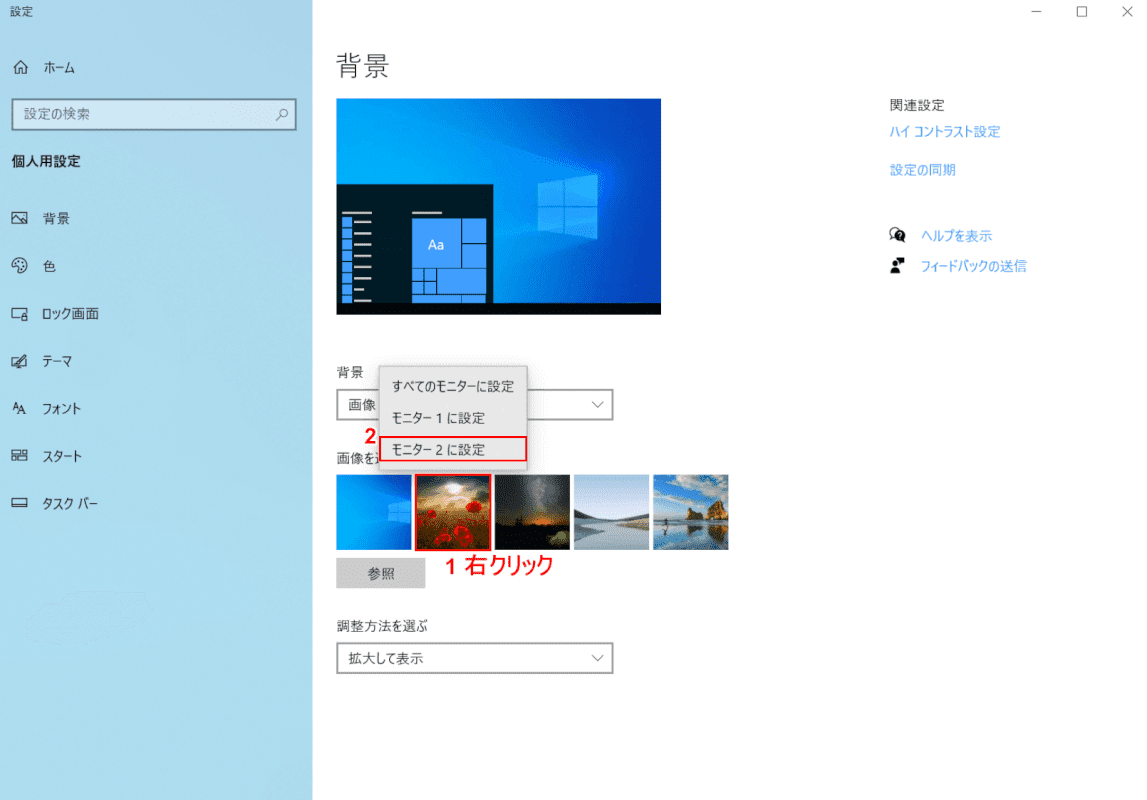
「設定」ダイアログボックスが表示されます。
①【「背景に設定したい画像」上で「右クリック」】し、②【モニター2に設定】を選択します。壁紙(背景)の設定が完了しました。
その他Windows 10の壁紙の設定に関する情報まとめについては以下の記事をご参照ください。
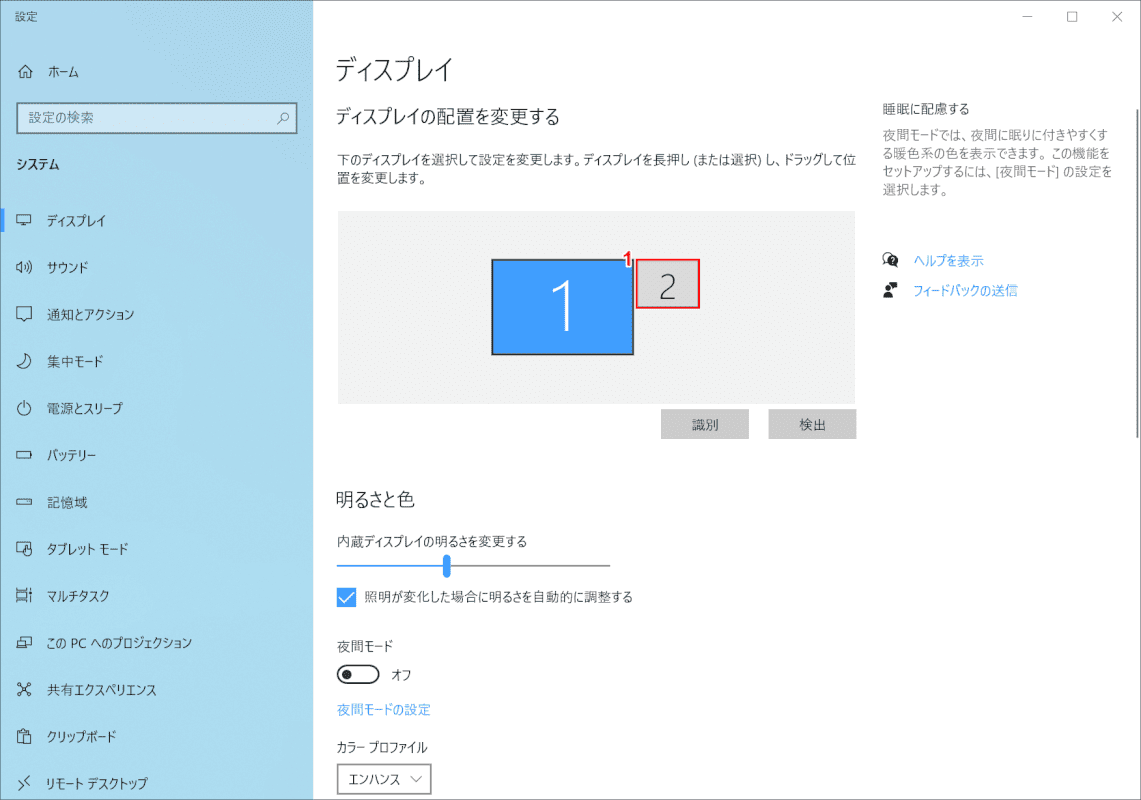
マルチディスプレイの解像度について
マルチディスプレイに解像度の異なる設定がされ、表示が崩れる場合は、セカンダリモニタの表示スケールを変更します。
「切り替える」セクションを参考に、「表示画面を拡張する」に設定してから以下の操作を行ってください。
Windows 10を開きます。spacedeskを起動し、プライマリモニタとセカンダリモニタを接続します。
①【「プライマリモニタのデスクトップ上」で「右クリック」】し、②【ディスプレイ設定】を選択します。
「設定」ダイアログボックスが表示されます。
【解像度を変更したいセカンダリモニタ(例:2)】を選択します。
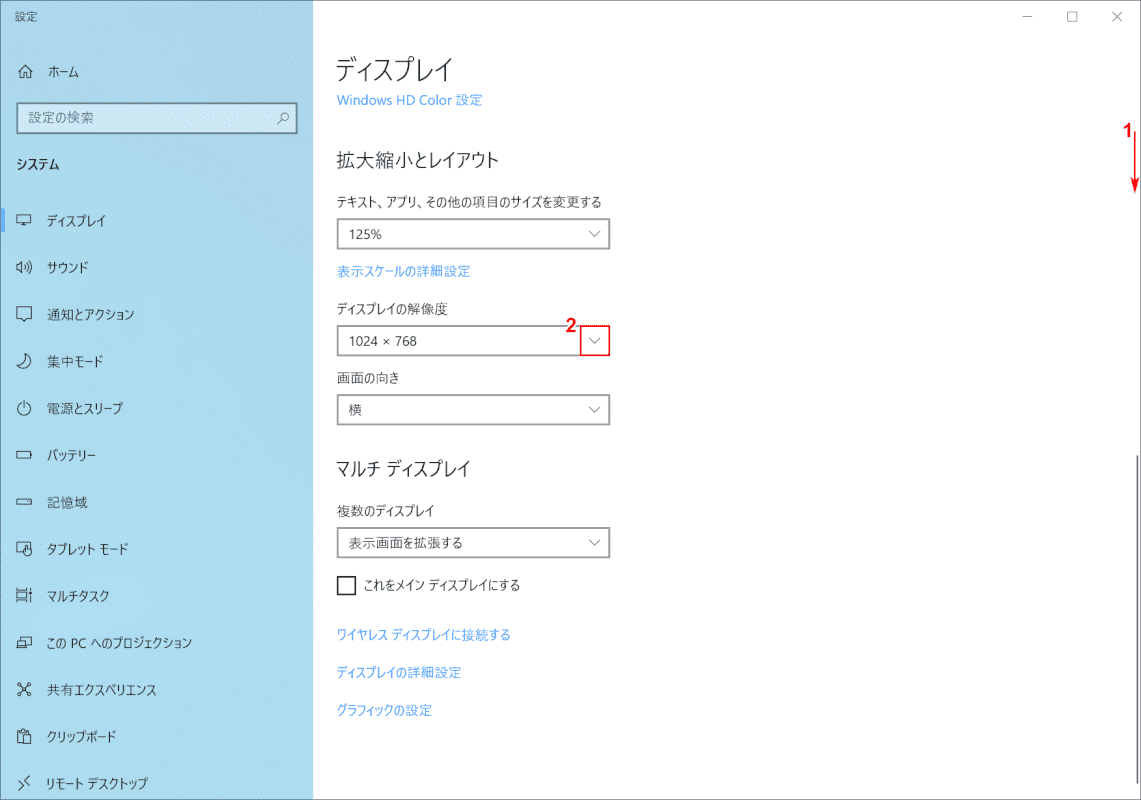
①【「スクロールバー」を「下へスクロール」】し、②【矢印】を押します。
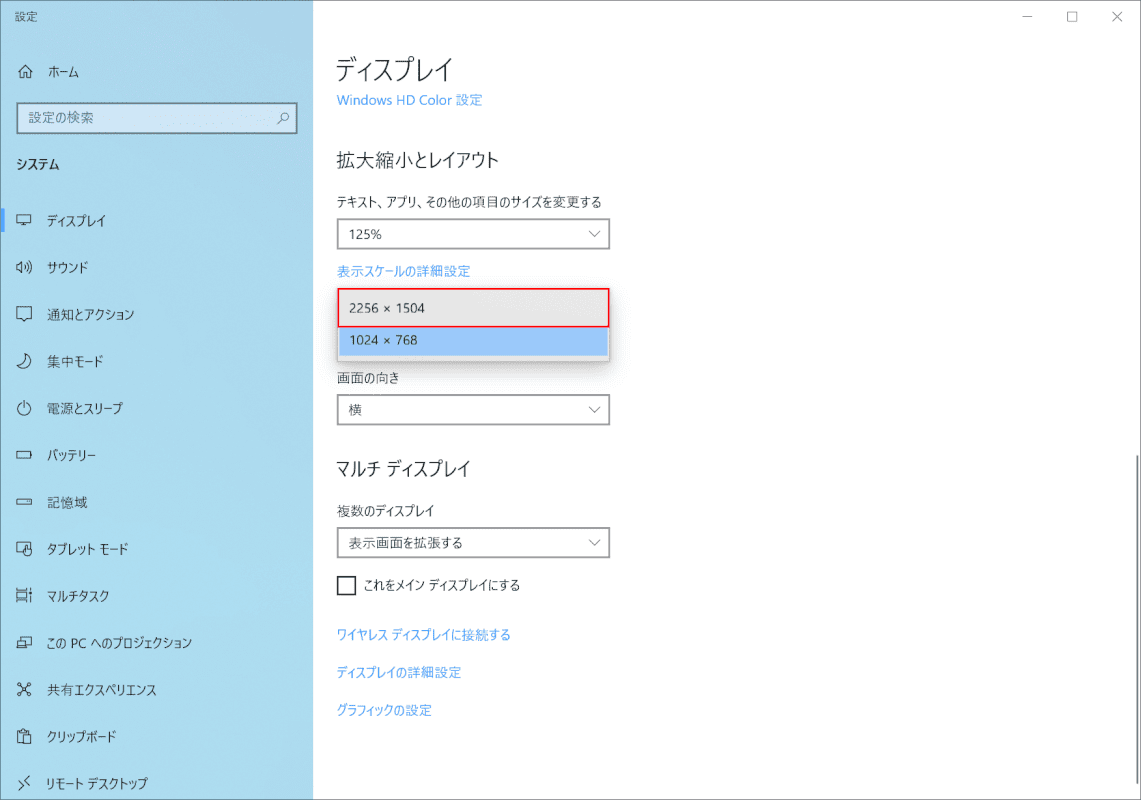
【「変更したい解像度(例:2256×1504)】を選択します。

「ディスプレイの設定を維持しますか?」ダイアログボックスが表示されます。
【変更の維持】ボタンを押します。
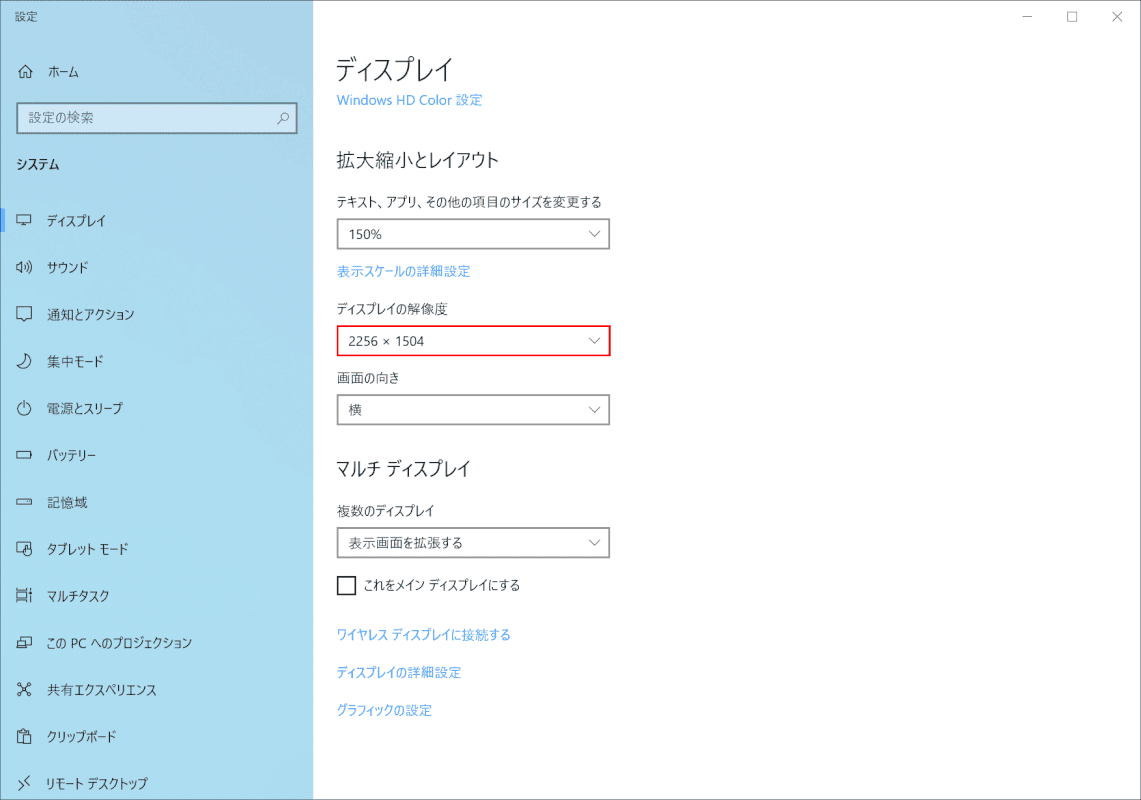
「ディスプレイの解像度(例:2256×1504)」の変更が完了しました。
マルチディスプレイのショートカット
ここでは、マルチディスプレイのショートカットについて解説します。
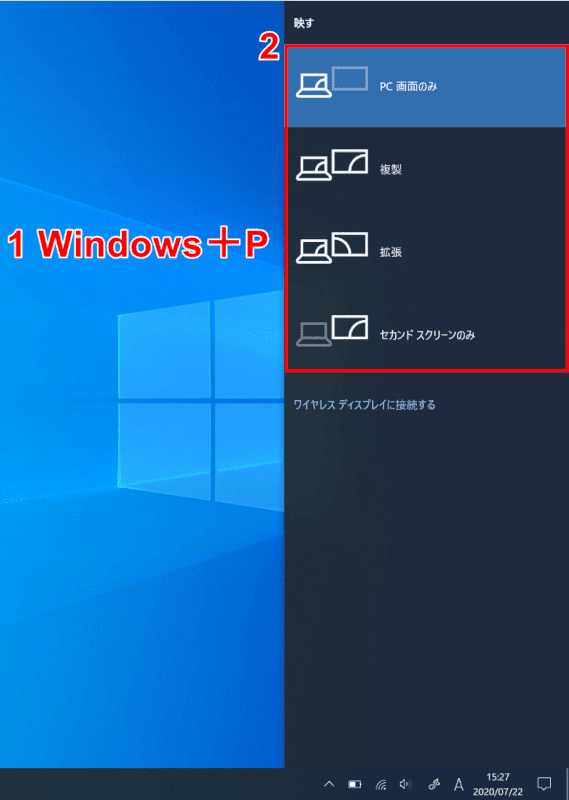
Windows 10を開きます。
①Windows+Pを押します。②マルチディスプレイの表示方法を一覧から変更できます。
Windows 10での仮想デスクトップの設定方法
Windows 10での仮想デスクトップの設定方法については以下の記事をご参照ください。
マルチディスプレイの不具合
マルチディスプレイの不具合については以下をご確認ください。
マルチディスプレイが設定できない
- パソコンを再起動する
- 「ディスプレイ設定」からモニタが認識されているか確認する
- プライマリモニタとセカンダリモニタを接続してから設定を開始する
- 「表示画面を拡張する」に設定してからモニタを個別に設定する
- spacedeskを使用の際は同じネットワーク上でデバイスを接続する
- spacedeskを再インストールする
マルチディスプレイが検出されない、認識しない
- パソコンを再起動する
- モニタ以外の周辺機器を外す
- ケーブルが正しく接続されているか確認する
- ケーブルを別の物に交換する
- 外部モニタを別の出力ポートに接続する
- 外部モニタを別のパソコンへ接続する
- ディスプレイアダプターが複数のモニタ出力に対応しているか確認する
- パソコンがマルチディスプレイに対応しているか確認する
- グラフィックドライバーを再インストールする
- オンボードのグラフィックアダプターを有効にする

モバイルモニター モバイルディスプレイゲーム cocopar15.6インチ スイッチ用モニター 非光沢IPS液晶パネル 薄い 軽量 1920x1080FHD FreeSync対応/ブルーカット機能 USB Type-C/HDMI/スピーカー内蔵/カバー付PS4/PS5/XBOX/Switch/PC/Macなど対応 在宅ワーク リモートワーク zs-156