
- 公開日:
ThunderbirdとOutlook間の移行について
この記事では、ThunderbirdとOutlook間の移行についての情報をご紹介します。
ThunderbirdとOutlook間でデータを移行する方法を知っておけば、会社や仕事、学校の都合などでメールソフトを変更しなくてはいけなくなった場合にスムーズに対応できます。
ぜひ参考にしてみて下さい。
ThunderbirdからOutlookへ移行する方法
ThunderbirdからOutlookへ移行する方法についてご紹介します。
ThunderbirdからOutlookへデータを移行したい場合は、最新版のThunderbirdではOutlook向けのインポートウィザードが無効化されているため古いバージョンのThunderbirdを使う必要があります。
古いバージョンのThunderbirdについては、Support Mozillaの「Outlook と Eudora からのインポート」セクションからダウンロードしてください。
メールデータ移行
ThunderbirdからOutlookへメールデータを移行する方法についてご説明します。

ThunderbirdからOutlookへメールデータを移行するには、MailStore Homeというソフトを使用します。
サイトにアクセスして、【Download MailStore Home(Free)】ボタンを押します。
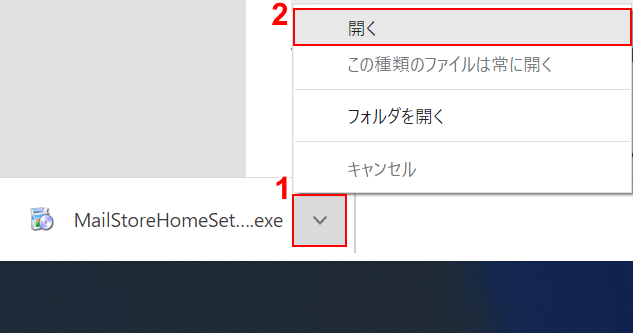
①「MailStoreHomeSetUp.exe」の【▽】、②【開く】の順に選択します。
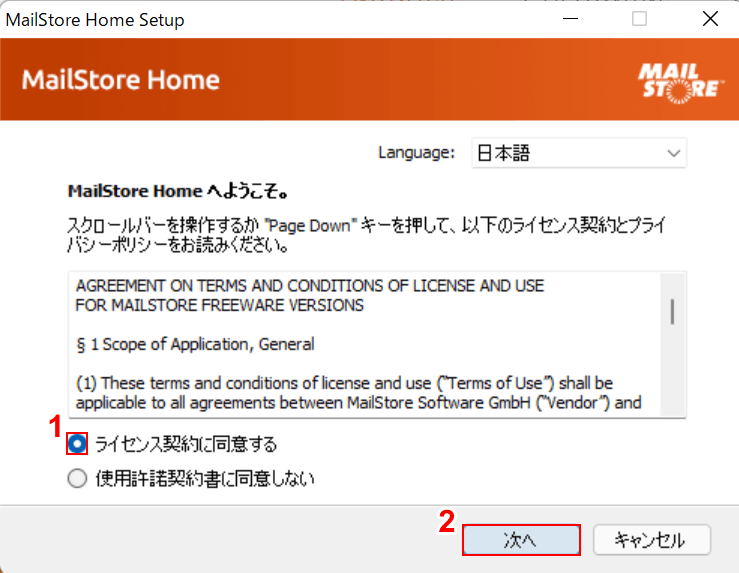
「MailStore Home SetUp」ダイアログボックスが表示されます。
①【ライセンス契約に同意する】を選択し、②【次へ】ボタンを押します。
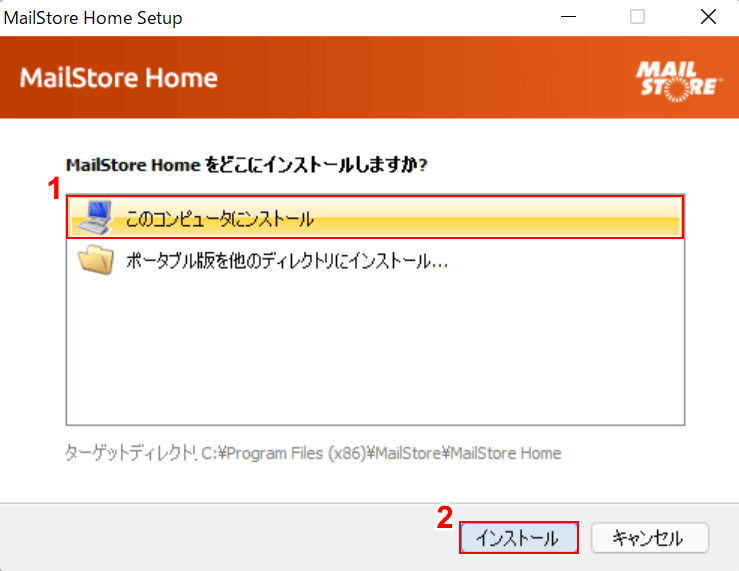
①【このコンピュータにインストール】を選択し、②【インストール】ボタンを押します。
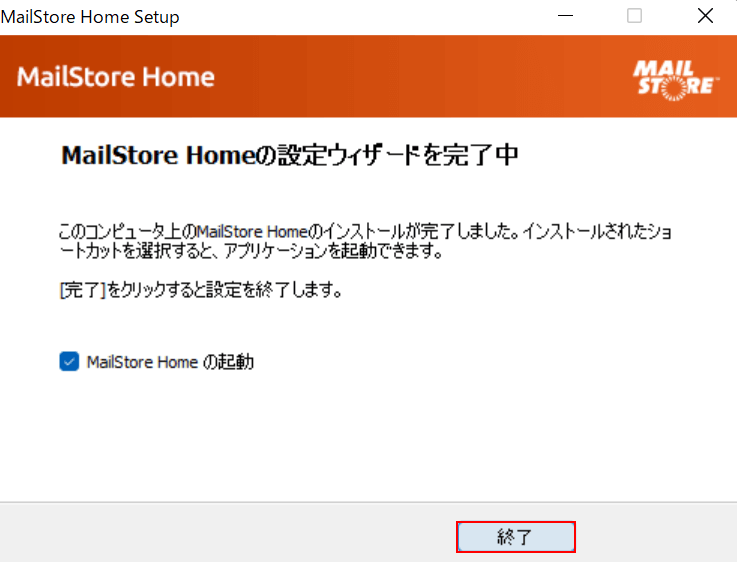
【終了】ボタンを押します。
「MailStore Home」が起動します。
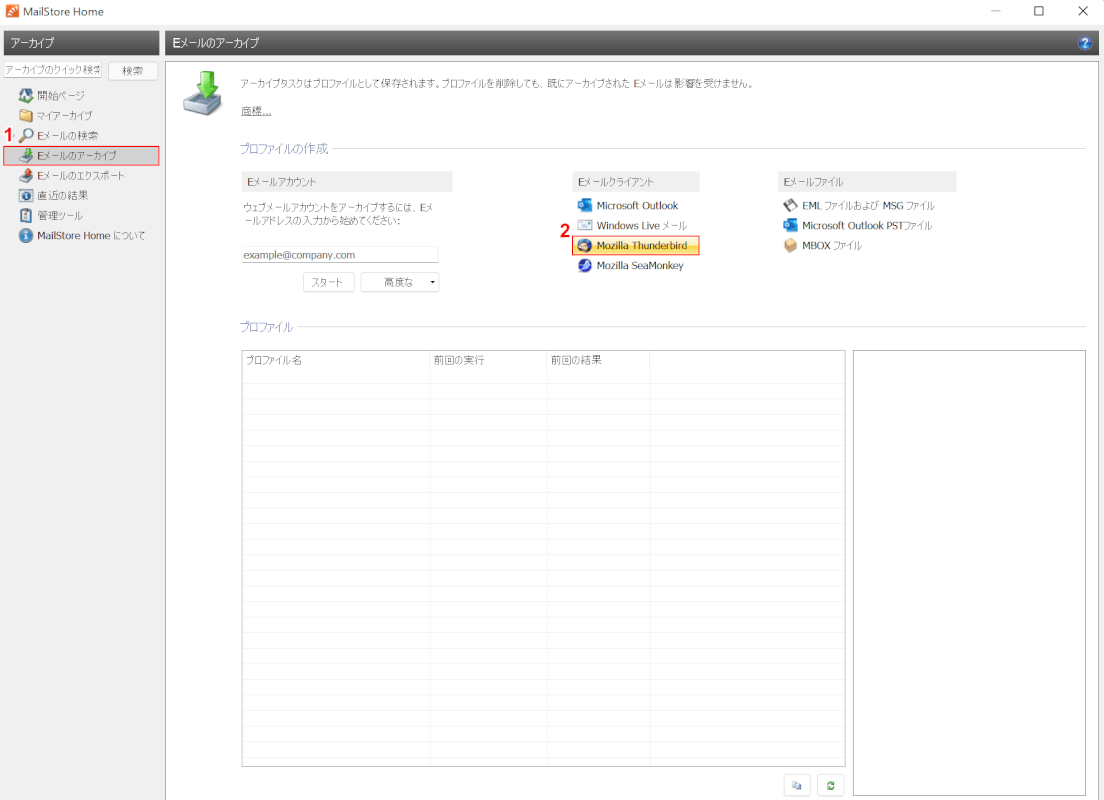
①【Eメールのアーカイブ】タブ、②【Mozilla Thunderbird】の順に選択します。
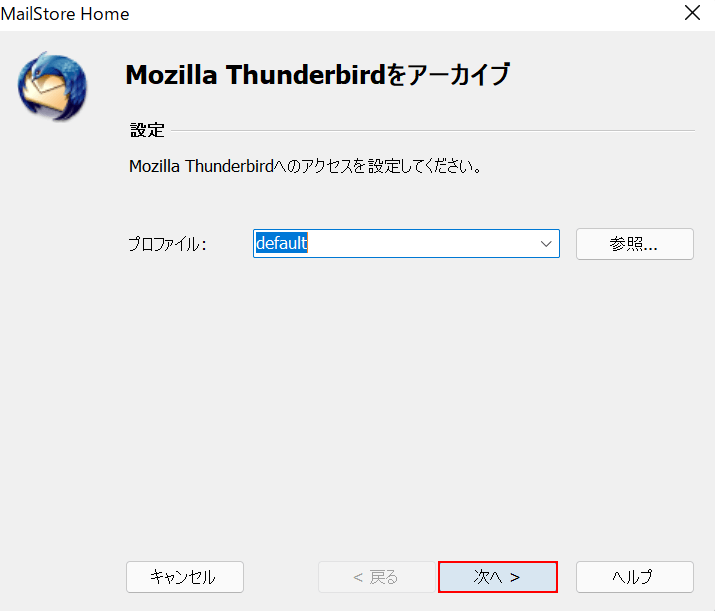
「Mozilla Thunderbirdをアーカイブ」ダイアログボックスが表示されます。
【次へ】ボタンを押します。
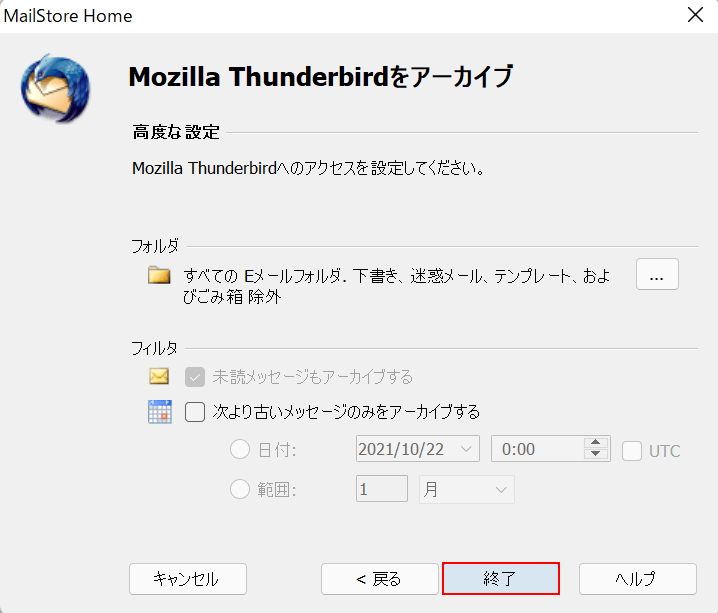
【終了】ボタンを押します。
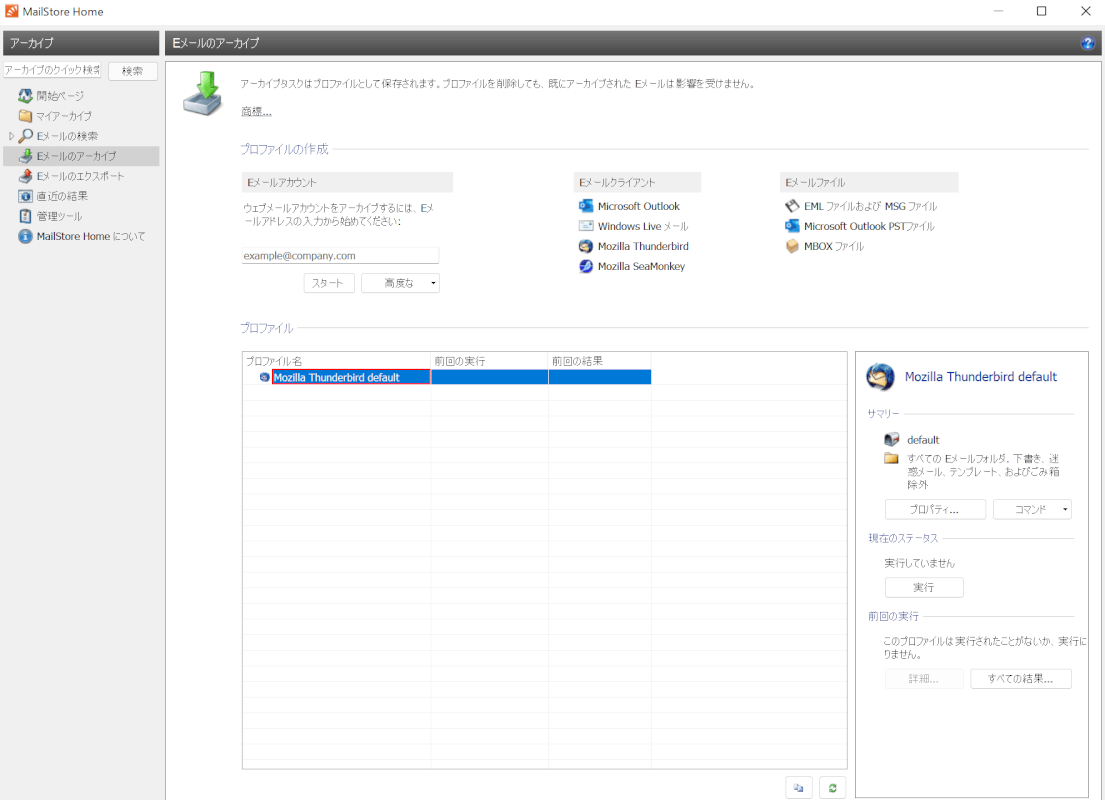
「プロファイル」にある「Mozilla Thunderbird default」を【ダブルクリック】します。
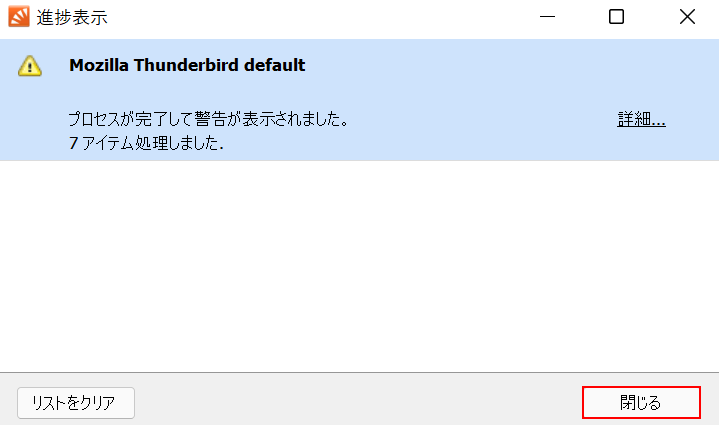
「進捗表示」ダイアログボックスが表示されます。
「処理しました。」のメッセージが表示されたら、【閉じる】ボタンを押します。
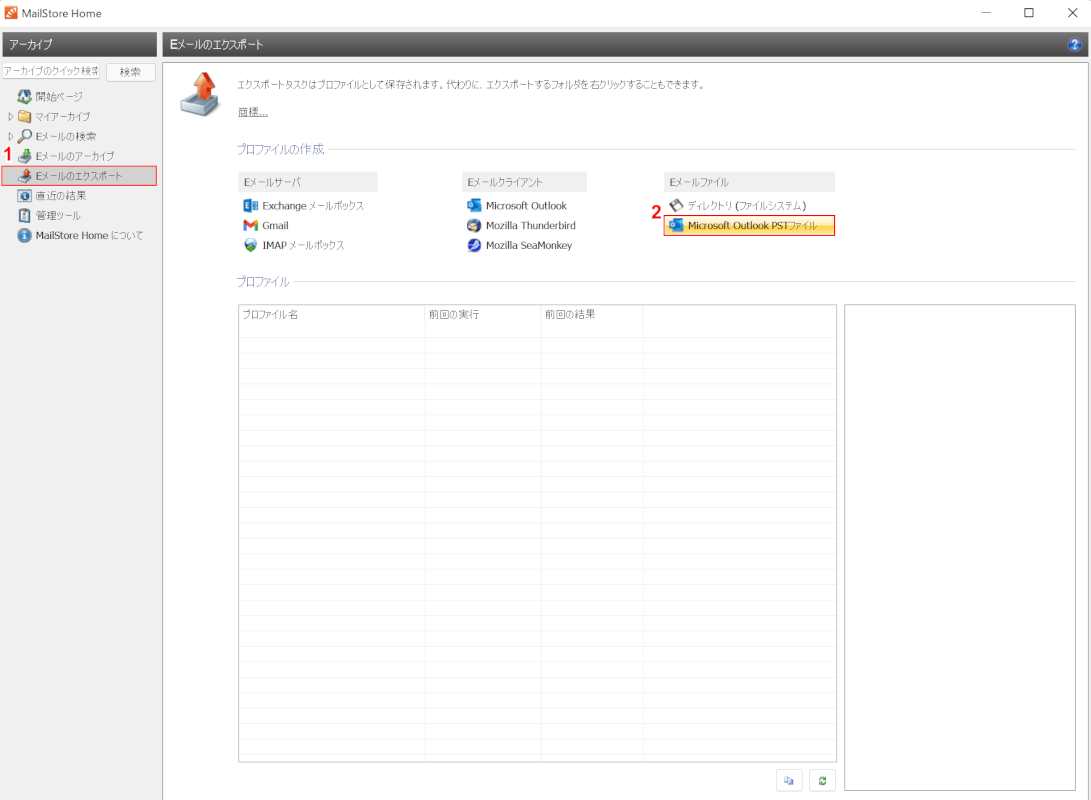
次に、エクスポートを行います。
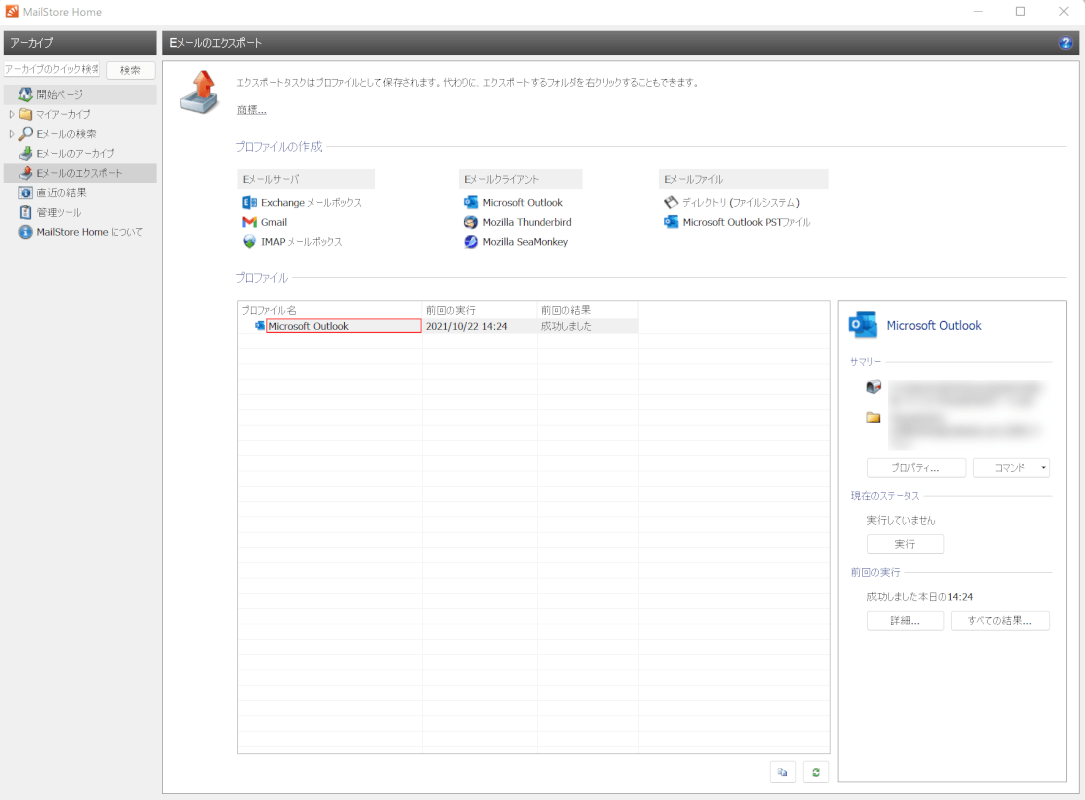
①【Eメールのエクスポート】タブ、②【Microsoft Outlook PSTファイル】の順に選択します。
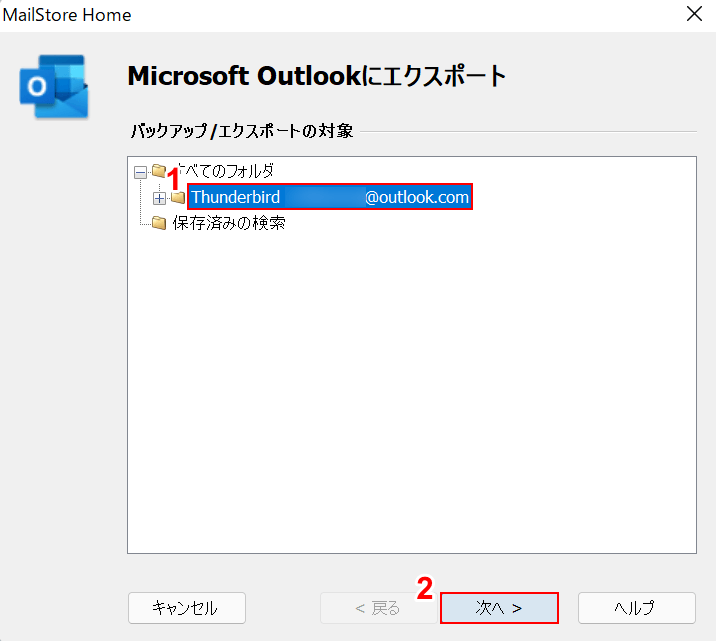
「Microsoft Outlookにエクスポート」ダイアログボックスが表示されます。
①【先ほど保存したアーカイブファイル(例:Thunderbird(メールアドレス)】を選択し、②【次へ】ボタンを押します。
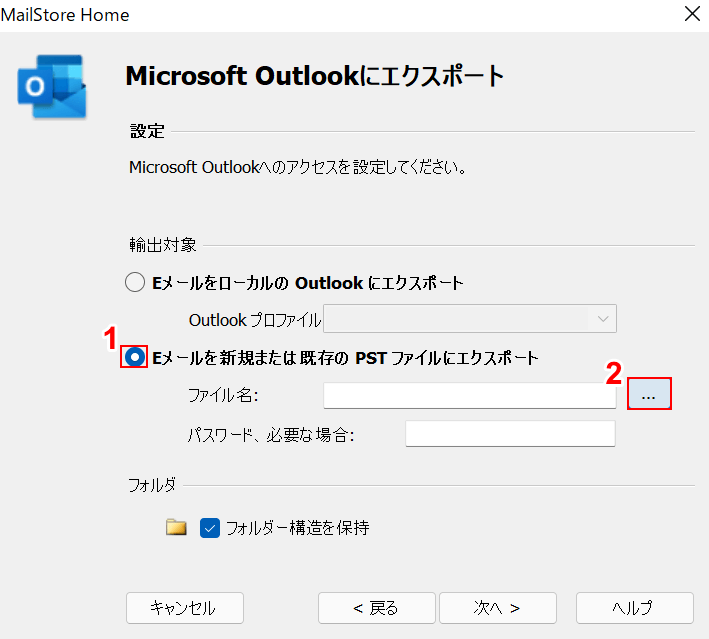
①【Eメールを新規または既存の PSTファイルにエクスポート】、②【…】の順に選択します。
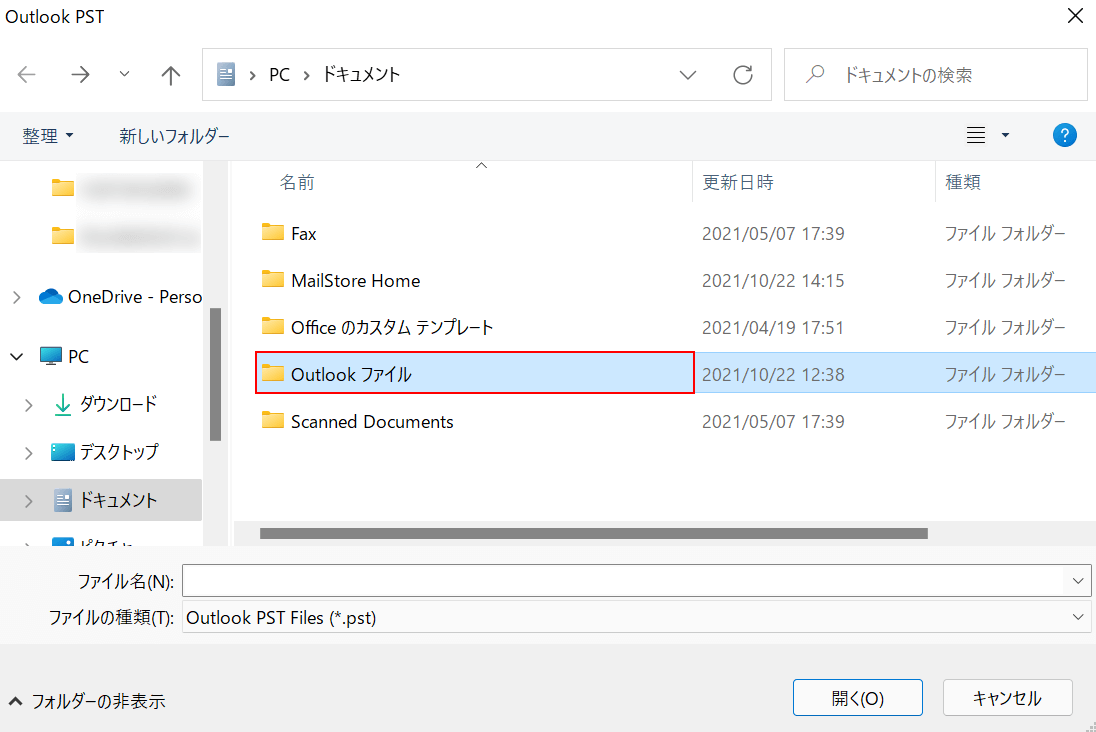
「Outlook PST」ダイアログボックスが表示されます。
「Outlook ファイル」を【ダブルクリック】します。
「Outlook ファイル」のフォルダが開きます。
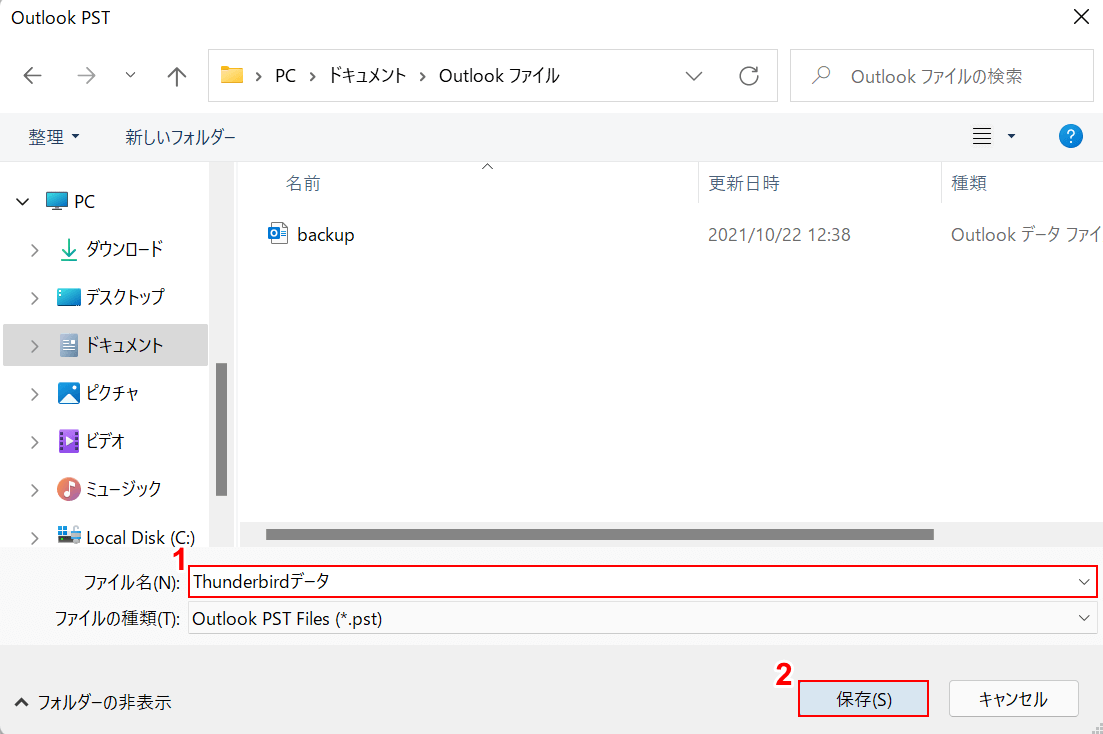
①「ファイル名」に『任意の名前(例:Thunderbirdデータ)』を入力し、②【保存】ボタンを押します。
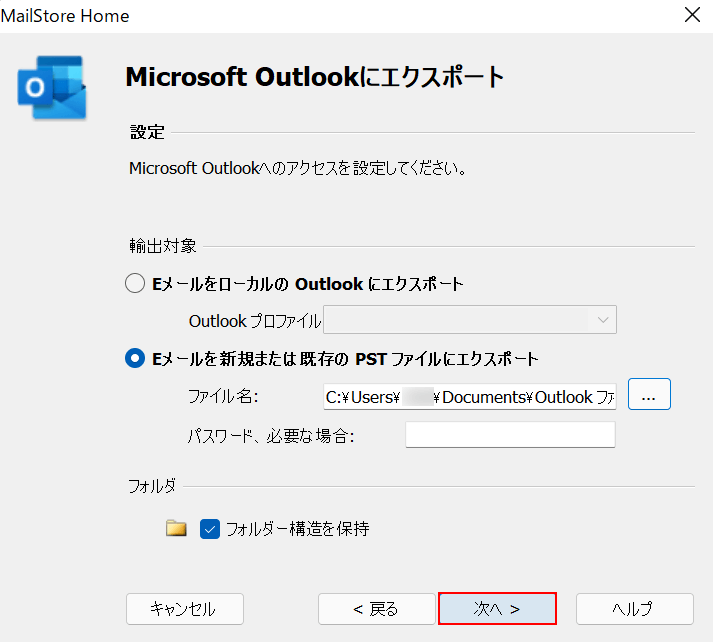
「Microsoft Outlookにエクスポート」ダイアログボックスに戻ります。
【次へ】ボタンを押します。
「プロファイル」にある「Microsoft Outlook」を【ダブルクリック】します。
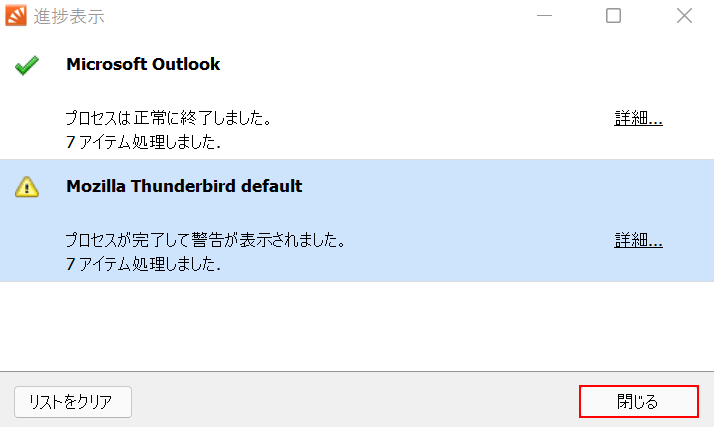
「進捗表示」ダイアログボックスが表示されます。
「処理しました。」のメッセージが表示されたら、【閉じる】ボタンを押します。
これで、「MailStore Home」ソフトでの操作は終了です。
次に、Outlookにデータをインポートします。
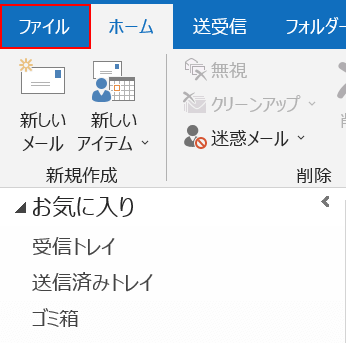
Outlookを起動し、【ファイル】タブを選択します。
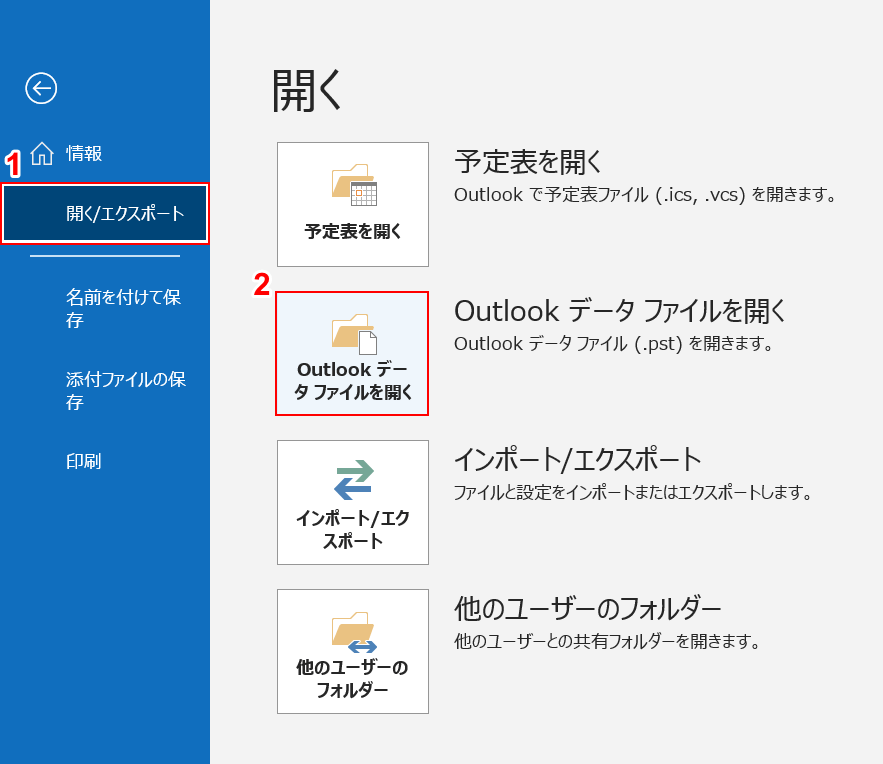
①【開く/エクスポート】、②【Outlook データ ファイルを開く】の順に選択します。
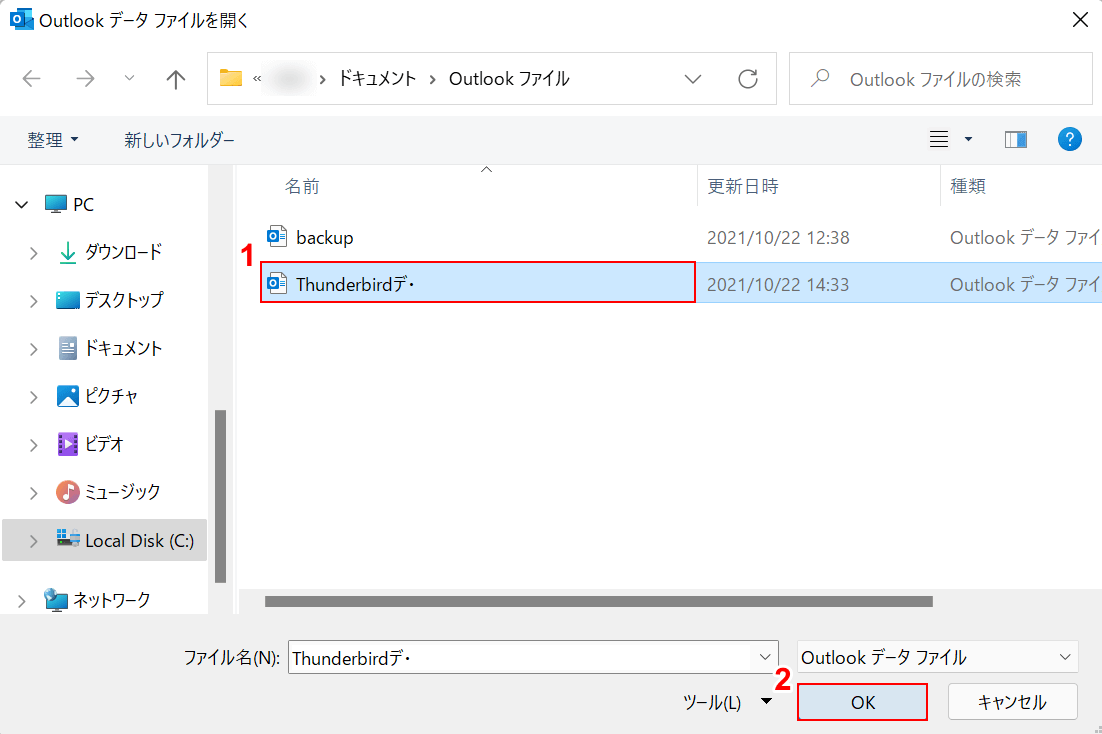
「Outlook データ ファイルを開く」ダイアログボックスが表示されます。
①【先ほどエクスポートしたPSTファイル】を選択し、②【OK】ボタンを押します。
PSTファイルになっていない場合は、出力したデータのファイル名の最後に「.pst」を書き加えましょう。
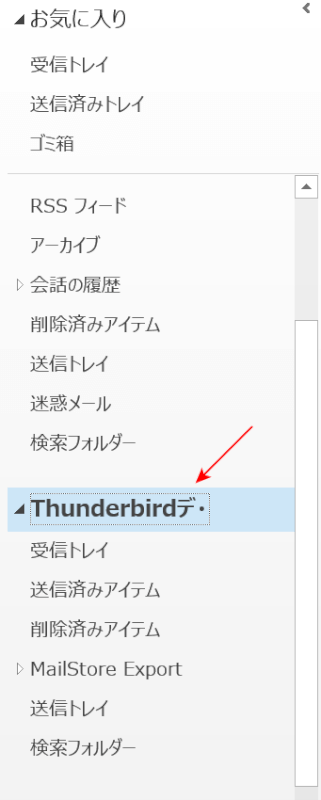
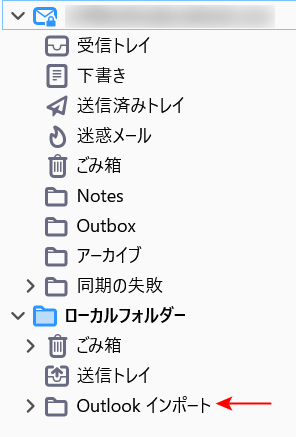
これで、ThunderbirdのメールデータがOutlookに取り込まれます。
Outlookを確認すると、赤い矢印で示したようにThunderbirdのデータが取り込まれていることが確認できます。
これで操作は終了です。
アドレス帳移行
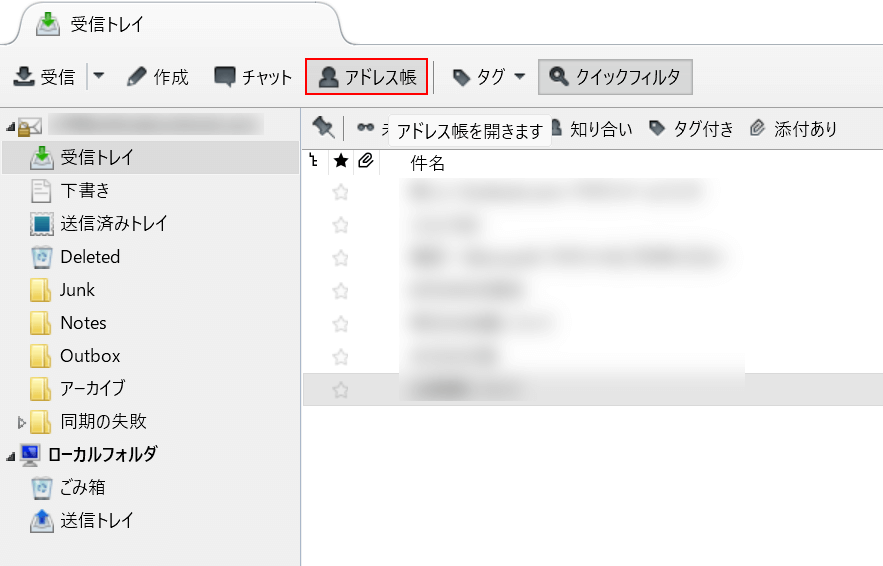
Thunderbirdを起動し、【アドレス帳】を選択します。
「アドレス帳」ダイアログボックスが表示されます。
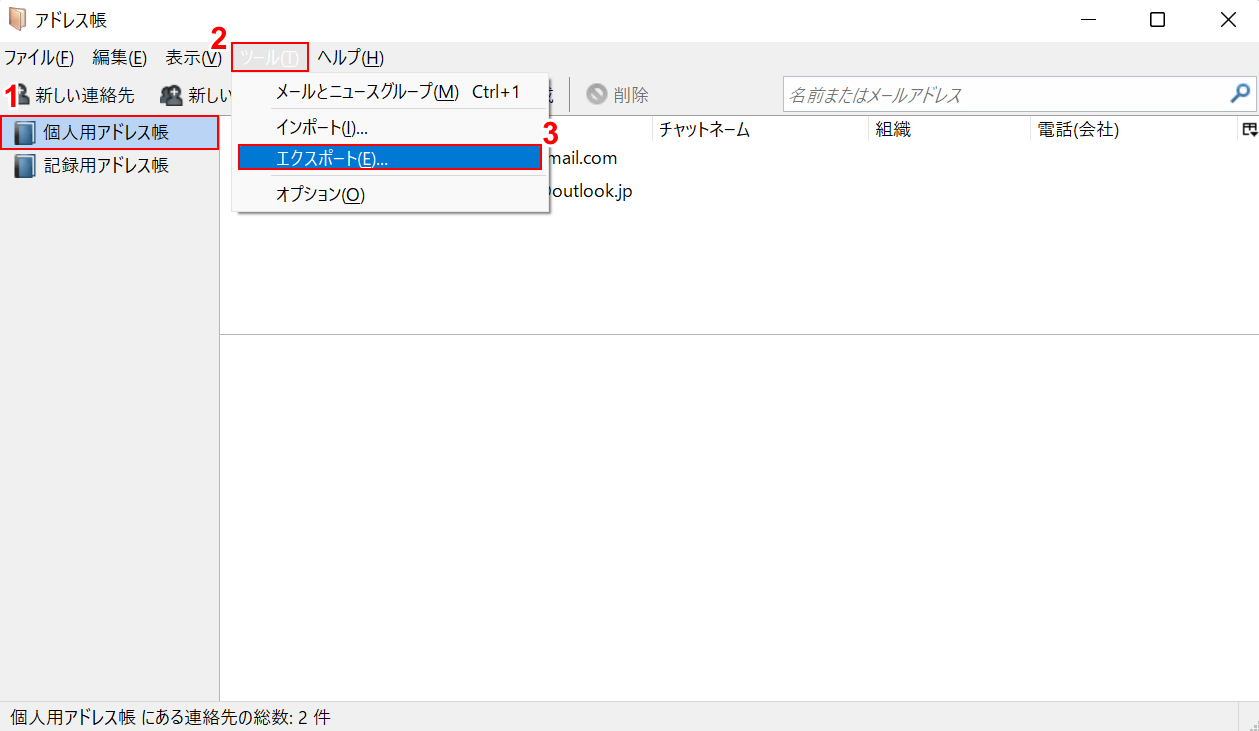
①【個人用アドレス帳】、②【ツール】、③【エクスポート】の順に選択します。
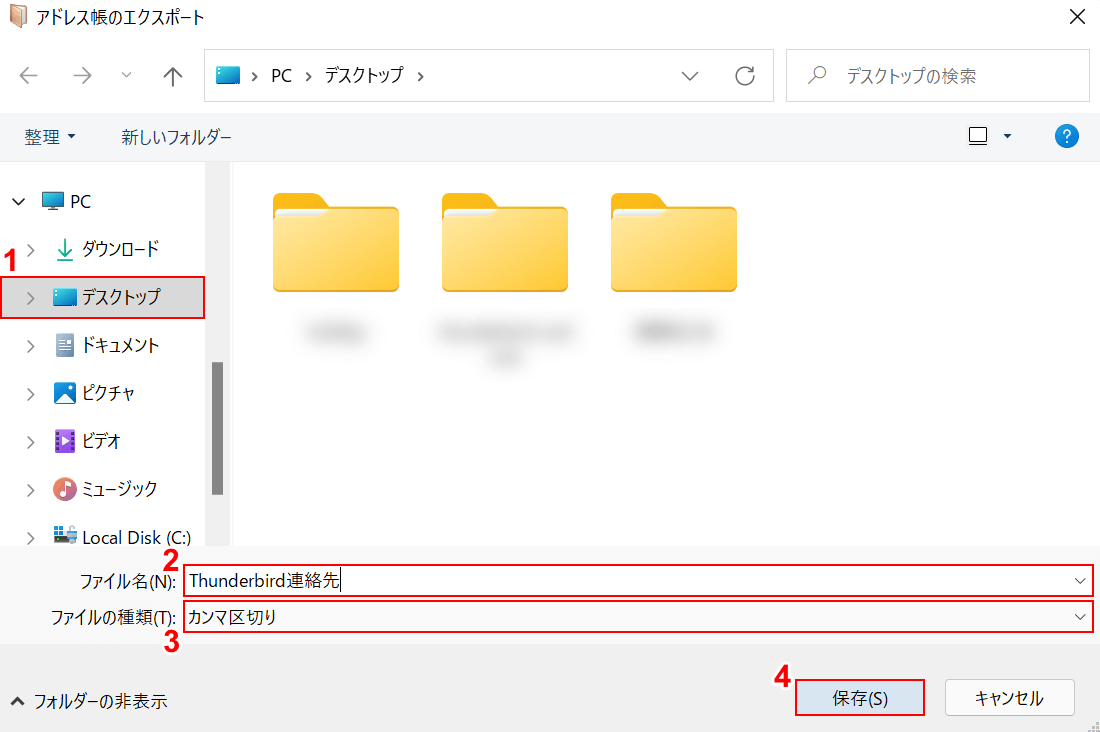
「アドレス帳のエクスポート」ダイアログボックスが表示されます。
①【任意の保存先(例:デスクトップ)】を選択し、②「ファイル名」に『任意の名前(例:Thunderbird連絡先)』を入力します。
③「ファイルの種類」の【カンマ区切り】を選択し、④【保存】ボタンを押すとアドレス帳のデータがエクスポートされます。
次に、Outlookにエクスポートした連絡先データをインポートします。
Outlookを起動し、【ファイル】タブを選択します。
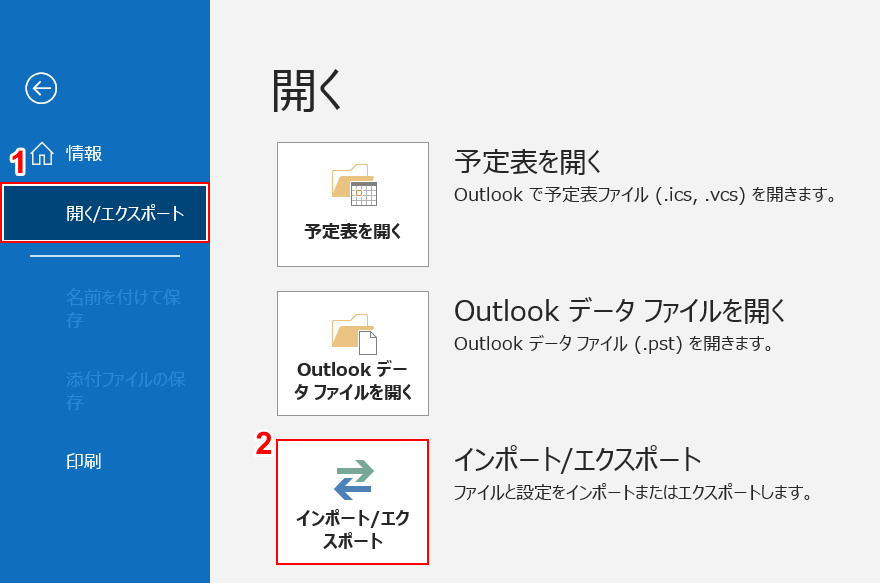
①【開く/エクスポート】、②【インポート/エクスポート】の順に選択します。
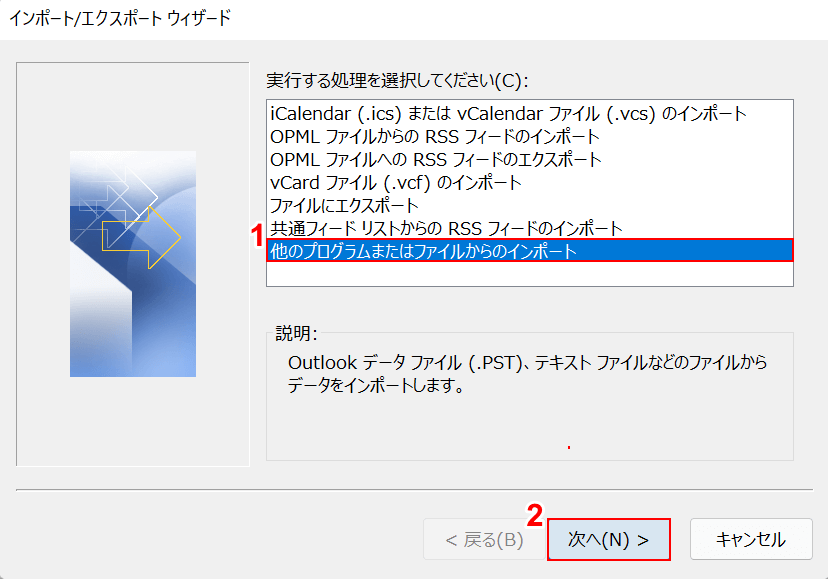
「インポート/エクスポート ウィザード」ダイアログボックスが表示されます。
①【他のプログラムまたはファイルからのインポート】を選択し、②【次へ】ボタンを押します。
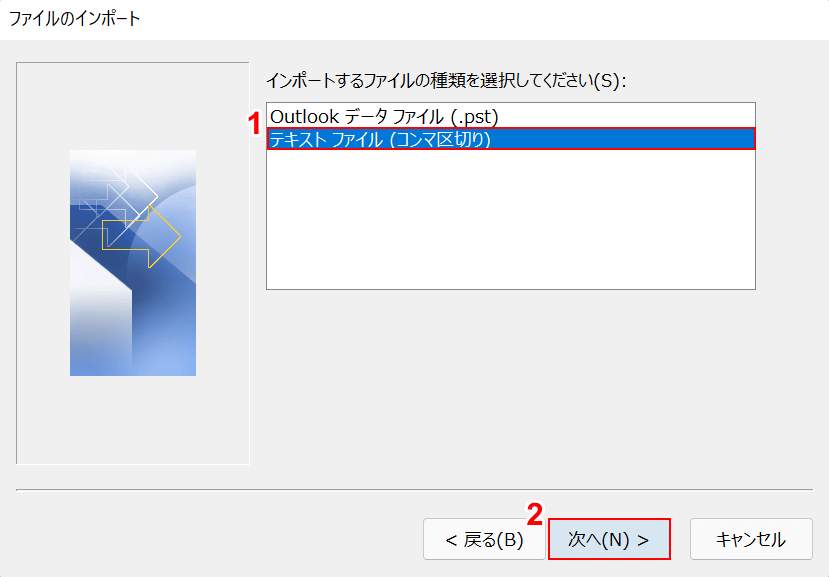
「ファイルのインポート」ダイアログボックスが表示されます。
①【テキスト ファイル(コンマ区切り)】を選択し、②【次へ】ボタンを押します。
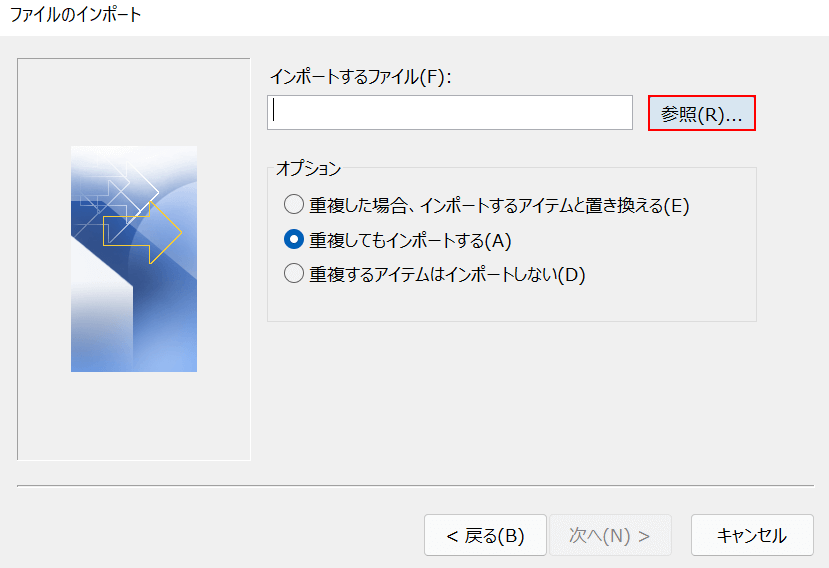
【参照】ボタンを押します。
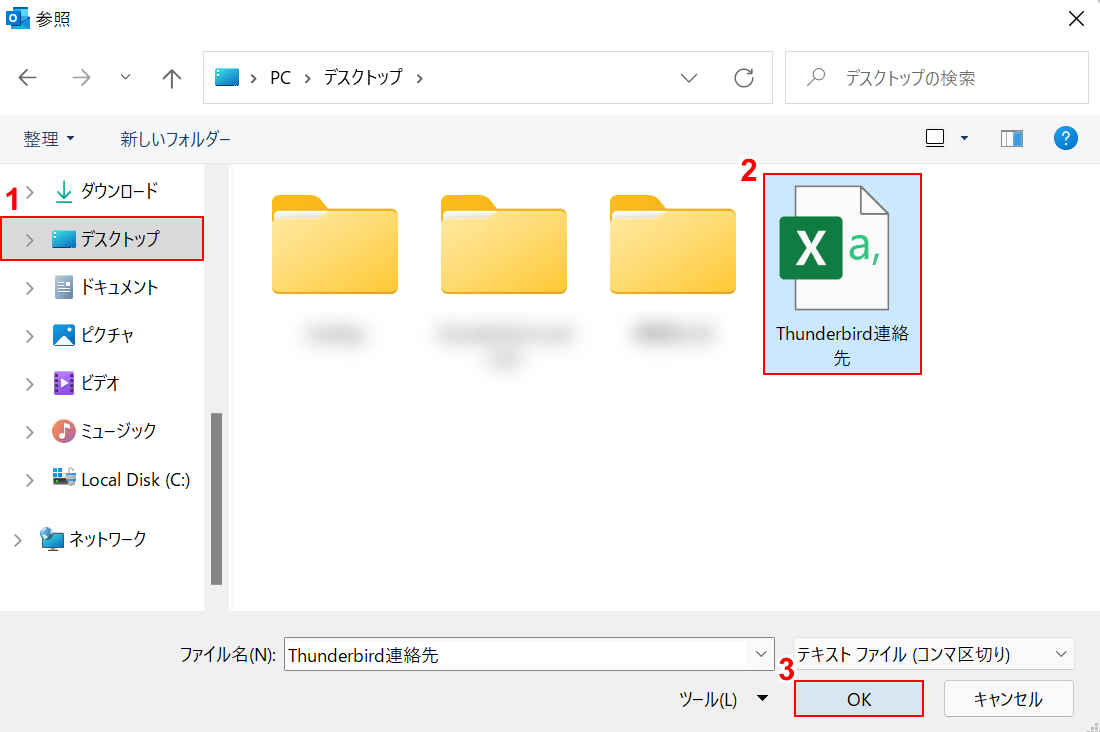
「参照」ダイアログボックスが表示されます。
①【ファイルの保存先(例:デスクトップ)】、②【エクスポートしたファイル(例:Thunderbird連絡先)】の順に選択し、③【OK】ボタンを押します。
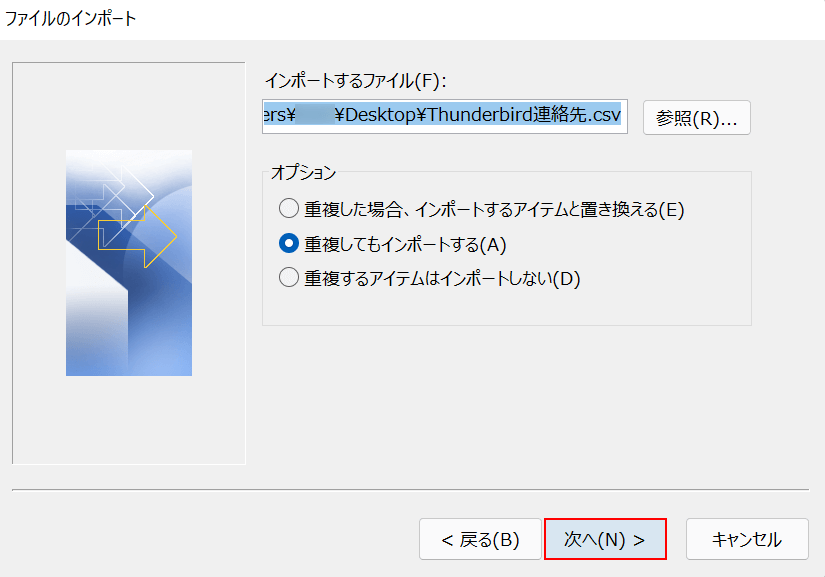
【次へ】ボタンを押します。
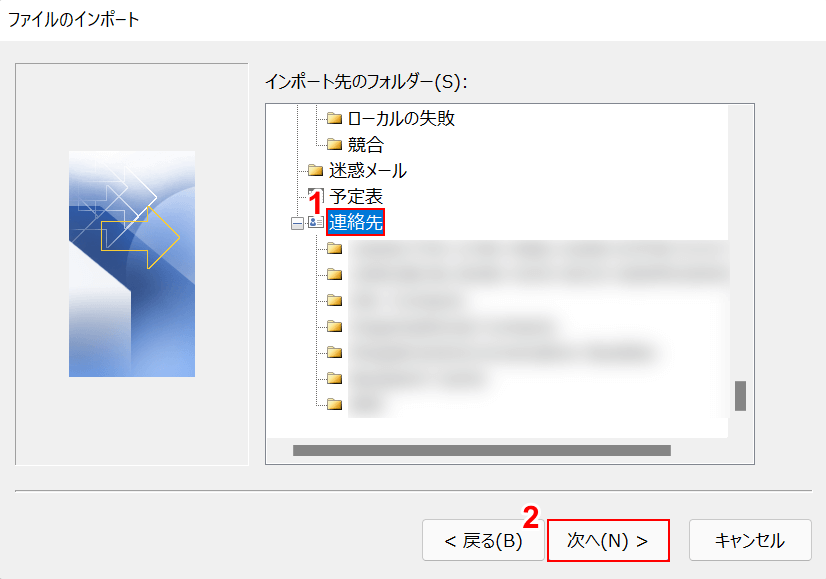
インポート先のフォルダーを選択します。
①【連絡先】を選択し、②【次へ】ボタンを押します。
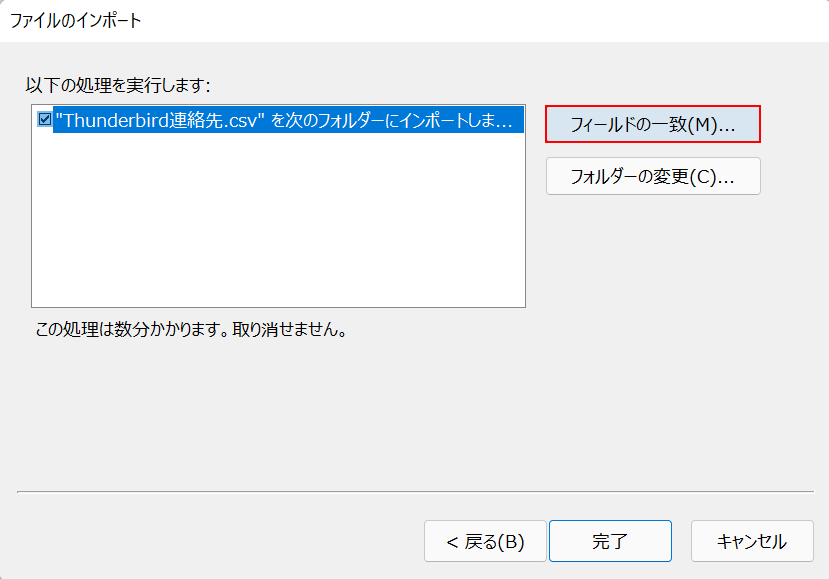
【フィールドの一致】ボタンを押します。
「フィールドの一致」ダイアログボックスが表示されます。
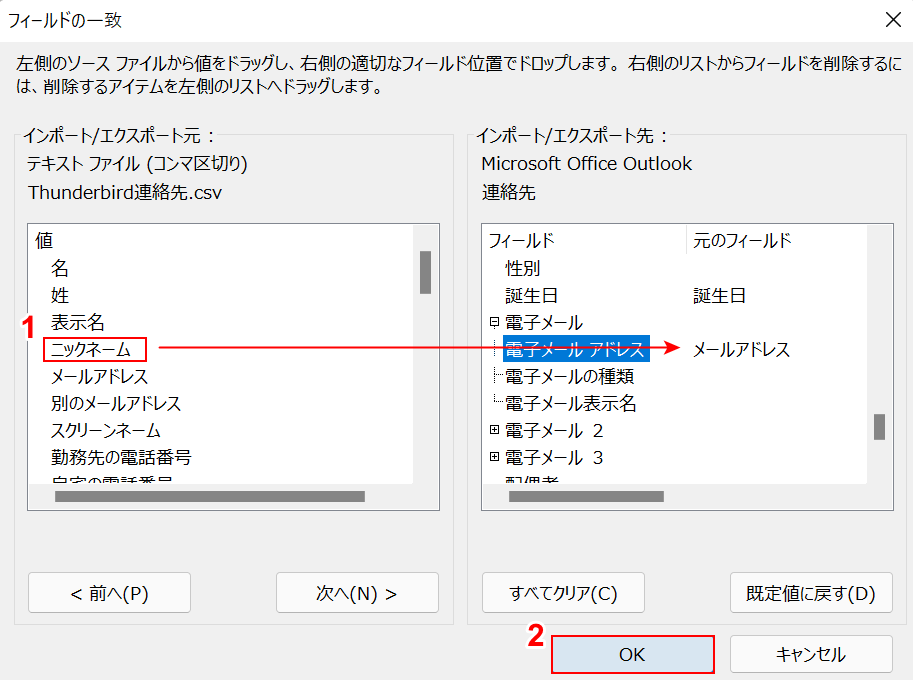
①左側のファイルから「任意の項目(例:ニックネーム)」を、右のフィールドに【ドラッグ】します。
②必要な項目を全て適切な位置にドラッグしたら、【OK】ボタンを押します。
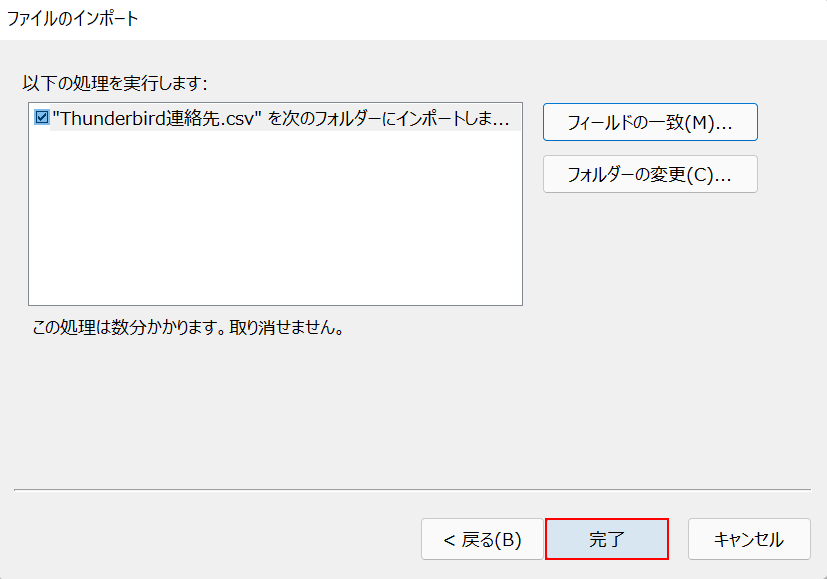
【完了】ボタンを押すと、Outlookに連絡先がインポートされます。
正しくインポートできているか確認してみましょう。
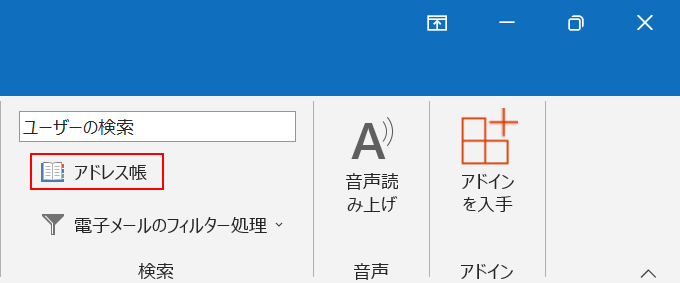
Outlookを起動し、【アドレス帳】を選択します。
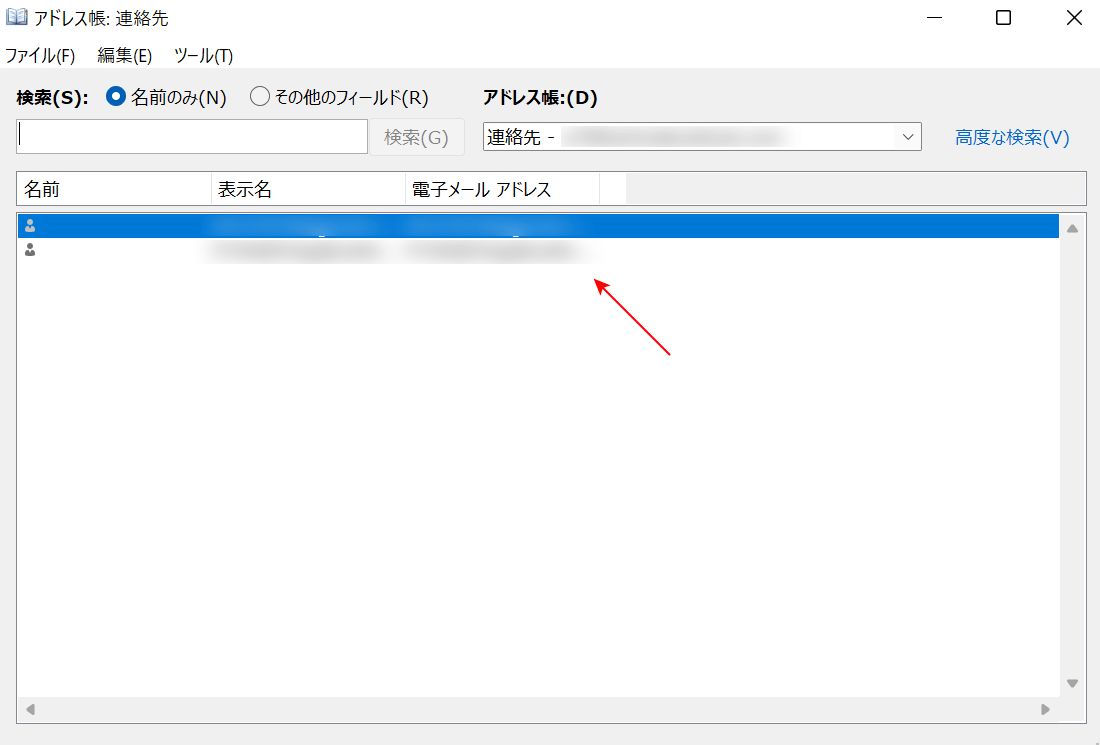
「アドレス帳:連絡先」ダイアログボックスが表示されます。
Thunderbirdからエクスポートした連絡先が表示されていれば、問題なくインポートできています。
これで操作は終了です。
OutlookからThunderbirdへ移行する方法
OutlookからThunderbirdへ移行する方法についてご紹介します。
OutlookからThunderbirdへの移行は、最新版のThunderbirdで可能です。
メールデータ移行
OutlookからThunderbirdへメールデータを移行する方法についてご説明します。
Thunderbirdを起動します。
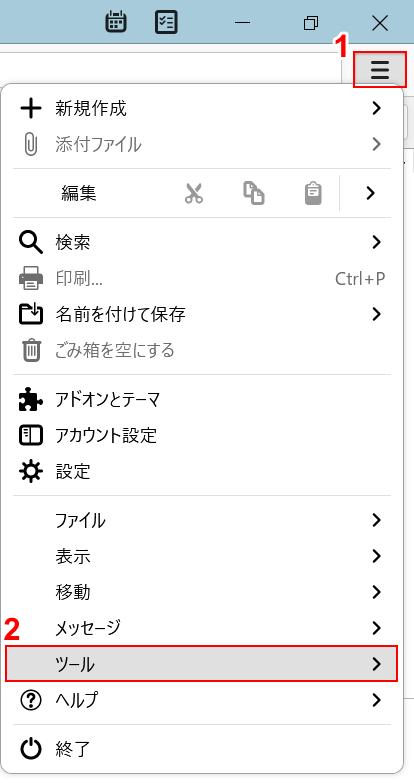
①画面右上の【縦三重線】、②【ツール】の順に選択します。

【設定とデータのインポート】を選択します。
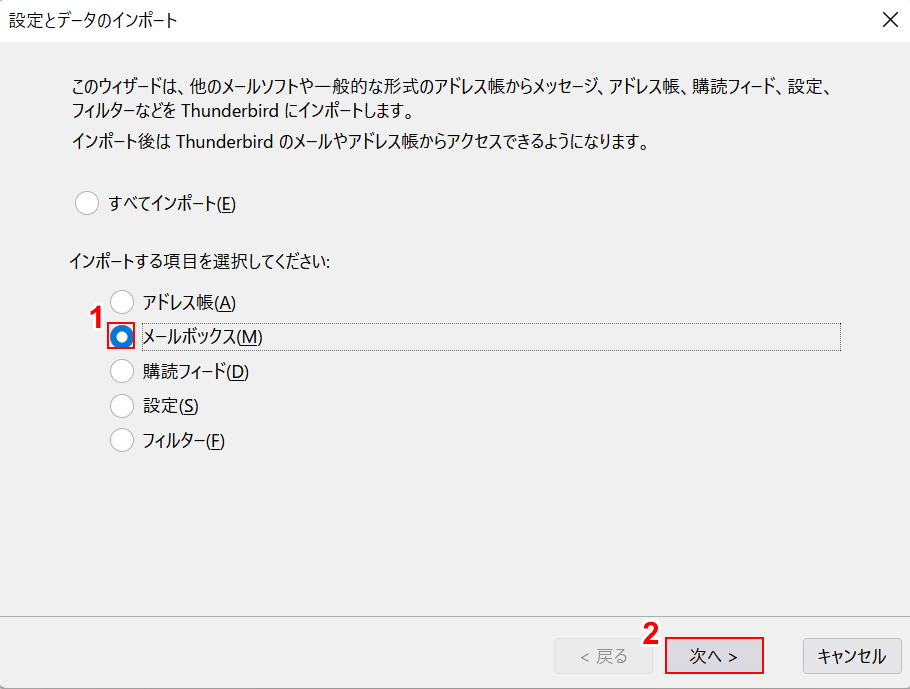
「設定とデータのインポート」ダイアログボックスが表示されます。
①【メールボックス】を選択し、②【次へ】ボタンを押します。
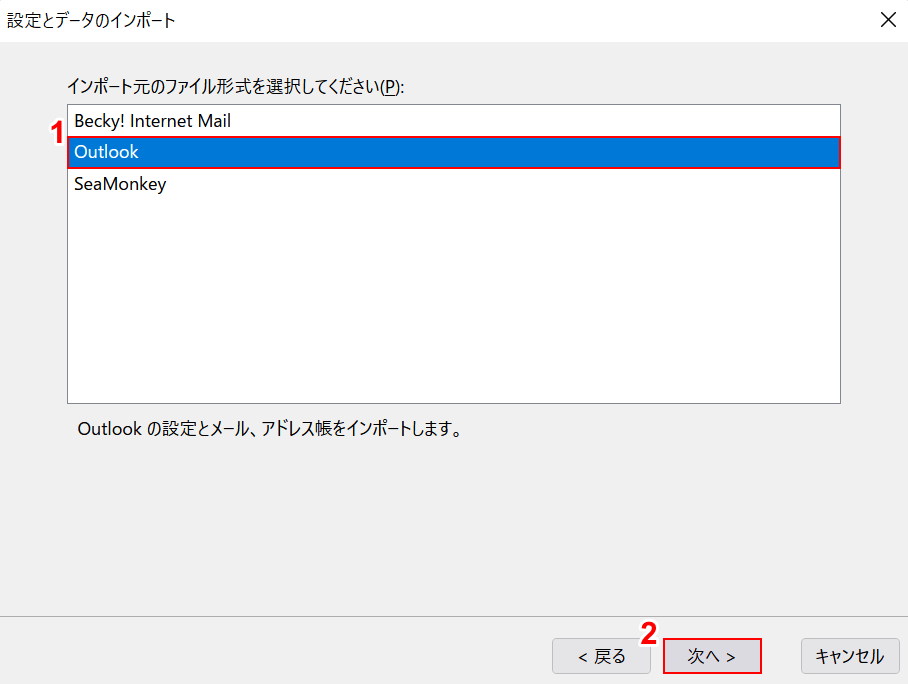
①【Outlook】を選択し、②【次へ】ボタンを押します。
これで、ThunderbirdにOutlookのメールデータがインポートされます。
アドレス帳移行
OutlookからThunderbirdへアドレス帳を移行する方法についてご紹介します。
Thunderbirdを起動します。
①画面右上の【縦三重線】、②【ツール】の順に選択します。
【設定とデータのインポート】を選択します。
「設定とデータのインポート」ダイアログボックスが表示されます。
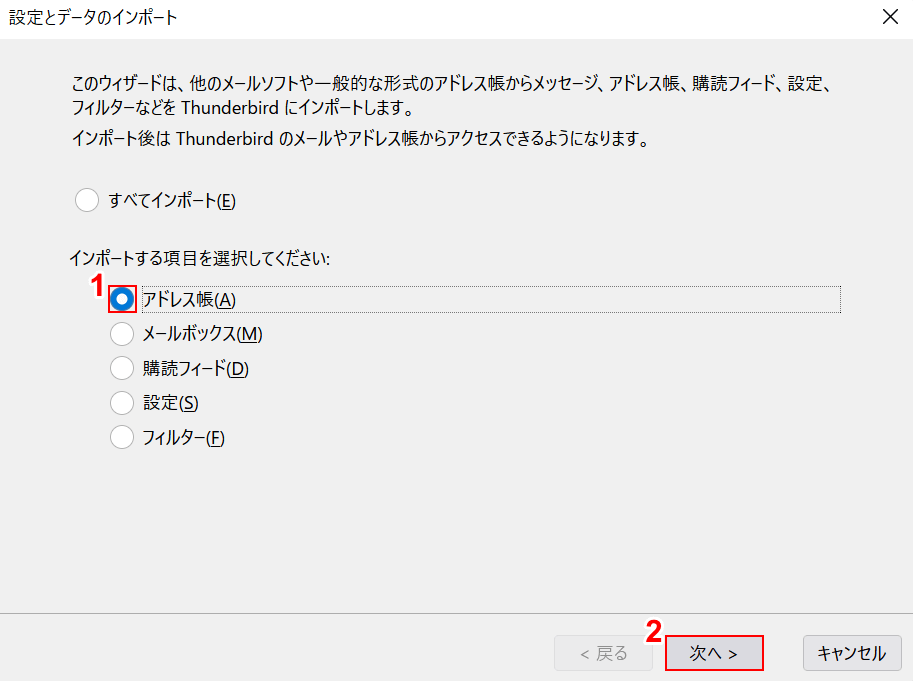
①【アドレス帳】を選択し、②【次へ】ボタンを押します。
①【Outlook】を選択し、②【次へ】ボタンを押します。
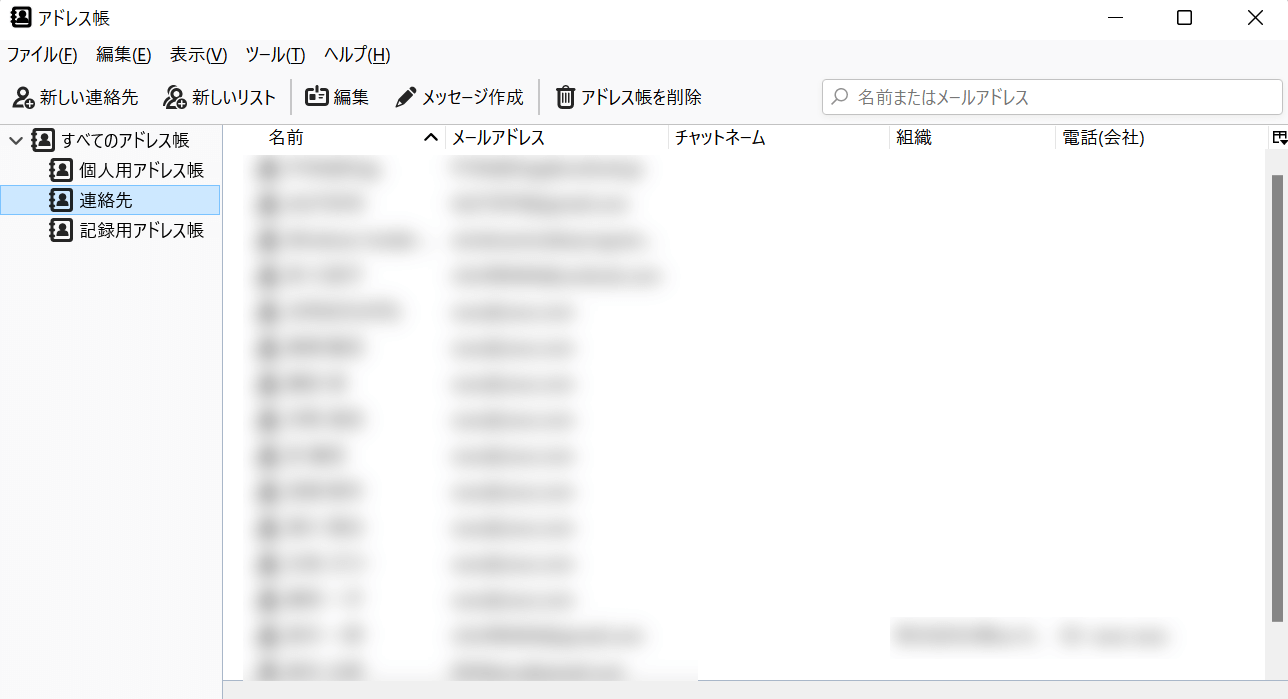
これで、Outlookのアドレス帳をThunderbirdに移行することが出来ました。
Thunderbirdのアドレス帳をみると、Outlookのアドレス帳がインポートされていることが確認できます。