
- 公開日:
Windows 10のアイコンを変更する方法(変更できない時の対処含む)
Windows 10では表示するアイコンを変更することができます。
アイコンの画像やフォントの種類/色を変更したり、オリジナルのアイコンにすることでフォルダーに何が保存されているかわかりやすくしたり、好みの色や画像を使うことで作業を楽しくすることができます。
フォルダーのアイコンを変更する
Windows 10に標準で用意されているフォルダーアイコンに変更する手順は、以下のとおりです。
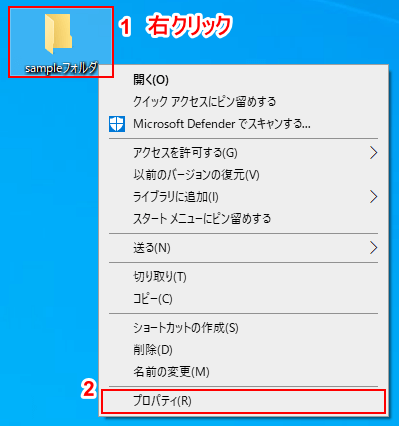
①「アイコンを変更したいフォルダー(例:sampleフォルダ)」を【右クリック】し、②【プロパティ】を選択します。
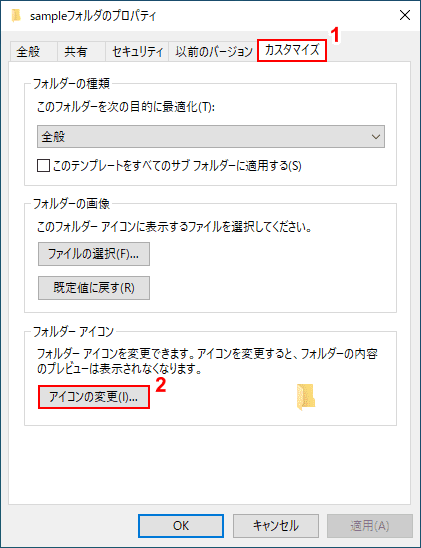
「sampleフォルダのプロパティ」ダイアログボックスが表示されました。①【カスタマイズ】タブを選択し、②【アイコンの変更】ボタンを押します。
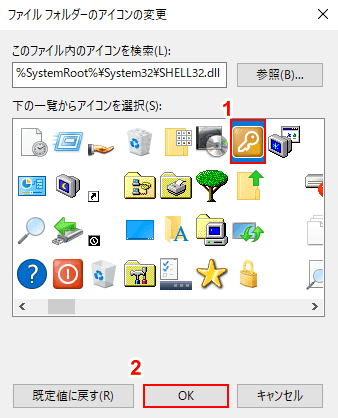
「ファイル フォルダーのアイコンの変更」ダイアログボックスが表示されます。 ①【お好きなアイコン(例:鍵のマーク)】を選択し、②【OK】ボタンを押します。
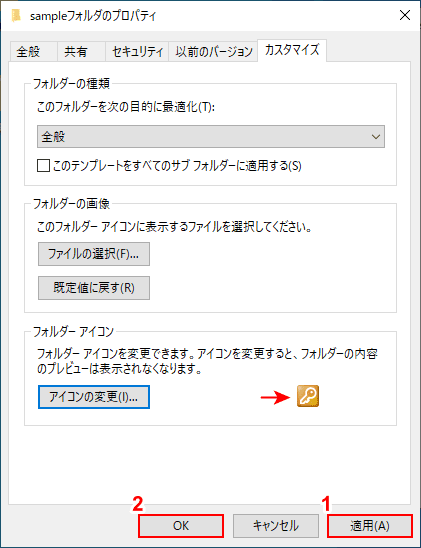
「sampleフォルダのプロパティ」ダイアログボックスが表示されます。「フォルダー アイコン(例:鍵のマーク)」のプレビューが変更されました。①【適用】ボタン、②【OK】ボタンの順に押します。
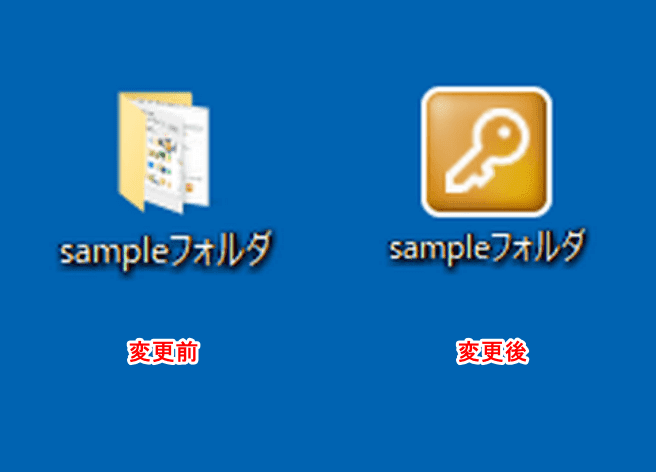
フォルダーのアイコンが変更されました。
拡張子に紐づいたアイコンを変更する
Windows 10ではファイルの種類(拡張子)ごとに既定のプログラムアイコンを表示します。
拡張子「.txt」を例に、ファイルのプログラムアイコンを変更する方法について、以下ご説明します。
ショートカットメニューから変更する方法
ショートカットメニューからファイルのプログラムアイコンを変更する方法は、以下のとおりです。
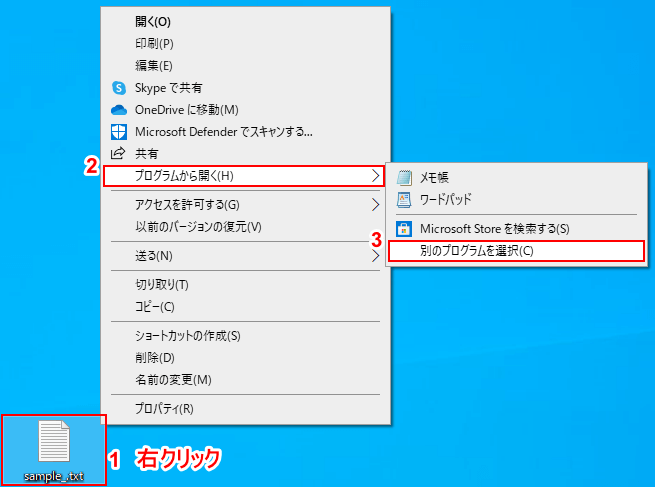
①「アイコンを変更したいファイル」を選択して【右クリック】します。表示されたコンテキストメニューから②【プログラムから開く】、③【別のプログラムを選択】の順に選択します。
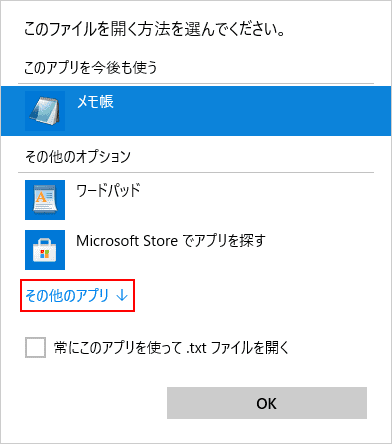
「このファイルを開く方法を選んでください。」ダイアログボックスが表示されます。
【その他のアプリ↓】を選択します。
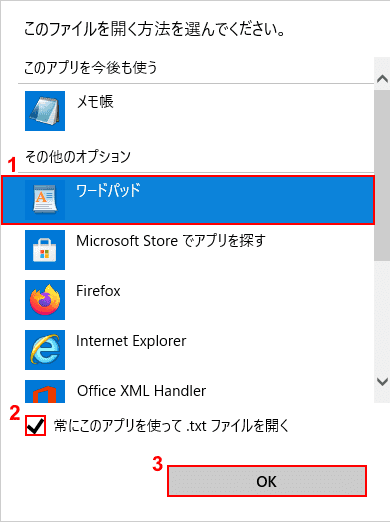
①【任意のアプリ(例:ワードパッド)】を選択し、②「常にこのアプリを使って .txt ファイルを開く」に【チェックマーク】を入れ、③【OK】ボタンを押します。
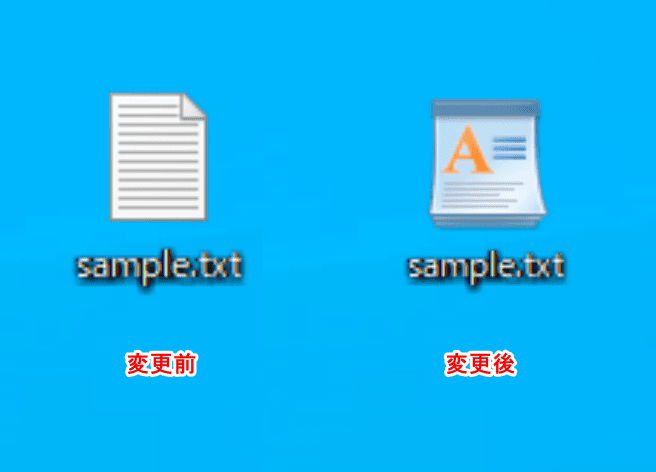
ファイルのアイコンが変更されました。
Windows 10の設定メニューから変更する方法
Windows 10の設定メニューからファイルのプログラムアイコンを変更する方法は、以下のとおりです。
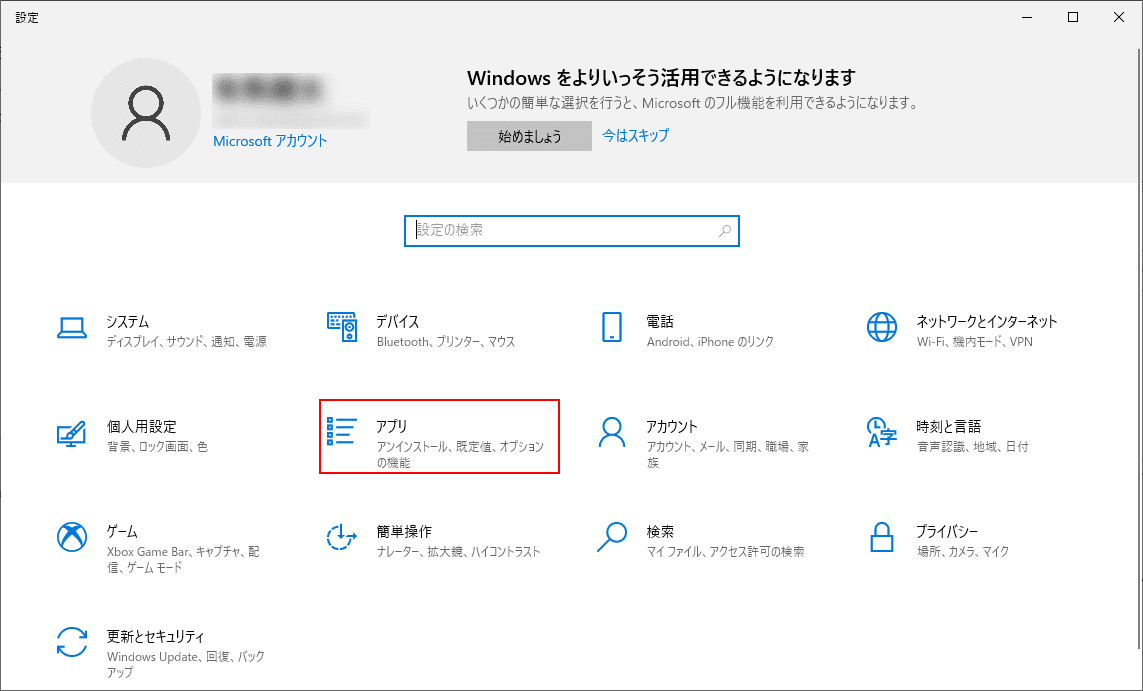
①【スタート】、②【設定】の順に選択します。
「設定」ダイアログボックスが表示されます。
【アプリ】を選択します。
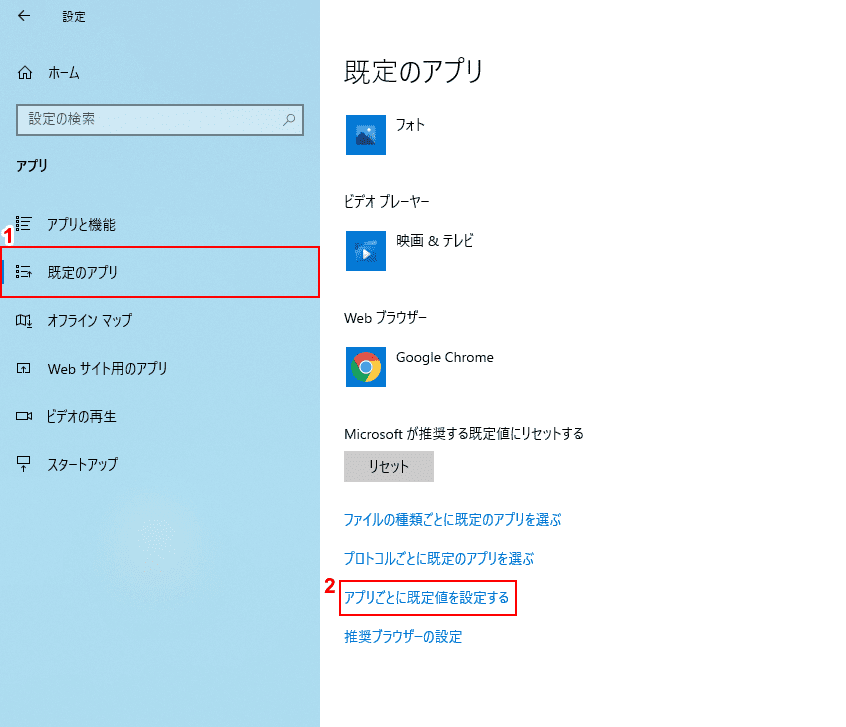
①【既定のアプリ】タブ、②【アプリごとに既定値を設定する】の順に選択します。
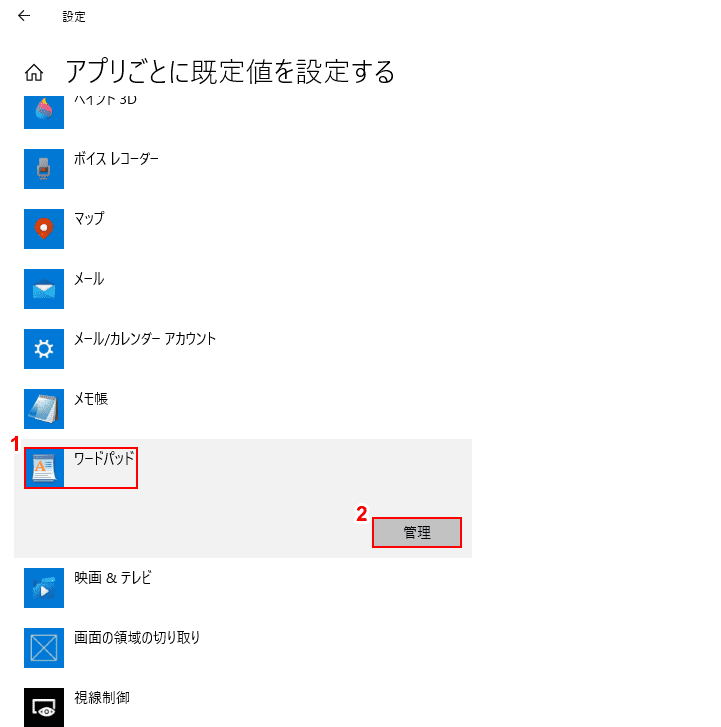
①【利用したいアプリ(例:ワードパッド)】を選択し、②【管理】ボタンを押します。
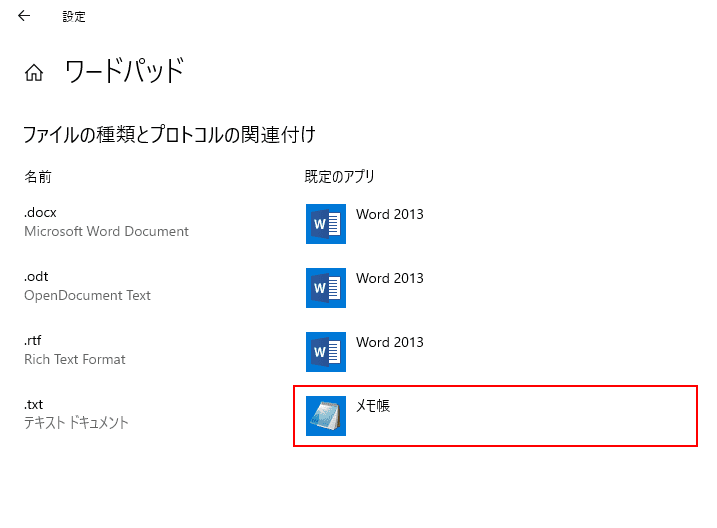
【アイコンを変更したい拡張子(例:.txt)に関連付いてる既定のアプリ(例:メモ帳)】を選択します。
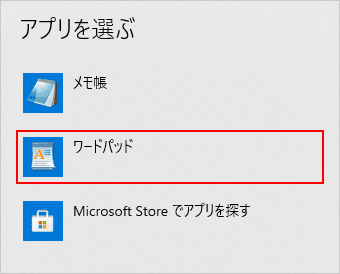
「アプリを選ぶ」ダイアログボックスが表示されます。
【目的のアプリ(例:ワードパッド)】を選択します。
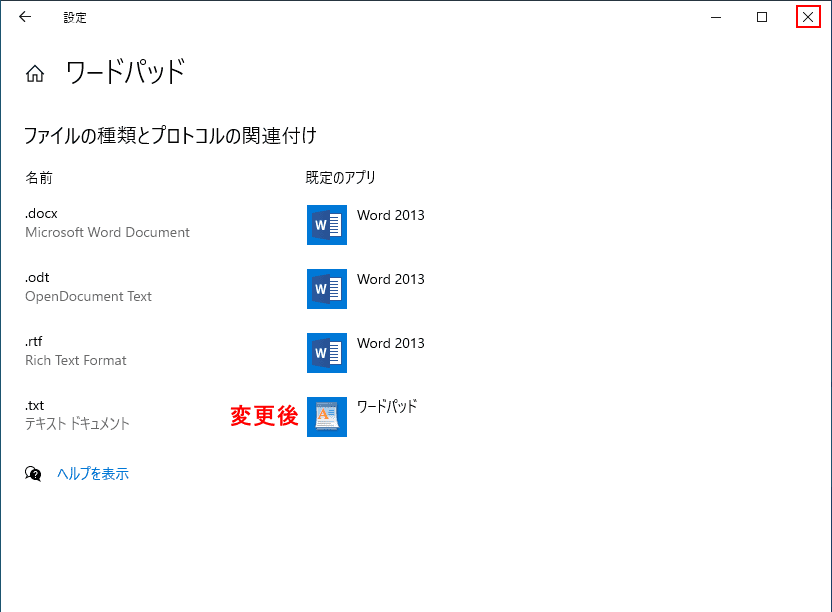
拡張子に紐づいたアプリが変更されました。
【×】ボタンを押して「設定」ダイアログボックスを閉じます。
アイコンの大きさを変更する
アイコンの大きさを変更する方法は、以下の記事をご覧ください。
アイコンの文字サイズ/フォントサイズを変更する
アイコンの文字サイズ/フォントサイズを変更する方法は、以下の記事をご覧ください。
アイコンのフォントを変更する
アイコンのフォントを変更する方法は、以下の記事をご覧ください。
アイコンの間隔を変更する
アイコンの間隔を変更する方法は、以下の記事をご覧ください。
Windows 10でアイコンを設定する様々な方法(間隔や大きさなど)
アイコンの文字色を変更する
Windows 10では、デスクトップ背景の色によってアイコンの文字色が自動的に変更されます。
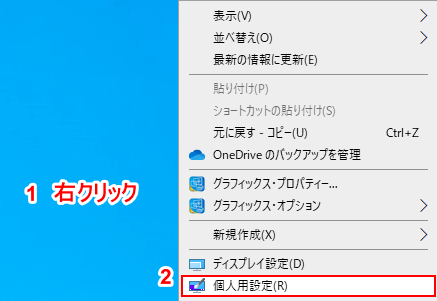
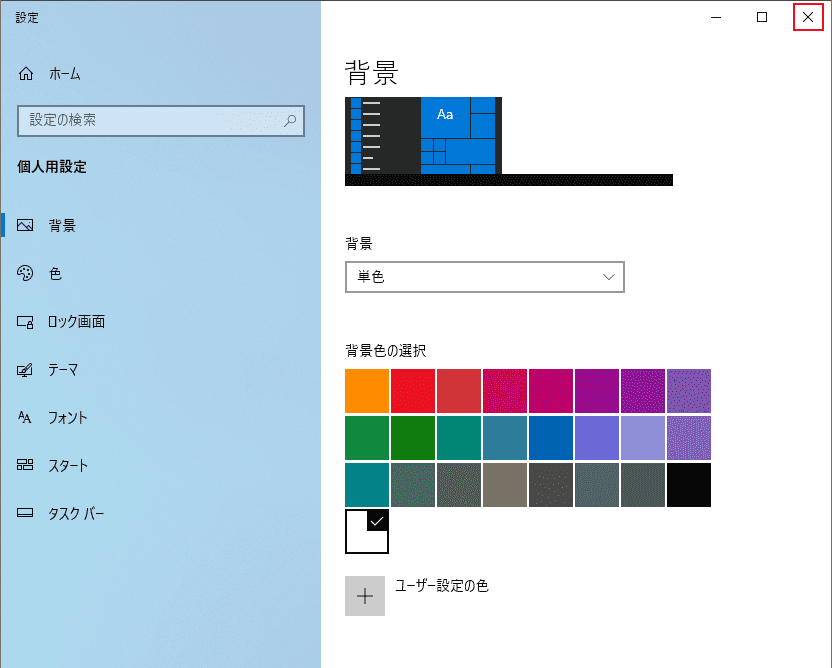
①デスクトップ上で【右クリック】し、②【個人用設定】を選択します。

「設定」ダイアログボックスが表示されました。
①【背景】タブ、②【背景】の順に選択します。
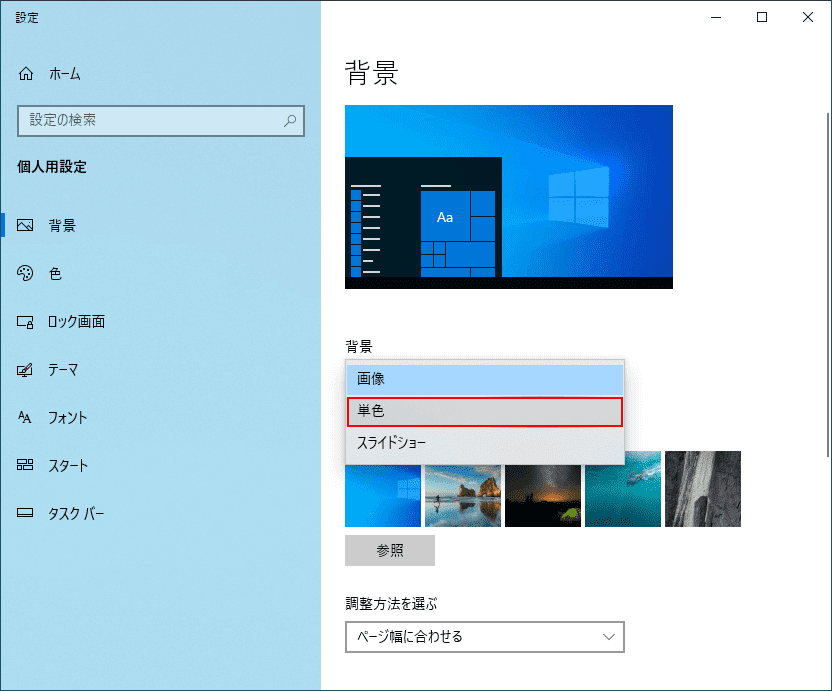
【単色】を選択します。
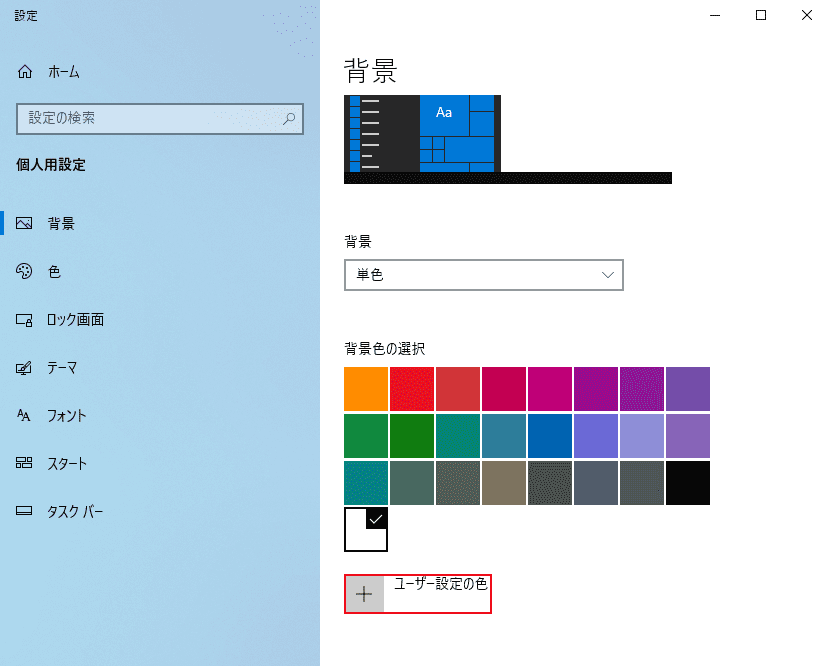
【+ ユーザー設定の色】を選択します。
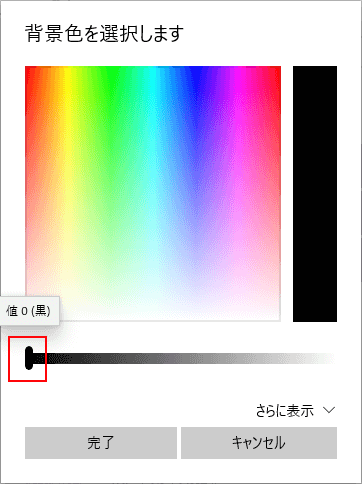
「背景色を選択します」ダイアログボックスが表示されます。
現時点でスライダーは左端にある状態です。この状態では背景色は黒、文字色は白となっています。
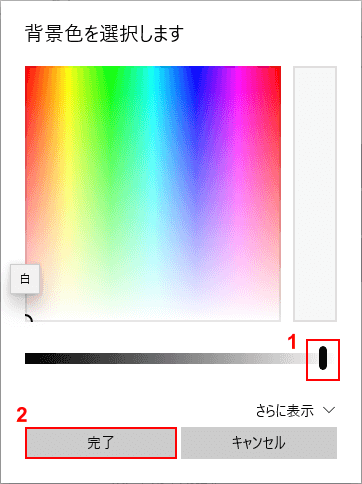
スライダーを右に動かすと背景色は白、文字色は黒に近づきます。
ここでは背景色を白、文字色を黒にしたいので、①スライダーを【右端】に動かし、②【完了】ボタンを押します。
【×】ボタンを押して「設定」ダイアログボックスを閉じます。
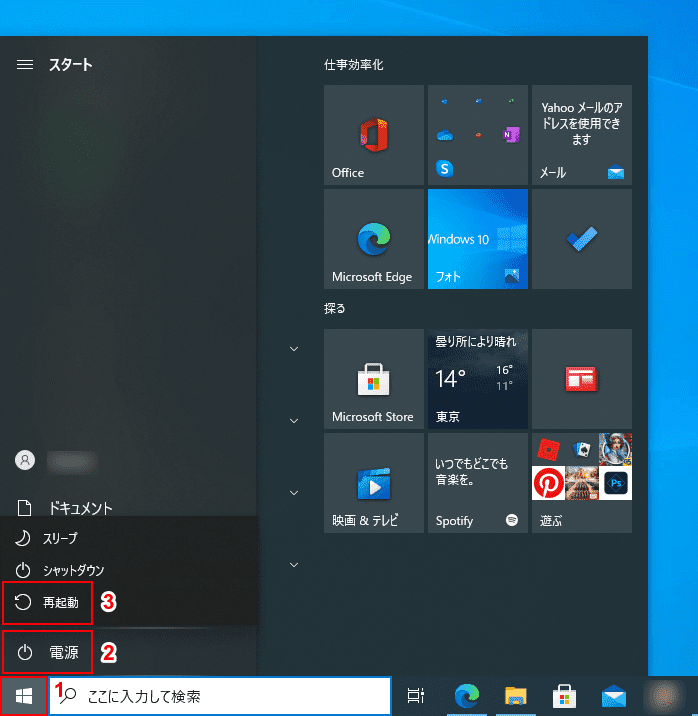
ここでPCを再起動して変更を反映してみましょう。
①【スタート】、②【電源】、③【再起動】の順に選択します。
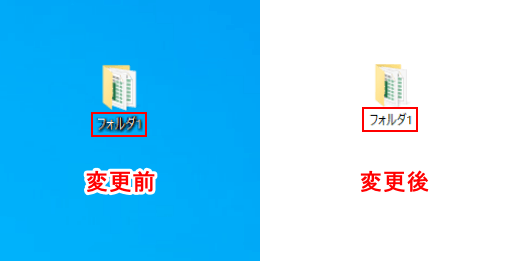
背景色を変えることでアイコンの文字色が白から黒に変更されました。
オリジナルのアイコンに変更する
自分で作成した画像をフォルダーのアイコンにすることができます。
オリジナルアイコンを作成する
ペイントでのオリジナルアイコンの作成方法は、以下のとおりです。
アイコンには大中小のサイズがありますが、今回は小アイコンの作成方法を解説しています。

①「ここに入力して検索」に『ペイント』と入力し、②【ペイント】を選択します。
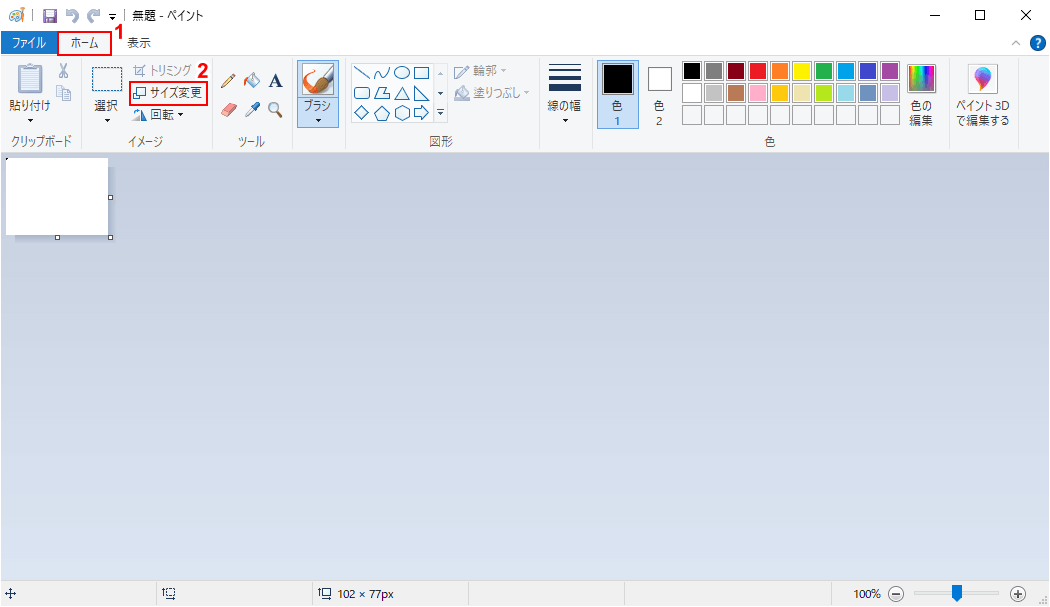
ペイントが開きました。①【ホーム】タブ、②【サイズ変更】の順に選択します。
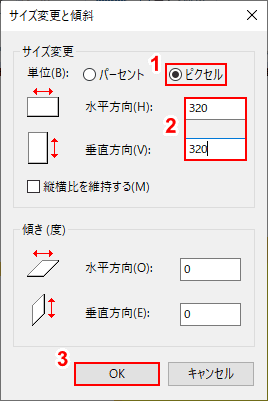
「サイズ変更と傾斜」ダイアログボックスが表示されます。
①【ピクセル】を選択し、②「水平方向」と「垂直方向」のそれぞれに『320』と入力し、③【OK】ボタンを押します。
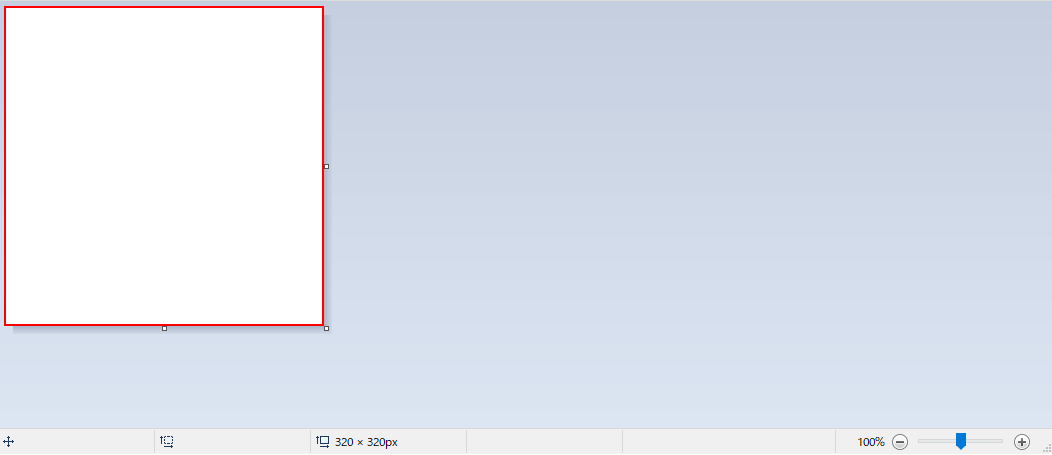
キャンバスがアイコン用の比率で描画しやすい大きさに変更されました。
描画エリアにアイコン画像を作成します。
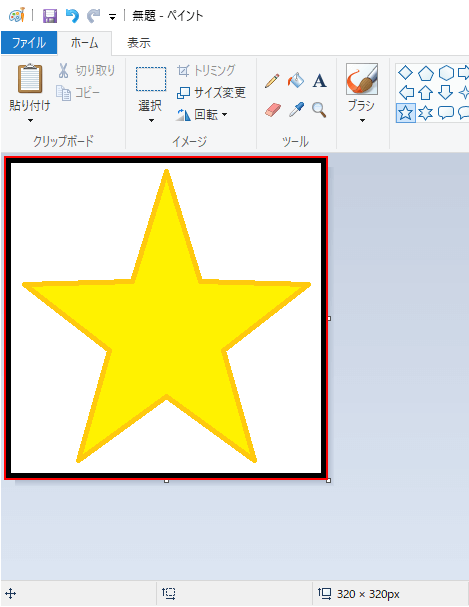
次に画像サイズを小アイコンの大きさに変更します。
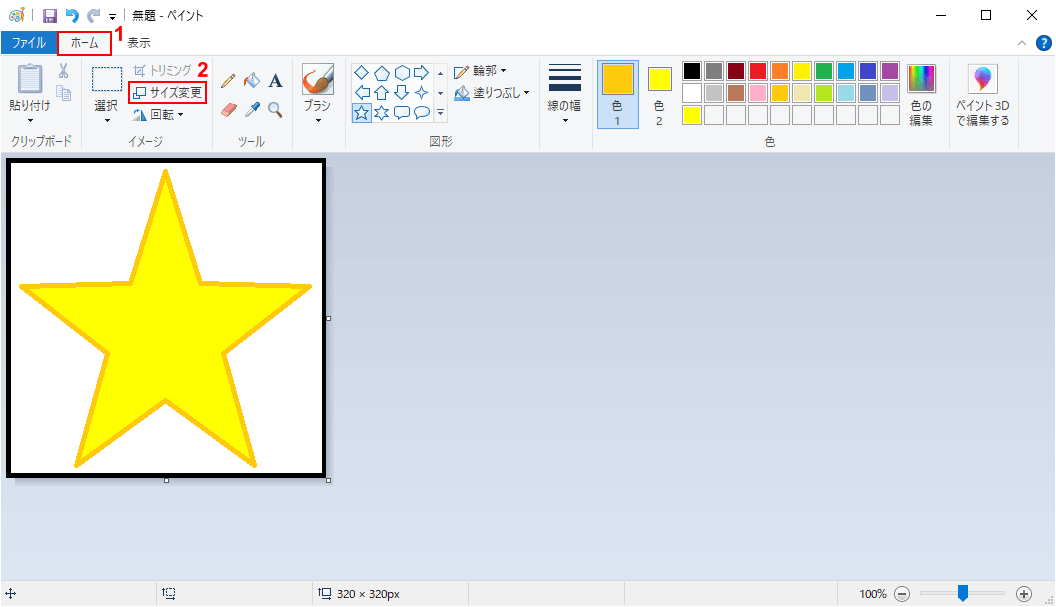
①【ホーム】タブ、②【サイズ変更】の順に選択します。
「サイズ変更と傾斜」ダイアログボックスが表示されます。
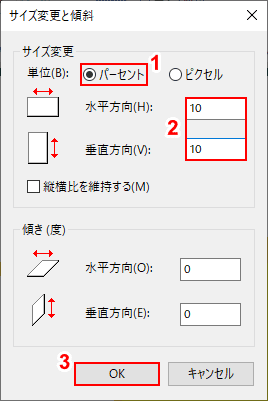
①【パーセント】を選択し、②「水平方向」と「垂直方向」それぞれに『10』と入力し、③【OK】ボタンを押します。
次に画像を保存します。
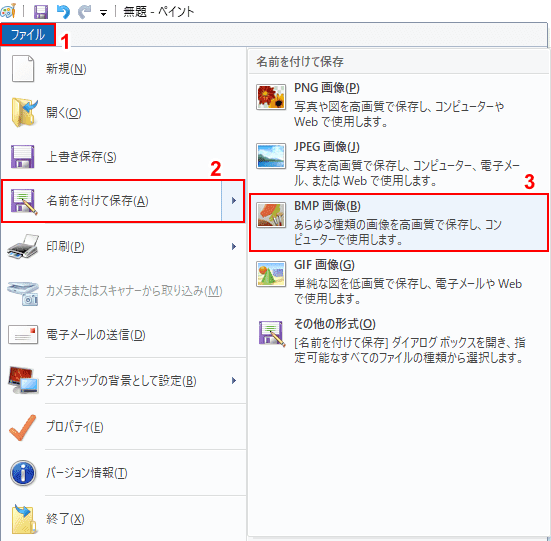
①【ファイル】タブ、②【名前を付けて保存】、③【BMP 画像】の順に選択します。
「名前を付けて保存」ダイアログボックスが表示されます。
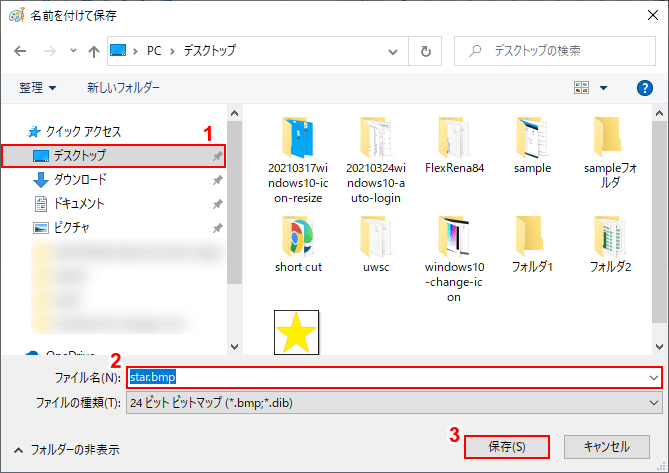
①【お好きなフォルダー(例:デスクトップ)】を選択し、②『お好きなファイル名(例:star.bmp)』を入力します。
③【保存】ボタンを押すと、オリジナルのアイコンの画像(BMPファイル)が保存されます。
オリジナルアイコンに変更する
フォルダーのアイコンを自分で作成したアイコンに変更してみましょう。

①「アイコンを変更したいフォルダー(例:フォルダ1)」を【右クリック】し、②【プロパティ】を選択します。
「フォルダ1のプロパティ」ダイアログボックスが表示されます。
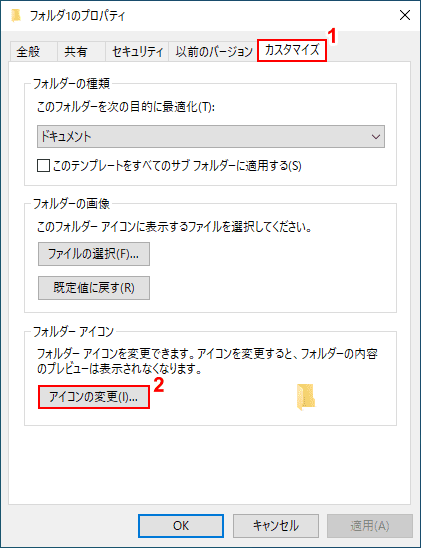
①【カスタマイズ】タブを選択し、②【アイコンの変更】ボタンを押します。
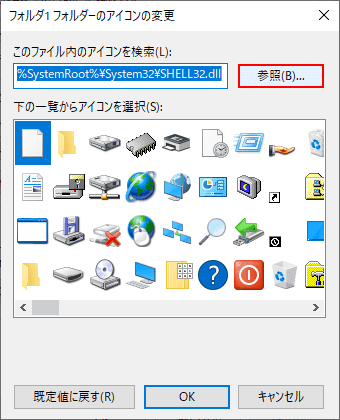
「フォルダ1 フォルダーのアイコンの変更」ダイアログボックスが表示されます。
【参照】ボタンを押します。

「フォルダ1 フォルダーのアイコンの変更」ダイアログボックスが表示されます。
①【アイコン ファイル(*.ico;*.icl;*.exe;*.dll)】、②【すべてのファイル】の順に選択します。
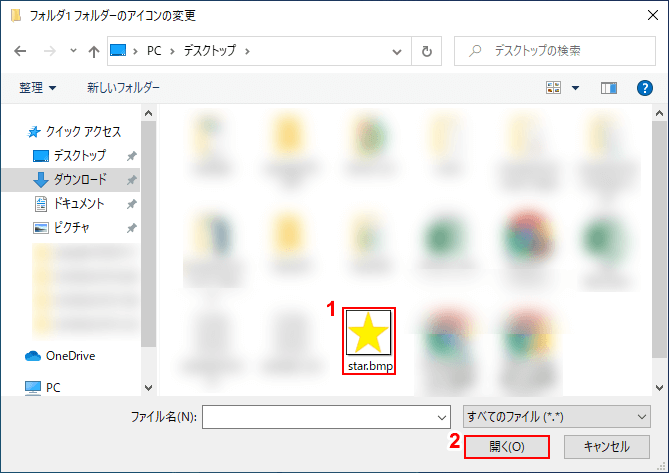
オリジナルのアイコン画像が表示されました。
①【オリジナルのアイコン画像(例:star.bmp)】を選択し、②【開く】ボタンを押します。
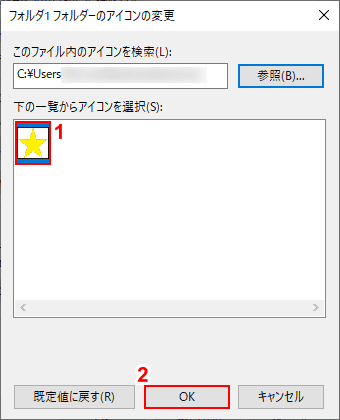
「フォルダ1 フォルダーのアイコンの変更」ダイアログボックスが表示されます。
①【オリジナルのアイコン画像】を選択し、②【OK】ボタンを押します。
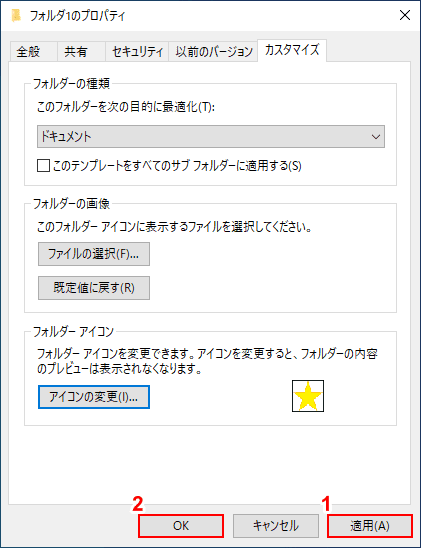
「フォルダ1のプロパティ」ダイアログボックスが表示されました。
①【適用】ボタン、②【OK】ボタンの順に押します。
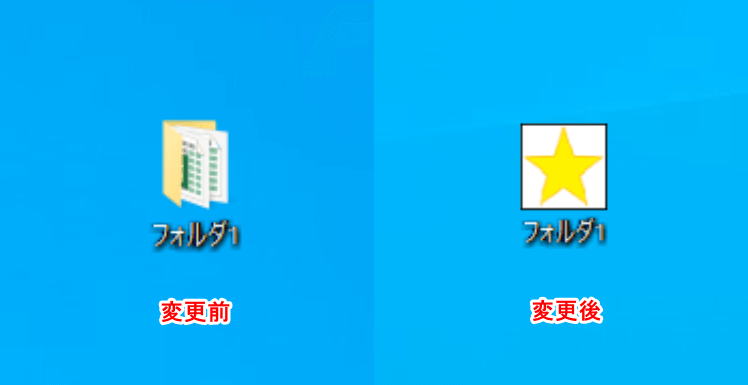
アイコンが変更されました。
デスクトップアイコンを変更する
「ごみ箱」などのデスクトップアイコンを変更する方法を説明します。
①デスクトップ上で【右クリック】し、②【個人用設定】を選択します。
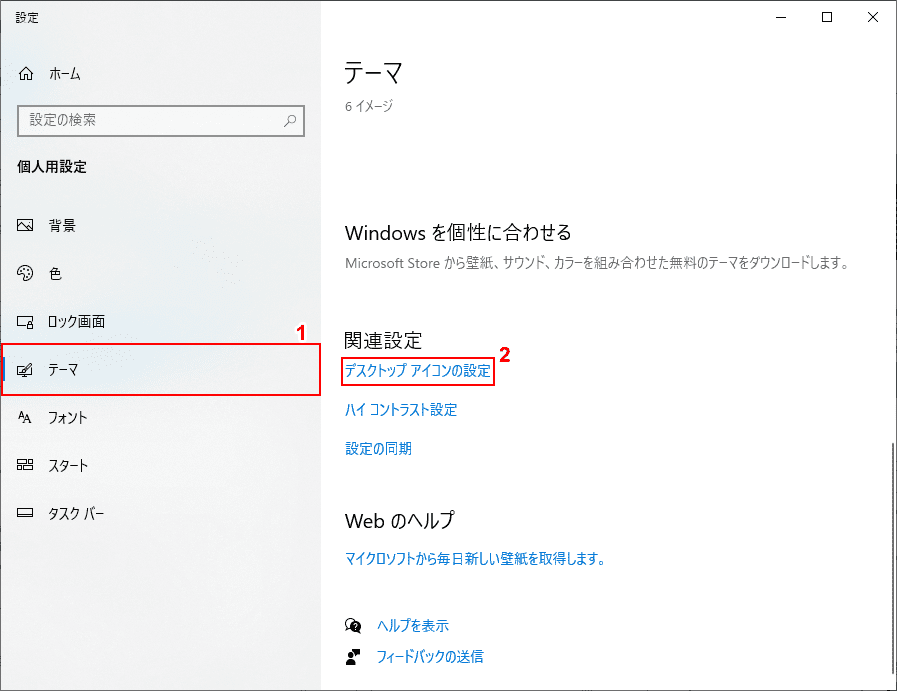
「設定」ダイアログボックスが表示されます。
①【テーマ】タブ、②【デスクトップ アイコンの設定】の順に選択します。
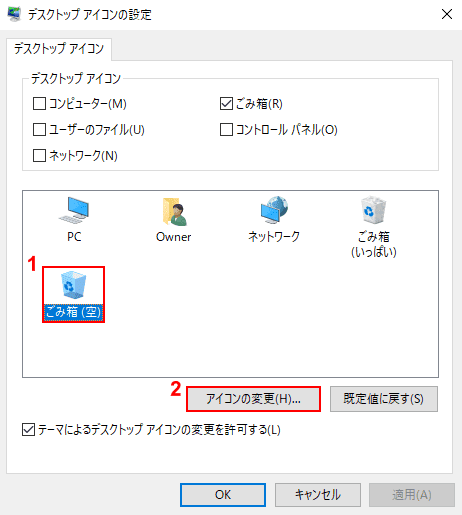
「デスクトップ アイコンの設定」ダイアログボックスが表示されます。
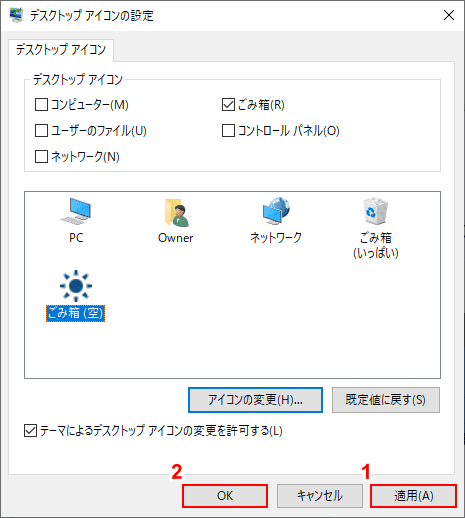
①【変更したいアイコン(例:ごみ箱(空))】を選択し、②【アイコンの変更】ボタンを押します。
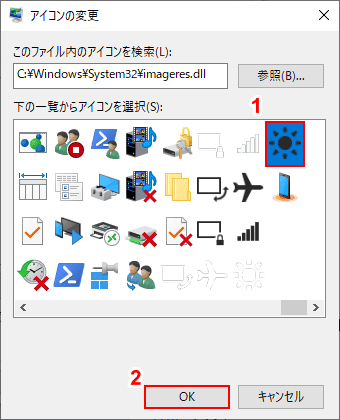
「アイコンの変更」ダイアログボックスが表示されます。
①【お好きなアイコン(例:太陽)】を選択し、②【OK】ボタンを押します。
「デスクトップ アイコンの設定」ダイアログボックスが表示されます。
①【適用】ボタン、②【OK】ボタンの順に押します。

デスクトップアイコンが変更されました。
ソフトを使用してアイコンを変更する
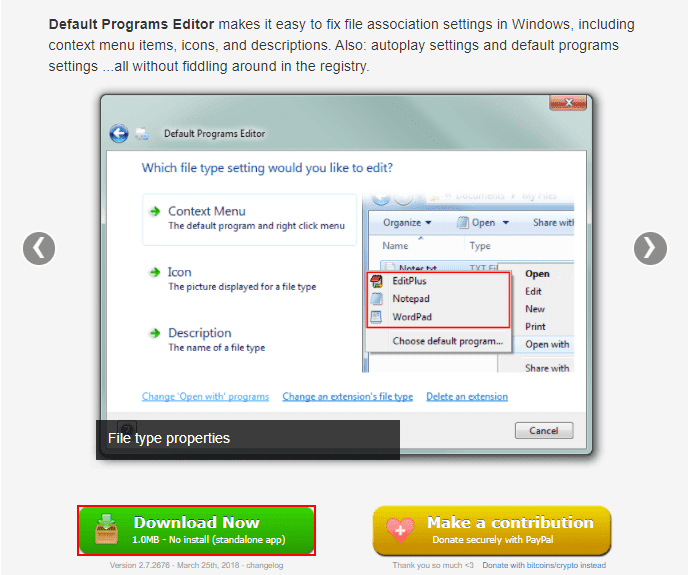
Windows 10ではファイルのアイコンを変更する機能が用意されていません。ファイルのアイコンを変更したい場合は、フリーソフトを利用しましょう。
ここでは、「Default Programs Editor」 (フリーソフト、Factor Mystic氏作)を利用します。
ソフトをダウンロード/解凍する
Default Programs Editor公式サイトにアクセスし、【Download Now】ボタンを押します。
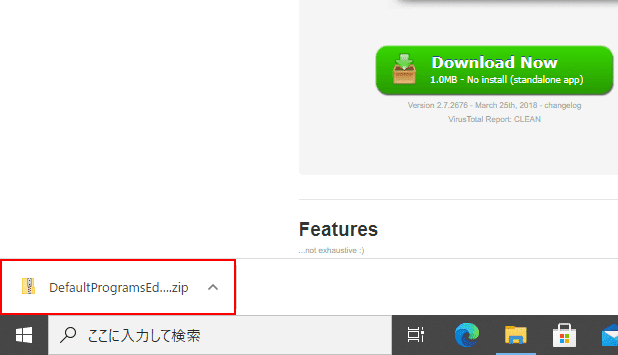
「ダウンロードされたインストーラー」を【ダブルクリック】します。
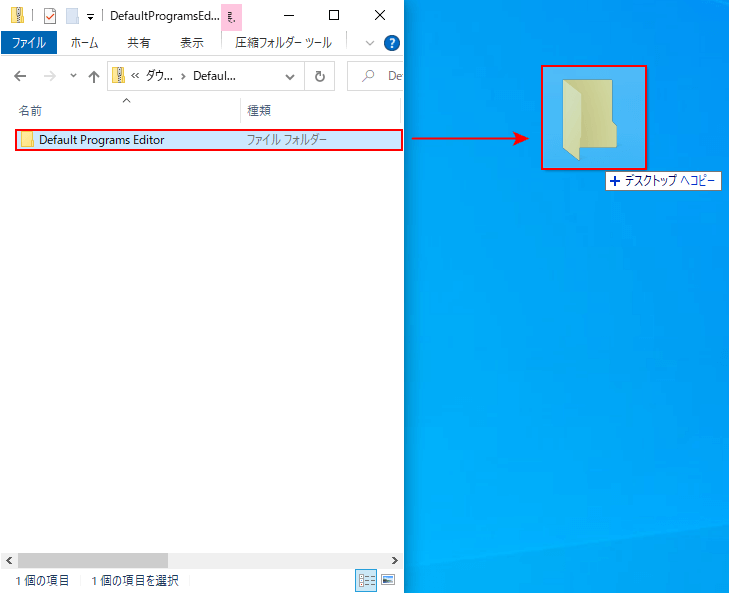
ZIPファイルが開きました。「Default Programs Editor」をデスクトップに【ドラッグ&ドロップ】して、ファイルを移動します。
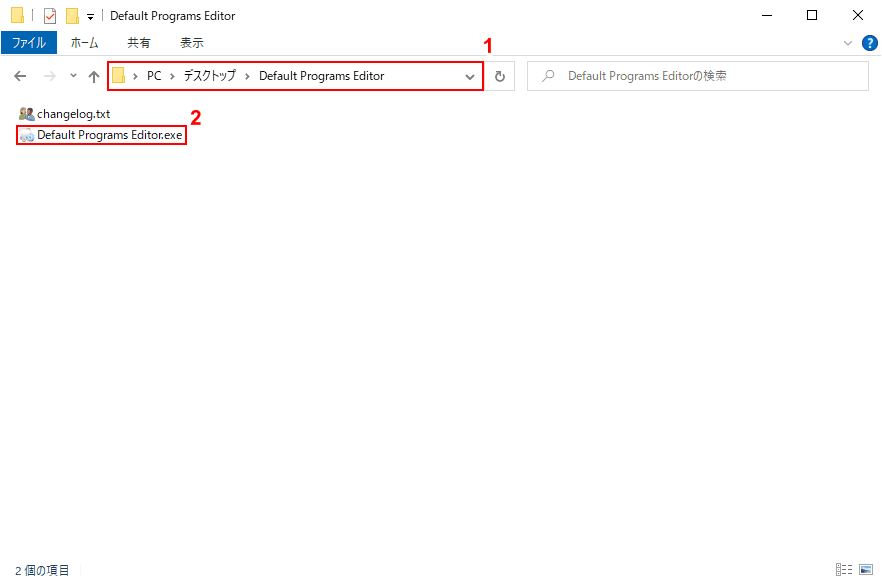
①「お好きな場所(例:デスクトップ)」にフォルダーを保存したことを確認し、②「Default Programs Editor.exe」を【ダブルクリック】します。
Default Programs Editorを使ってアイコンを変更する
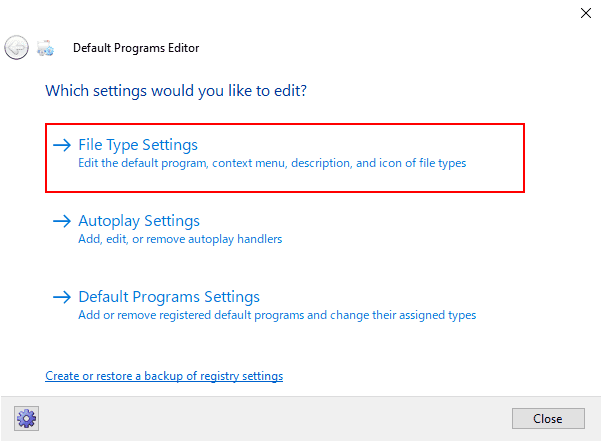
「Default Programs Editor」が起動します。
【File Type Settings】を選択します。
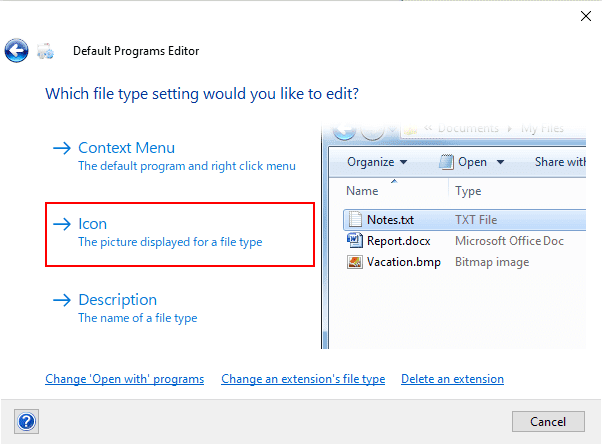
【Icon】を選択します。
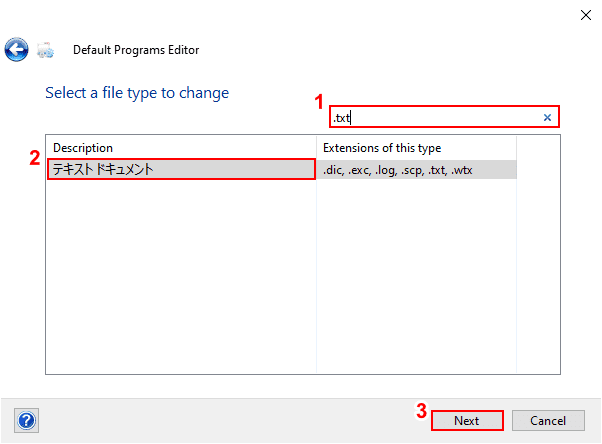
アイコンを変更したい拡張子を選択します。例として「.txt」を変更します。
①検索ボックスに『.txt』と入力し、②「Description」欄で【テキストドキュメント】を選択し、③【Next】ボタンを押します。
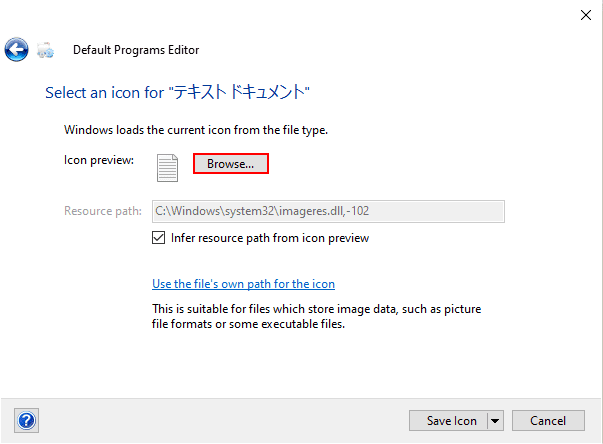
【Browse】ボタンを押します。
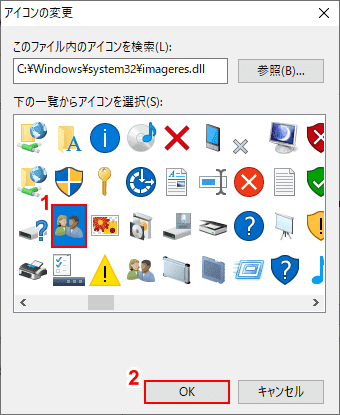
「アイコンの変更」ダイアログボックスが表示されます。
①【お好きなアイコン】を選択して、②【OK】ボタンを押します。
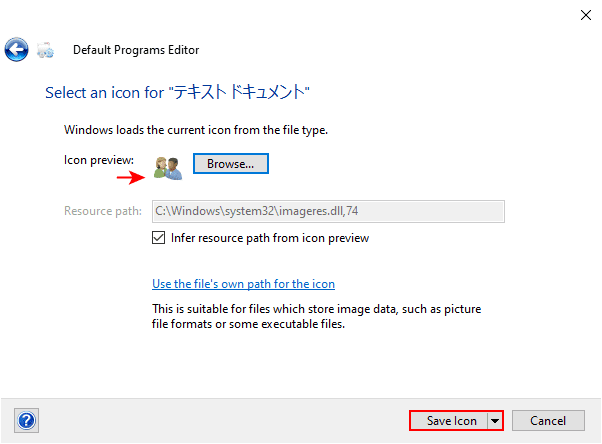
変更後のアイコンが表示されます。
【Save Icon】ボタンを押します。
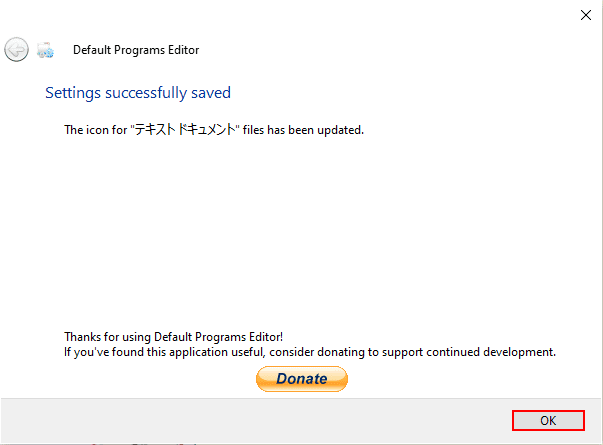
設定変更が成功したメッセージが表示されました。【OK】ボタンを押します。
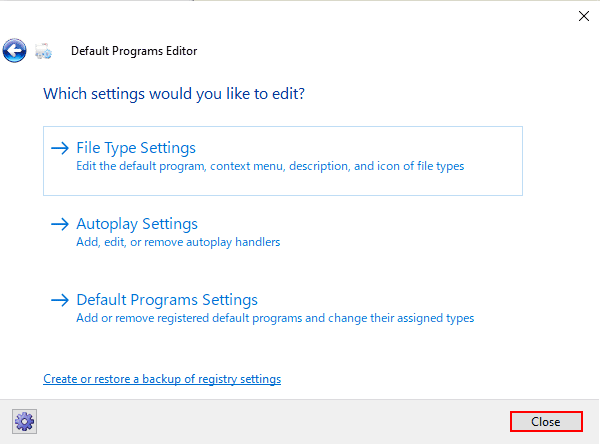
【Close】ボタンを押してDefault Programs Editorを閉じます。
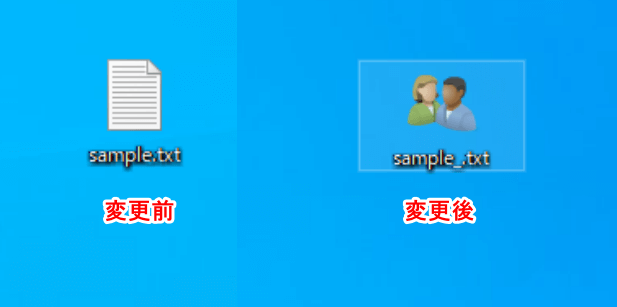
アイコンが変更されたことが確認できました。
マウスポインターのアイコンを変更する
マウスポインターを変更する方法は、以下のとおりです。
①【スタート】、②【設定】の順に選択します。
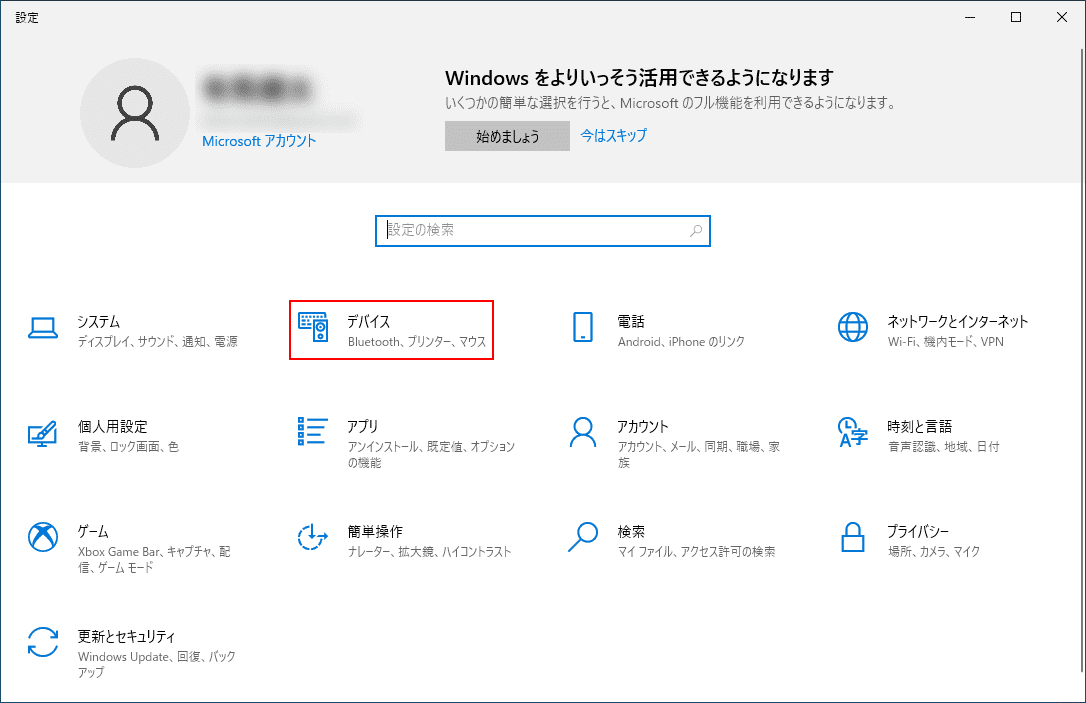
「設定」ダイアログボックスが表示されます。
【デバイス】を選択します。
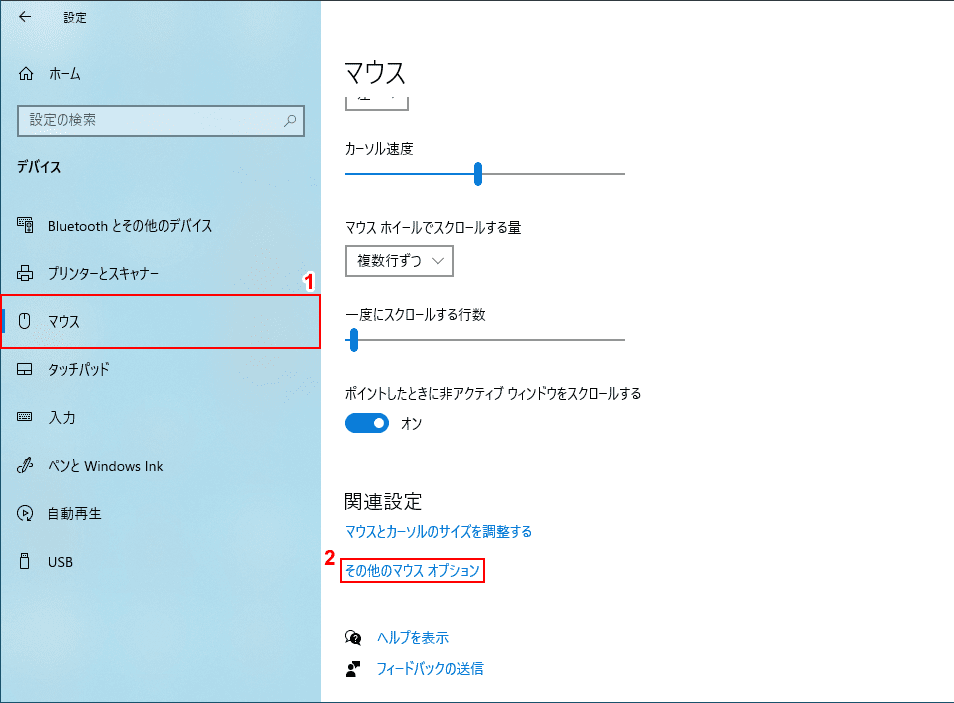
①【マウス】タブ、②【その他のマウス オプション】の順に選択します。
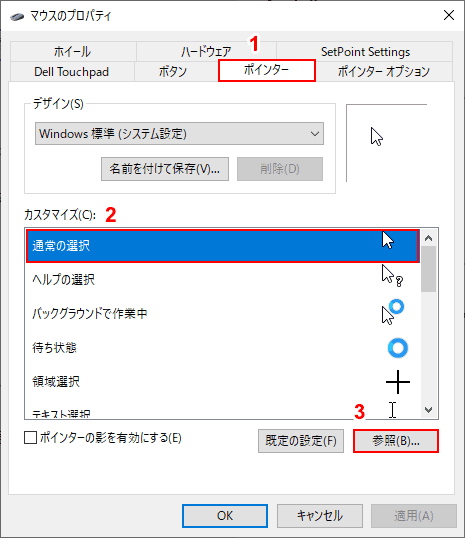
「マウスのプロパティ」ダイアログボックスが表示されます。
①【ポインター】タブ、②【通常の選択】の順に選択し、③【参照】ボタンを押します。
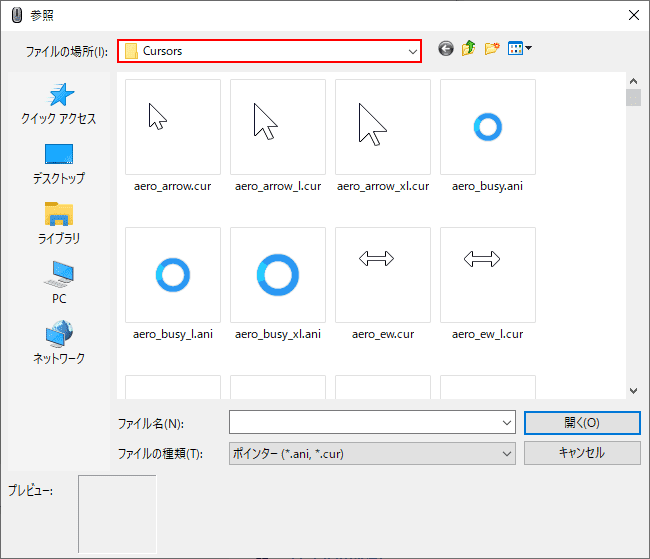
「参照」ダイアログボックスが表示されます。
「ファイルの場所」が「Cursors」になっていることを確認します。
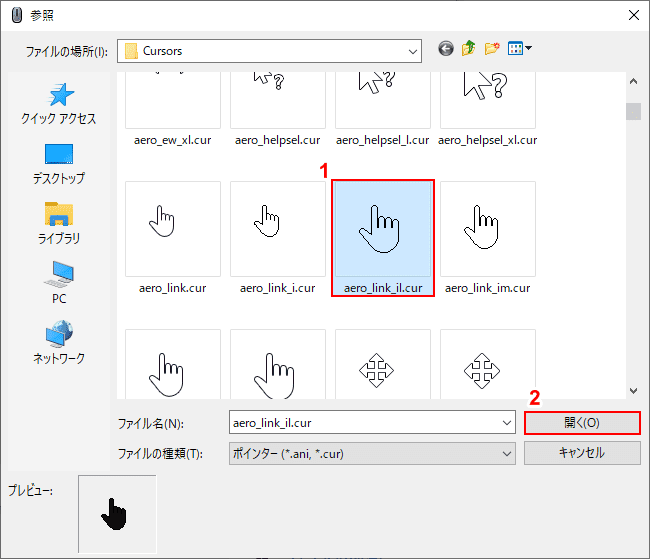
①【お好きなアイコン(例:aero_link_il.cur)】を選択し、②【開く】ボタンを押します。
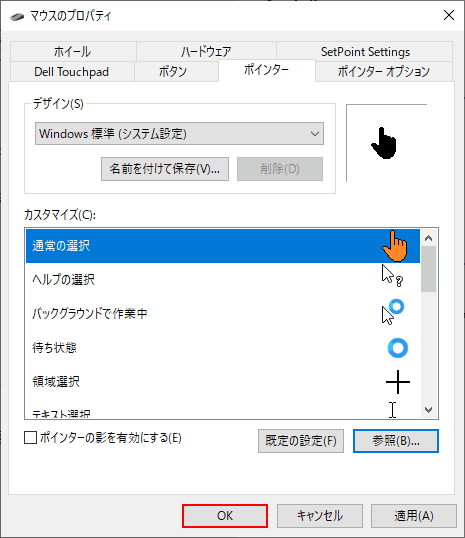
「マウスのプロパティ」ダイアログボックスに戻ります。
【OK】ボタンを押します。

マウスポインターのアイコンが変更されました。
アイコンが変更できない場合
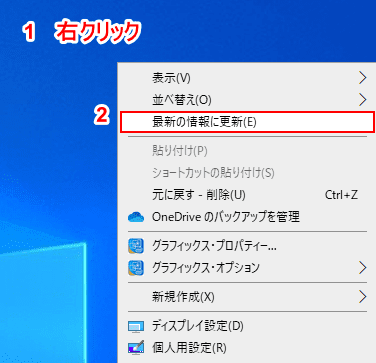
もしアイコンが変更されていなければ、①デスクトップ上で【右クリック】し、②【最新の情報に更新】を選択してみましょう。
上記の方法でもアイコンが変更できない場合は、マイクロソフトコミュニティをご参照ください。